

Oh, I know that sinking feeling! You spend hours getting those sugar cookies perfect, only to have the gorgeous topping smear the second you try to stack them, or worse—arrive looking like a colorful mess after shipping. It drives me absolutely mad! Trust me, I’ve been there too many times. That’s why getting your **cookie icing** right is the secret MVP of holiday baking. Here at Cookery Command, founder Emily Harrison blends tried-and-true traditional methods with meticulous testing from professional kitchens. We don’t mess around with soft, tacky frosting here. This Royal Icing recipe is foolproof; it dries rock hard, shines like glass, and is absolutely perfect for detailed work, gifting, or stacking high. Forget the stress; you’re about to master the most durable and beautiful topping for your treats.
- Why This Foolproof Royal Icing is the Best Cookie Icing Recipe
- Ingredients for Your Quick 10-Minute Cookie Icing
- Step-by-Step Instructions for Perfect Cookie Icing Consistency
- Mastering Application: Tips for Using Your Cookie Icing
- Troubleshooting Common Cookie Icing Issues
- Storage and Shelf Life for Leftover Cookie Icing
- Understanding Sugar Cookie Glaze vs Icing
- Frequently Asked Questions About This Cookie Icing
- Share Your Cookie Icing Creations
Why This Foolproof Royal Icing is the Best Cookie Icing Recipe
If you’re looking for the best cookie icing recipe out there, stop browsing—you’ve found it! This isn’t just frosting; it’s engineered for stunning results. I love this recipe because it delivers three huge things busy bakers need: speed, durability, and good looks. You can trust this method, just like the science Emily Harrison applies to all our recipes, which is why this recipe comes highly recommended—you can even check out our sugar cookie icing recipe that dries hard for more background!
- It’s lightning fast to mix up (we’re talking 10 minutes max!).
- It sets rock hard so your cookies are safe for gifting and shipping.
- It produces a beautifully glossy icing recipe that sets firm.
This is how you move from beginner frustration to bakery-style perfection without wasting a single cookie!
Achieving a Hard, Durable Finish for Gifting
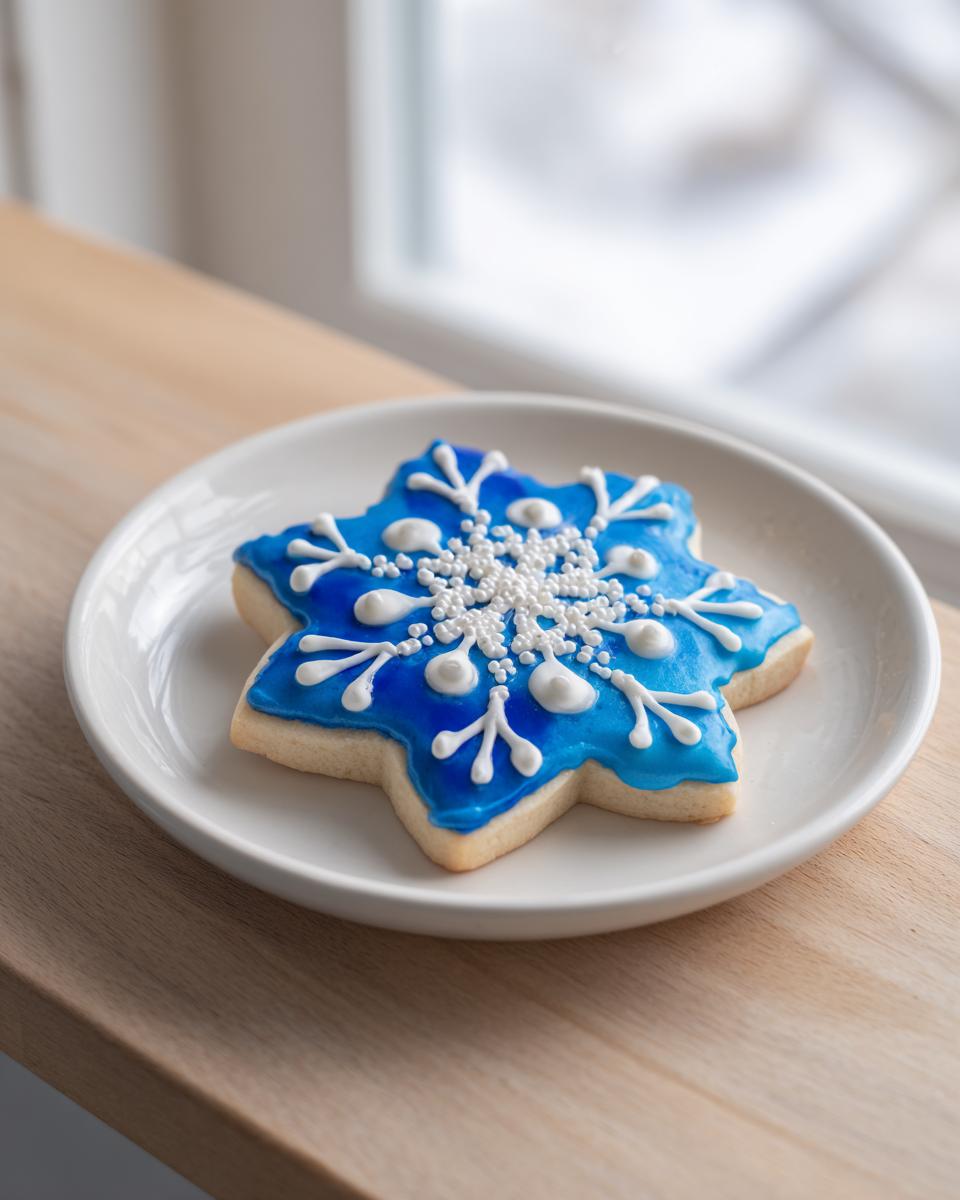
The key to locking in your beautiful designs is knowing how to make icing that hardens, and that’s all thanks to the meringue powder base here. Unlike simple confectioners’ sugar glazes that stay tacky, this royal icing dries completely firm. Once it sets, you can stack those holiday cookies high in a tin without worrying about gorgeous piped lines smudging into a colorful watercolor! It’s the ultimate durable cookie frosting for shipping.
The Secret to a Smooth Sugar Cookie Icing Look
Nobody wants grainy, dull icing on a beautiful cutout cookie, right? This method guarantees that velvety, professional sheen for your cookie icing. We beat the mixture long enough to incorporate air, making it super smooth and eliminating any grittiness you sometimes get from just stirring powdered sugar. It creates that sharp, clean edge you see in bakery displays. Seriously, watching it dry smooth gives me such a thrill every time!

Ingredients for Your Quick 10-Minute Cookie Icing
Wow, is this ever simple! You only need four main ingredients, and chances are you already have most of this stuff hiding in the pantry. This short ingredient list is exactly why this recipe fits the bill for a quick 10 minute cookie icing that still delivers that premium, hard finish. Don’t forget that meringue powder is our secret workhorse here—it’s what gives us that structure!
If you’re looking for creamy favorites, I have a wonderful vanilla buttercream recipe too, but for hard royal icing, these are the stars:
- 4 cups powdered sugar, sifted (Don’t skip the sifting, seriously!)
- 3 tablespoons meringue powder
- 6 tablespoons warm water (Nice and warm helps it dissolve perfectly.)
- 1 teaspoon vanilla extract (This is optional, but I love it for the scent!)
That’s it! Within ten minutes, you’ll have enough beautiful, professional-grade cookie icing to decorate about two dozen medium cookies. Easy peasy!
Step-by-Step Instructions for Perfect Cookie Icing Consistency
Okay, now that we have our ingredients ready, this is where the magic happens, and honestly, technique matters more than anything here. We need to ensure this **cookie icing** gets that trademark stiffness and shine. Remember, we are aiming for a reliable result, so pay close attention to the mixing times—that’s where most people rush it!
We start by beating everything together until we hit those perfect stiff peaks. I know 5 to 7 minutes sounds like a long time for just mixing frosting, but this is what gives you that professional, non-runny finish. You can find more about perfecting the mix when you check out our full royal icing recipe details, but for now, focus on the mixer!
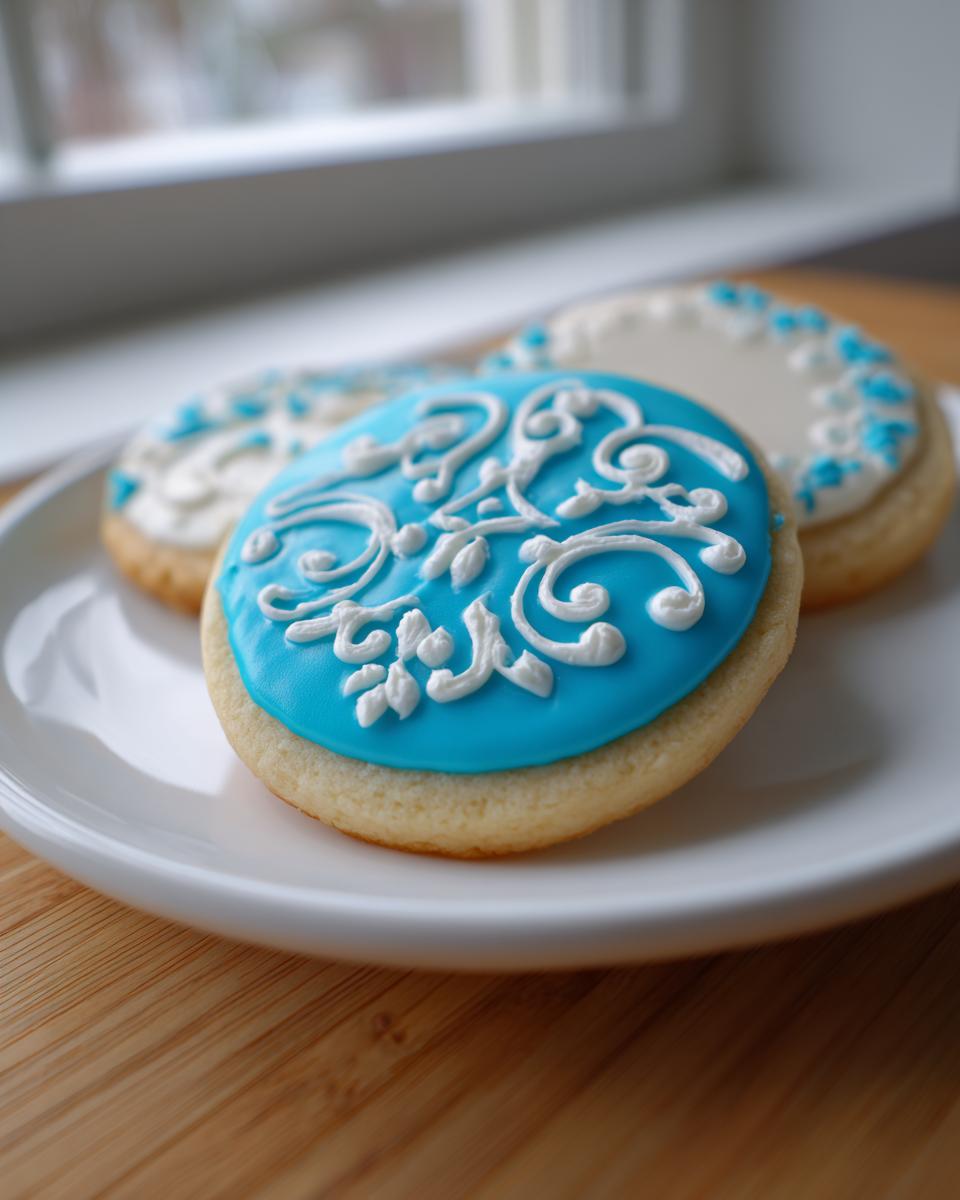
Mixing for Piping Consistency: The Perfect Piping Icing Recipe Base
This initial whipping is critical; it creates the base for the perfect piping icing recipe. You combine the sugar, powder, water, and vanilla, then you beat it on medium-high speed for a full five to seven minutes! Seriously, let the mixer run. When it’s done, it should look super thick, bright white, and hold a stiff peak right on the whisk. This heavy-duty mix is what you use for outlining your cookies and doing all those beautiful, tiny details. Don’t under-beat this stage!
Adjusting for Flooding: How to Flood Cookies Perfectly
Once you have your thick piping base ready, you can thin some down for the filling—that’s the flood icing! Take a portion that you want to use for filling and start adding warm water, just one teaspoon at a time. The goal here is to achieve what we call the 10-second rule for how to flood cookies perfectly. You lift the spoon and let the icing drop back into the bowl. If the trail it leaves slowly sinks back into the rest of the icing within about 10 seconds, you’ve nailed it! If it disappears instantly, add a tiny bit more sugar; if it sits on top for longer than 15 seconds, keep adding water, drop by drop.
Mastering Application: Tips for Using Your Cookie Icing
Now that you have your piping consistency icing made—how exciting!—we need to talk about applying it like the pros do. Remember those instructions about letting the outline set? That’s non-negotiable if you want that bakery-style, clean fill. You need to pipe your borders first, then let those outlines dry just until they feel firm to the touch, usually about fifteen minutes. This creates a little dam so your thinner flood icing doesn’t sneak out onto the table!
When it’s time to fill, you pour or gently spoon that slightly thinner flood icing into the center of your dam. Then, you can use a toothpick to gently coax the icing toward the edges, popping any stubborn air bubbles as you go. If you want to see some jaw-dropping examples of this technique, check out this fantastic guide on royal icing decorating!
Achieving Vibrant Color Cookie Icing Guide
This is where so many people accidentally sabotage their beautiful, hard-setting icing! You absolutely must use gel food coloring, not the liquid drops you keep in your fridge door. Liquid coloring adds too much moisture, and that extra wetness will break down the structure we just worked so hard to build in the mixer. A tiny bit of gel provides that intense saturation needed for vibrant color cookie icing without thinning out the royal icing structure.
Troubleshooting Common Cookie Icing Issues
Even with the best recipe, sometimes things go a little sideways when you’re piping away, right? Don’t panic! This is where knowing a few quick fixes turns a potential disaster into a simple adjustment. We worked so hard to get that professional finish, so we want to make sure your **cookie icing** behaves exactly how it should. If it’s too stiff, we fix it; if it gets too runny, we know what to do. This is the practical know-how that takes you from being a novice decorator to someone who truly feels in command of the process! If you want to dive deeper into making sure your icing dries hard, check out our knowledge on sugar cookie icing recipe that dries hard.
Preventing Cracking in Your Hard-Setting Cookie Icing
The biggest visual heartache after all that hard work is seeing cracks spiderweb across your beautiful design once it dries overnight. This usually happens because there’s too much sugar or too little moisture in the base mix, or honestly, sometimes because we over-beat it once it gets that fantastic thick, smooth consistency. The notes I gave stressed stopping the mixer once that beautiful, glossy texture appears. Aiming for that perfect, smooth finish is how we avoid developing the structural weaknesses that cause cracking in the drying phase of your **no crack cookie icing recipe** attempt.
Storage and Shelf Life for Leftover Cookie Icing
Don’t you hate throwing away leftover **cookie icing** when you’ve made a big batch? Because this is royal icing, it’s actually super forgiving! You don’t need to stick this in the fridge, which is a huge win. Just make sure you seal your leftover icing tightly in an airtight container at room temperature.
I mean, really seal it! Air is the enemy here, it’ll start to crust over immediately. If you keep it sealed up tight, this beautiful royal icing stays perfect and usable for up to two whole weeks. That means you can whip up a big batch ahead of time, which really helps if you’re packing cookies for gifting or shipping later. For more tips on keeping food perfectly preserved, you can check out my guide on easy refrigerator dilly beans too!

Understanding Sugar Cookie Glaze vs Icing
A lot of people get tripped up by terms, so let me clear this up quickly because it matters! This recipe we just made is a true Royal Icing—that means it’s designed to set up firm, dry hard, and give you that crisp, shatter quality we love for decorated cookies. If you stack them, they stay put! A simple powdered sugar glaze, on the other hand, is often much thinner and tends to stay soft or tacky, even after drying, which makes it a disaster for gifting or travel. You want the hard-setting version for professional-looking baked goods, like the one you just mastered. For more insight on reliable hardening recipes, see this resource on sugar cookie icing that hardens.
Frequently Asked Questions About This Cookie Icing
I know you might still have a few little questions buzzing around, especially when dealing with tricky toppings like this! Decorating shouldn’t feel like a science experiment, but knowing these little quirks helps so much. We made this Royal Icing to be foolproof, but I totally get wanting extra reassurance before you start piping those holiday designs. If you’re looking for more tried-and-true favorites for your kitchen, you should check out my recipe for the best soft and chewy snickerdoodle recipe while you wait for your cookies to dry!
Can I make this cookie icing without meringue powder?
That’s a common question! While this specific recipe uses meringue powder for stability and safety, yes, you absolutely can substitute it with pasteurized egg whites. Just be warned: egg whites can be tricky! You have to be extra careful with food safety, and often the consistency isn’t quite as reliable as the powder. For the easiest, most dependable result, stick with the powder.
What is the best royal icing consistency for writing?
If you want super fine, hair-thin writing—like a delicate signature—you actually need an icing consistency thinner than your flood stage! You’ll want an icing that holds a peak but gently slumps when you lift the spoon, maybe sinking back into the bowl in about 15 to 20 seconds. This allows it to flow smoothly through the smallest piping tip for those elegant details.
Why does my professional cookie topping sometimes crack?
This usually happens if you’ve added too much extract or too much water, making the icing too stiff near the end, or if you over-mixed it when it got thick. We are aiming for that smooth, beaten texture and then we stop! Over-incorporating too much air or sugar can lead to that dreaded early cracking as it dries. Be gentle during the final mixing steps!
Is this durable cookie frosting ideal for beginners?
Absolutely, yes! This is designed to be your go-to beginner cookie icing tutorial favorite. Because it uses simple measurements and relies on the mixer rather than delicate whisking, it’s one of the most reliable bases out there. Just make sure you watch those whisking times, and you’ll get that **bakery style cookie icing** on your first try!
Share Your Cookie Icing Creations
Now that you have this rock-hard, glossy **cookie icing** in your piping bag, I am just dying to know how they turned out! Please take a moment to rate this recipe down in the comments below—it helps me feel like I’m serving up exactly what you need in your kitchen.
Did you try flooding? Did you master those tiny details? Snap a picture and tag us on social media! I love seeing how you transform simple cookies into edible art. And if you’re already thinking about your next baking adventure, maybe take a peek at my raspberry thumbprint cookies while you wait for your latest batch to dry hard!
PrintFoolproof Royal Icing That Dries Hard and Glossy for Perfect Cookie Decorating

Make professional-looking sugar cookies using this easy royal icing recipe. This frosting sets firm, dries hard and glossy, and is perfect for detailed piping and flooding.
- Prep Time: 10 min
- Cook Time: 0 min
- Total Time: 10 min
- Yield: Coats approximately 2 dozen medium cookies 1x
- Category: Baking
- Method: Mixing
- Cuisine: American
- Diet: Vegetarian
Ingredients
- 4 cups powdered sugar, sifted
- 3 tablespoons meringue powder
- 6 tablespoons warm water
- 1 teaspoon vanilla extract (optional)
Instructions
- In a large bowl, combine the sifted powdered sugar and meringue powder.
- Add the warm water and vanilla extract, if using.
- Beat the mixture with an electric mixer on low speed until the ingredients are just combined.
- Increase the speed to medium-high and beat for 5 to 7 minutes until the icing is very thick, smooth, and holds stiff peaks. This is your piping consistency.
- If you need thinner icing for flooding, mix in water one teaspoon at a time until the icing flows smoothly off a spoon and sinks back into the bowl within 10 seconds.
- Divide the icing into separate bowls for coloring, if desired.
- Use the thick icing immediately for outlining and piping details.
- Use the thinned icing to flood the cookie centers, allowing the outline to set for 15 minutes first to prevent spreading.
- Let the decorated cookies dry completely at room temperature for several hours, or overnight, until the icing is rock hard.
Notes
- For vibrant color cookie icing, use gel food coloring, as liquid coloring can thin the icing too much.
- If your icing becomes too stiff while working, add water a half teaspoon at a time until you reach the desired consistency.
- To prevent cracking, do not over-mix once the icing is thick; stop mixing once it is smooth and glossy.
- Store unused icing in an airtight container at room temperature for up to two weeks; do not refrigerate.
Nutrition
- Serving Size: 1/4 cup
- Calories: 190
- Sugar: 48
- Sodium: 5
- Fat: 0
- Saturated Fat: 0
- Unsaturated Fat: 0
- Trans Fat: 0
- Carbohydrates: 49
- Fiber: 0
- Protein: 1
- Cholesterol: 0