
Oh, the heartbreak! You spend hours on perfect sugar cookies, only to pull out your icing and find it’s runny, grainy, or just won’t hold that crisp edge. I’ve been there so many times, believe me! When I worked in test kitchens, my goal was always taking tricky techniques and making them totally reliable for the home baker. That’s why I’m obsessed with this royal icing recipe. Forget the guesswork. We are using meringue powder here to give you that absolutely foolproof reliability and the most beautiful, glossy finish that dries firm, too. This is the royal icing recipe that lets you create those professional-looking cookies without any drama.
- Why This Royal Icing Recipe Delivers Glossy, Firm Results
- Ingredients for the Perfect Royal Icing Recipe
- How to Make Royal Icing: Step-by-Step Instructions
- Essential Royal Icing Tips and Tricks for Success
- Storage and Making Royal Icing Flowers
- Serving Suggestions for Your Hardening Icing Recipe
- Estimated Nutritional Information
- Frequently Asked Questions About This Royal Icing Recipe
- Take Command of Your Cookie Decorating
Why This Royal Icing Recipe Delivers Glossy, Firm Results
The reason this royal icing recipe works so darn well every single time is all about stability and the science behind the mixture. When you rely on meringue powder instead of raw egg whites, you get a completely dependable product, which is something I always pushed for when working in professional settings. The proportions of sugar to powder are just right to ensure you get that perfect smooth texture that sets up beautifully and gives you that high-shine finish you see on fancy cookies.
Key Benefits of Our Meringue Powder Royal Icing Recipe
- Total reliability—no more worrying about raw ingredients!
- It yields that highly sought-after Glossy Cookie Icing finish.
- The texture mixes up incredibly smooth, which is vital for fine piping work.
- It dries firm and hard, creating durable decorations that won’t smudge or crack easily.
If you want to learn more about the philosophy behind merging tradition with reliable technique, you can check out our story on the About Us page. Trust me, this formula is your new best friend for cookie decorating.
Ingredients for the Perfect Royal Icing Recipe
Okay, get your stuff ready! Making this amazing royal icing recipe is super fast because we use exactly four things—and I mean *exactly*. The one thing you absolutely cannot skip is sifting that confectioners’ sugar. If you dump it in un-sifted, you’ll end up with tiny clumps that just won’t dissolve. Nobody wants gritty icing, right? We’re aiming for pure smoothness here. Measure everything out, and we’re ready to roll!
Ingredient Notes and Substitutions
Since we want that pristine white color that pops against any background, I always lean on clear vanilla extract. Regular vanilla will tint your icing slightly yellow or brown, and we just don’t need that when we’re trying to achieve brilliance! If you are making a huge batch or know you need it rock-hard fast for something like gingerbread houses, definitely look back at the recipe notes—a tiny bit of cream of tartar helps it set up like concrete, quickly!
How to Make Royal Icing: Step-by-Step Instructions
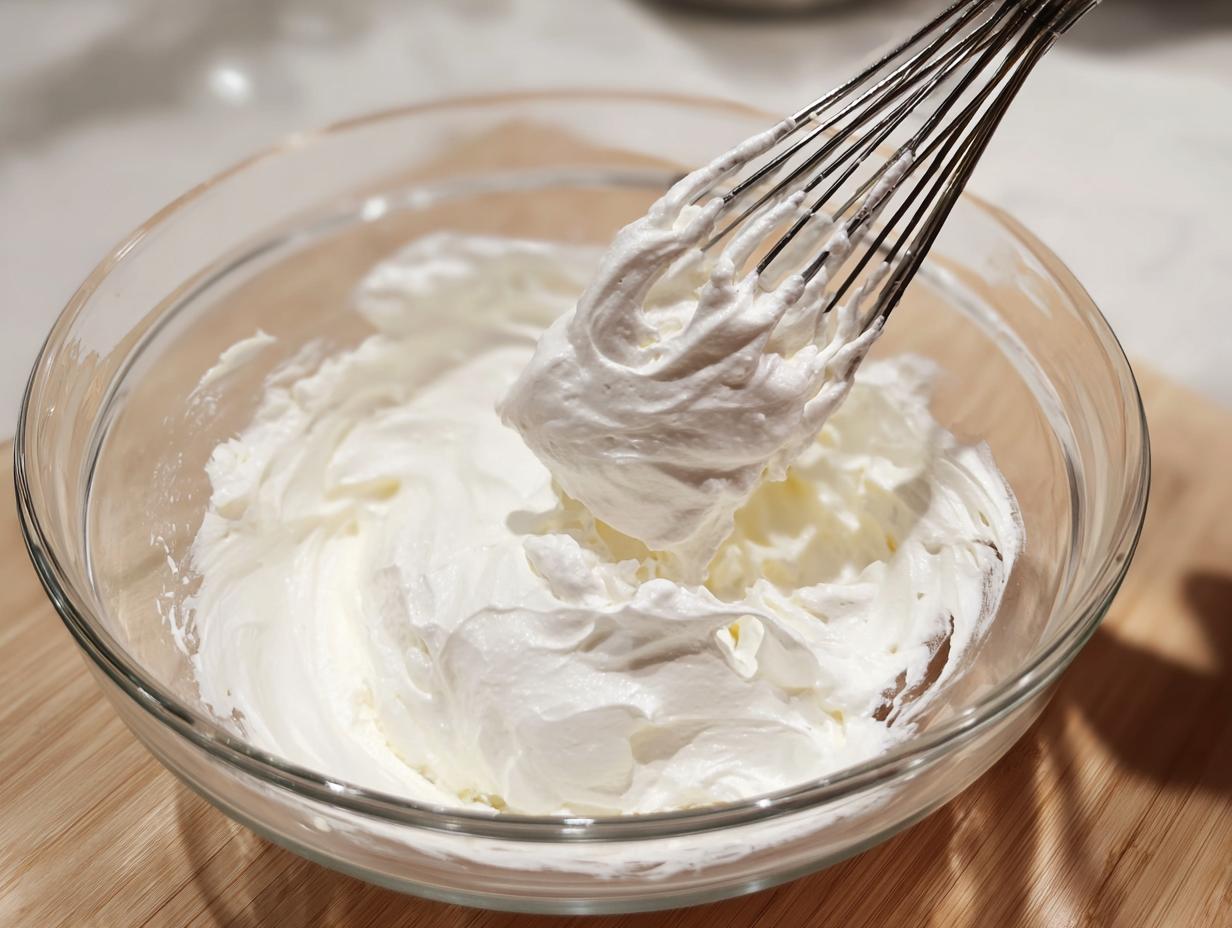
Making this royal icing recipe couldn’t be simpler, but you do need a mixer for the best results. Start by whisking your sifted sugar and meringue powder together right in the bowl—get those dry guys happy first. Then, pour in your warm water and clear vanilla. Don’t even use a spoon yet! Start your mixer on super low just until everything is moistened up. Scrape the sides down—this is important so no dry bits get left behind!
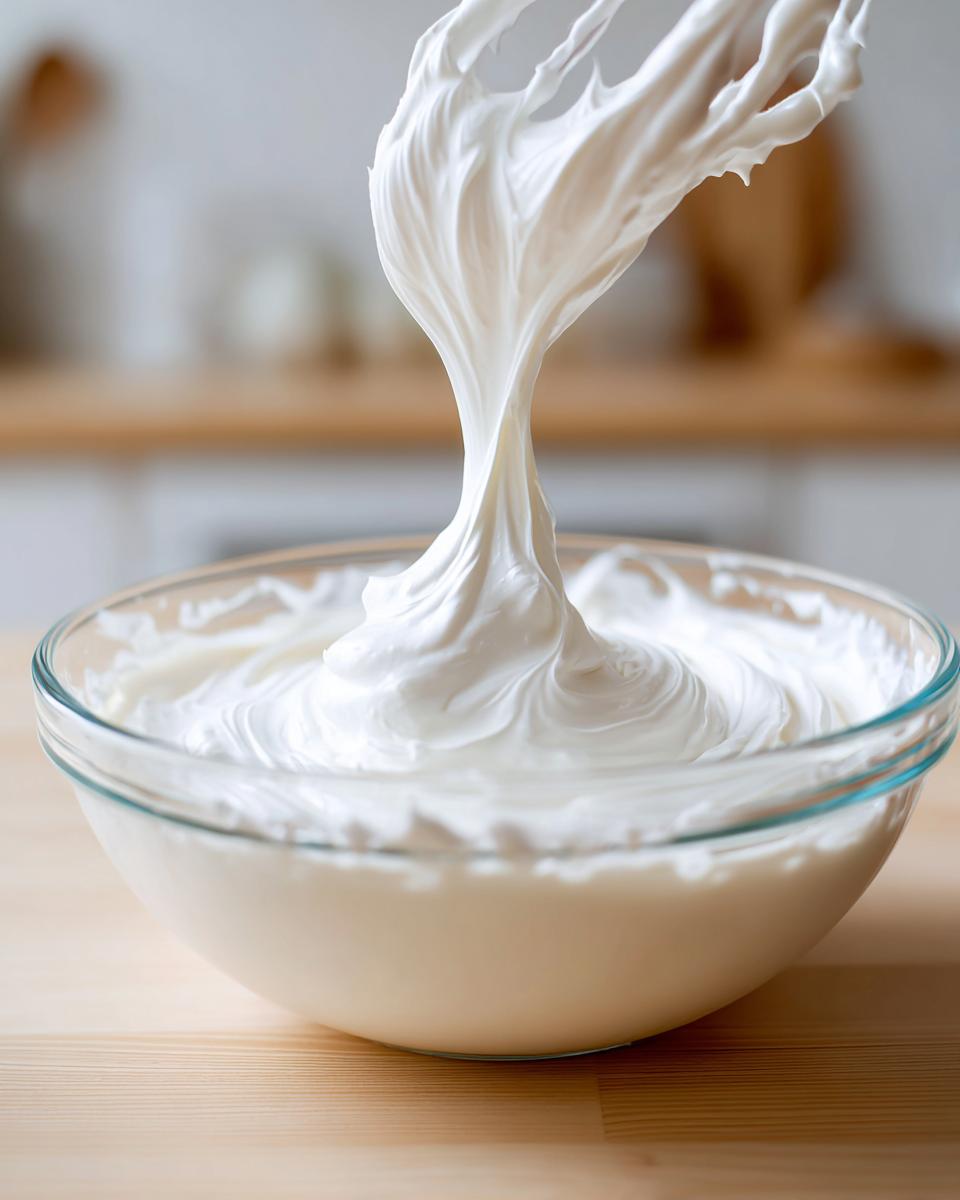
Now for the magic part that takes it from dusty sugar to shiny frosting. Crank that mixer up to medium-high and let it go for a full five to seven minutes. Seriously, don’t stop early! That high speed is what incorporates the air and gives you that gorgeous, fluffy gloss. You’ll know it’s ready when it looks super smooth and thick. Remember, if you want to peek at other great methods, check out this inspiration online!

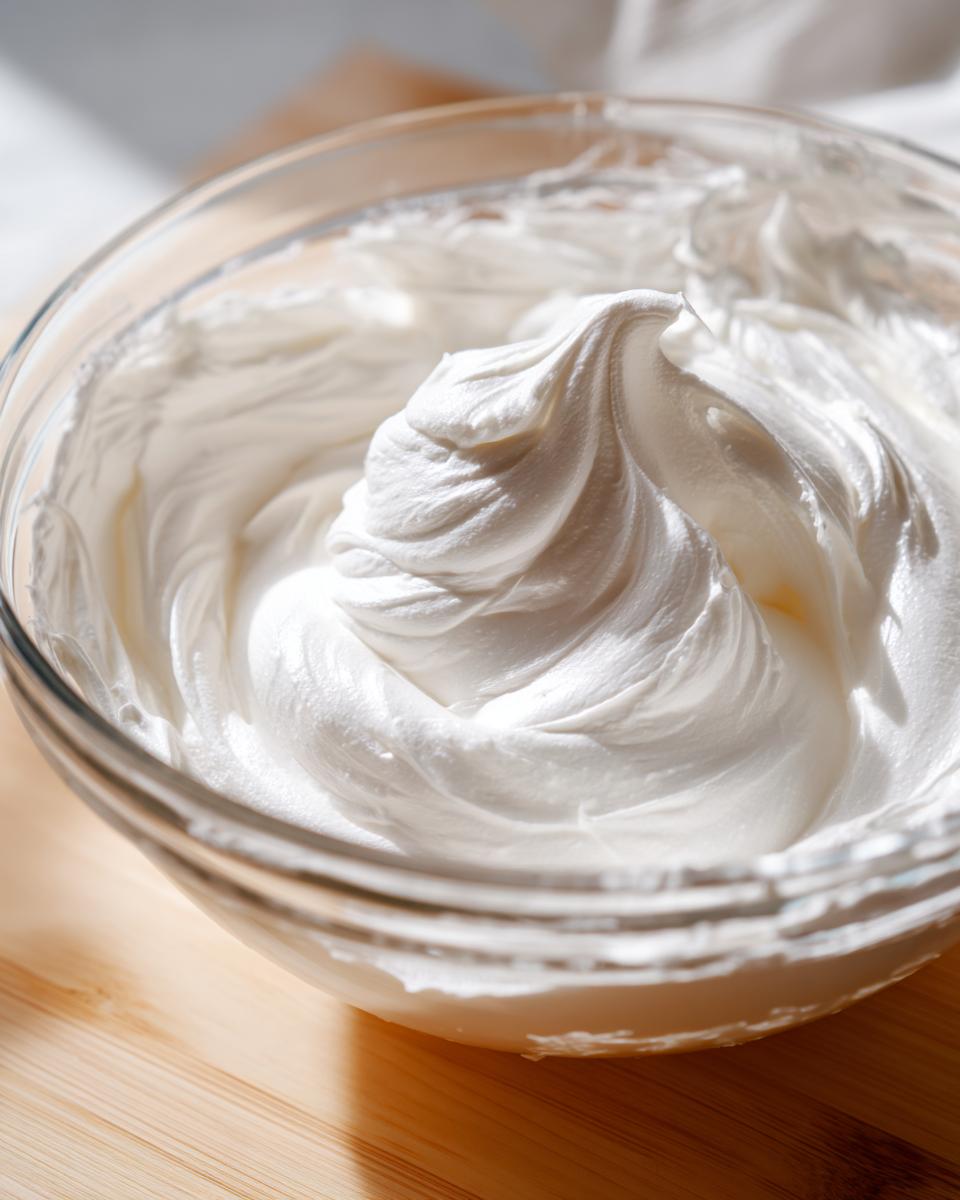
Achieving the Best Royal Icing Consistency
This is the absolute make-or-break step for decorating, friends. Your base icing is stiff, perfect for outlining—you should be able to lift your mixer attachment and see a soft peak hold its shape without immediately collapsing. That’s your Piping Icing Consistency!

For covering large areas, we need that Flood Consistency Icing. You thin this down *slowly* by adding warm water, just one teaspoon at a time. Don’t splash it in! To test it, drizzle some icing over the top of what’s left in the bowl. If the trail you just made sinks back into the smooth surface entirely within ten seconds—that’s the famous 10-second rule—you’re golden for flooding! If it takes longer, add a tiny bit more water. If it disappears instantly, you’ve gone too far and need to add a spoonful of sifted sugar to correct it.
Essential Royal Icing Tips and Tricks for Success
Even with the best royal icing recipe, things can sometimes go sideways! Don’t panic if your icing seems a little sad. If you notice tiny cracks later on, it usually means you added too much water trying to get that final flood consistency, or maybe the humidity is just killing your vibe that day. If the icing starts weeping or looks grainy, it’s often just overworked or maybe hasn’t set yet.
My best advice, which I learned the hard way, is that you must cover everything related to the icing immediately. Seriously, a crust forms if you look away for two minutes. If you aren’t actively using a batch—even if you’re just finishing up the piping batch—cover the bowl tightly with plastic wrap, pressing that wrap directly onto the surface of the icing. This traps that moisture in and keeps everything silky smooth until you need it again. Check out these expert tips for troubleshooting if you run into trouble!
Coloring Your Cookie Decorating Icing
When it’s time to splash some color into your cookie decorating icing, stay away from standard liquid food dyes! They are water-based, and adding any extra liquid will ruin your carefully calibrated consistency. You absolutely must grab gel or paste food colors; they are super concentrated, so you only need a tiny toothpick dip to get vibrant colors. Remember, colors darken slightly as the icing dries, so pull back just a little when you’re mixing!
If you need anything at all—maybe you messed up the thinning ratios or need a quick answer—don’t hesitate to reach out to us through the contact page. We’ve all been there making this royal icing recipe!
Storage and Making Royal Icing Flowers
Now that you’ve made the perfect batch of this royal icing recipe, you need to know how to keep it happy! If you’re not using all of your icing right away—and you probably won’t be, since we made a huge yield—you’ve got to store the colored batches separately. Put each color into a little airtight container, and again, make sure the plastic wrap is pressed right down onto the icing surface. At room temperature, it stays good for about a week, which is great for last-minute cookie decorating!
If you know you won’t need it for a while, you can freeze it! Yes, you can freeze royal icing. Just thaw it slowly in the fridge and remix it gently before you use it. If you’re feeling fancy and want to try making those beautiful little blooms, royal icing is perfect for Making Royal Icing Flowers. You use a slightly thicker consistency, pipe the petals directly onto wax paper, and let them dry completely overnight before setting them on your cake. Super simple, right? Don’t forget to look at how the experts do their advanced decorations!
Serving Suggestions for Your Hardening Icing Recipe
This reliable hardening icing recipe is really your canvas for anything sweet and decorative! We all love it on classic sugar cookies—following this Sugar Cookie Icing Tutorial gives such a clean, perfect look. But don’t stop there! Because this icing dries so solid and strong, it’s my absolute go-to when I’m building or decorating gingerbread houses. It acts like edible cement, holding those walls together through weeks of display.
It also works fantastic piped right onto cakes for those crisp borders or small lettering elements where you need precision. If you need inspiration on making it perfect for biscuits or holiday treats, take a peek at these ideas on holiday baking!
Estimated Nutritional Information
Now, I know you’re probably focused on how pretty those cookies will look, but since we believe in total command in the kitchen, let’s peek at the numbers for this royal icing recipe. This information is, of course, just an estimate! I always say that once you start adding gel colors or switching out vanilla for almond extract, those numbers shift a little. So take this as a general guide, okay?
- Serving Size: 1/4 cup
- Calories: 450
- Sugar: 110g (Yep, it’s sweet! That’s the joy of icing.)
- Fat/Cholesterol: 0g (See? It’s fat-free, which is a bonus when you need sheer volume!)
- Protein: 1g
Remember, since this is purely sugar, water, and powder, the exact amounts can change slightly based on how much water you ended up needing to thin it out for your specific Cookie Decorating Icing needs. It’s an estimate, but it gives you a baseline!
Frequently Asked Questions About This Royal Icing Recipe
Whenever I share this foolproof royal icing recipe, I always get asked the same few questions. It makes sense; we want to make sure these perfect decorations last! Here are the things folks ask me most often about getting that perfect Beginner Royal Icing.
Can I use real egg whites instead of meringue powder?
You totally can, but I really push for the meringue powder because it’s safer—you avoid using raw egg whites, which is a big win, especially if you’re working with kids or sensitive guests. If you must use egg whites, use pasteurized ones! You’ll usually start with about two large egg whites and adjust the water from there. Just know that the consistency can be trickier to nail down compared to our reliable powder version.
How fast will this icing dry and harden?
That’s the magic of royal icing! If you’re not adding weirdly high amounts of coloring, your icing should be dry enough to stack cookies after about 4 to 8 hours, depending on the humidity in your kitchen. If you need it to dry faster for gift giving, remember that tiny pinch of cream of tartar we talked about in the notes? That really helps speed up the hardening process for your Hardening Icing Recipe.
My icing looks broken or separated after mixing—what happened?
Oops, that usually means you either mixed it too long or maybe you added your liquid too fast in the beginning! If it looks grainy or stiff, scrape down the bowl again and try mixing on low speed for maybe a minute or two max—sometimes that just brings it back together. If you look up our main Royal Icing Recipe instructions, you’ll see I emphasized starting low and adding wet slowly. But honestly, if it truly separates badly, sometimes it’s faster to just start over. Don’t worry, we all waste a little powdered sugar learning this!
Can I color the icing ahead of time?
Yes, and you should if you’re doing detailed work! Just separate the white icing into as many small bowls as you have colors. Cover each bowl tightly. If you are worried about things shifting, you can check our privacy policy page for some extra details on how we handle our kitchen workflow, but mainly, just cover it up good! When you’re ready to use the colors, give them a gentle remix.
Take Command of Your Cookie Decorating
Now that you have the absolute best, foolproof royal icing recipe in your arsenal, it’s time to put it to work! Don’t let those perfect cookies sit un-iced waiting for perfect weather or luck. Grab that mixer, sift that sugar like I showed you, and whip up a batch today. You’ll be amazed at the sharp outlines and gorgeously smooth floods you can achieve—no more messy edges!
I sincerely hope this helps you feel totally confident next time you tackle decorated cookies. Please, if you try this out, come back and leave me a rating or drop a comment below telling me what you decorated! I love seeing your creations and hearing which techniques worked best for you. Getting command over your kitchen starts with mastering small, foundational recipes like this one!
PrintThe Best Foolproof Royal Icing Recipe Using Meringue Powder
Make smooth, glossy royal icing that dries firm using meringue powder. This recipe is easy to adjust for outlining, flooding, and detailed cookie decorating.
- Prep Time: 10 min
- Cook Time: 0 min
- Total Time: 10 min
- Yield: About 4 cups 1x
- Category: Baking
- Method: Mixing
- Cuisine: American
- Diet: Vegetarian
Ingredients
- 4 cups confectioners’ sugar, sifted
- 2 tablespoons meringue powder
- 1 teaspoon clear vanilla extract (or other clear flavoring)
- 6 tablespoons warm water
Instructions
- In a large bowl, whisk together the sifted confectioners’ sugar and meringue powder.
- Add the vanilla extract and warm water to the dry ingredients.
- Mix on low speed with an electric mixer until the ingredients are just combined. Scrape down the sides of the bowl.
- Increase the mixer speed to medium-high and beat for 5 to 7 minutes until the icing is very smooth, thick, and glossy.
- Test the consistency. If the icing is too thick for your needs, add water, one teaspoon at a time, mixing well after each addition.
- If the icing is too thin, add more sifted confectioners’ sugar, one tablespoon at a time.
- Separate the icing into bowls if you plan to color it. Cover all unused icing with a damp cloth or plastic wrap pressed directly onto the surface to prevent drying.
Notes
- For outlining consistency, the icing should hold a soft peak when lifted.
- For flooding consistency, add water until the icing flows smoothly off a spoon and the trail disappears into the main batch within 10 seconds (the 10-second rule).
- To make the icing dry faster and harder, add 1/4 teaspoon of cream of tartar to the initial dry ingredients.
- Store colored icing in airtight containers at room temperature for up to one week, or freeze for longer storage.
Nutrition
- Serving Size: 1/4 cup
- Calories: 450
- Sugar: 110g
- Sodium: 5mg
- Fat: 0g
- Saturated Fat: 0g
- Unsaturated Fat: 0g
- Trans Fat: 0g
- Carbohydrates: 112g
- Fiber: 0g
- Protein: 1g
- Cholesterol: 0mg