
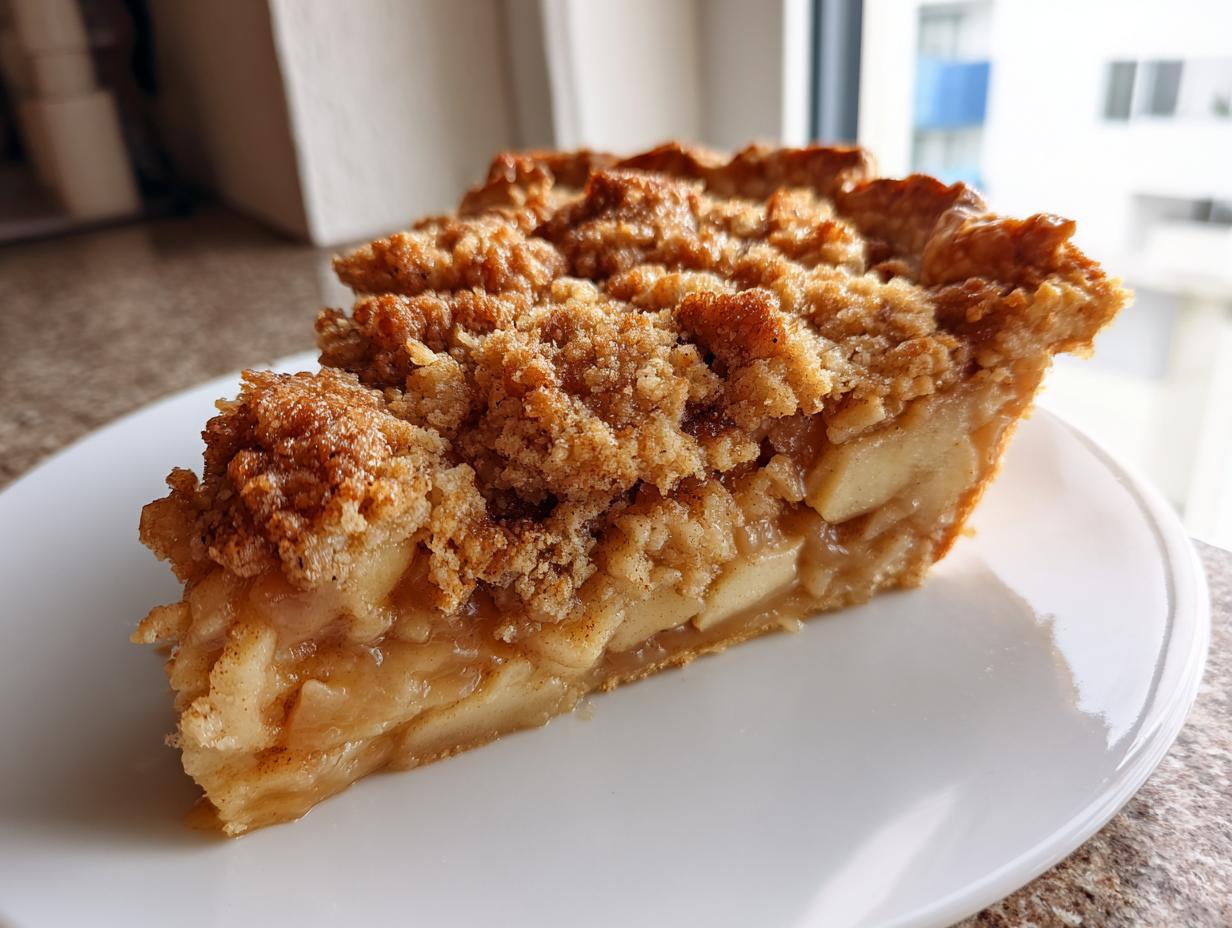
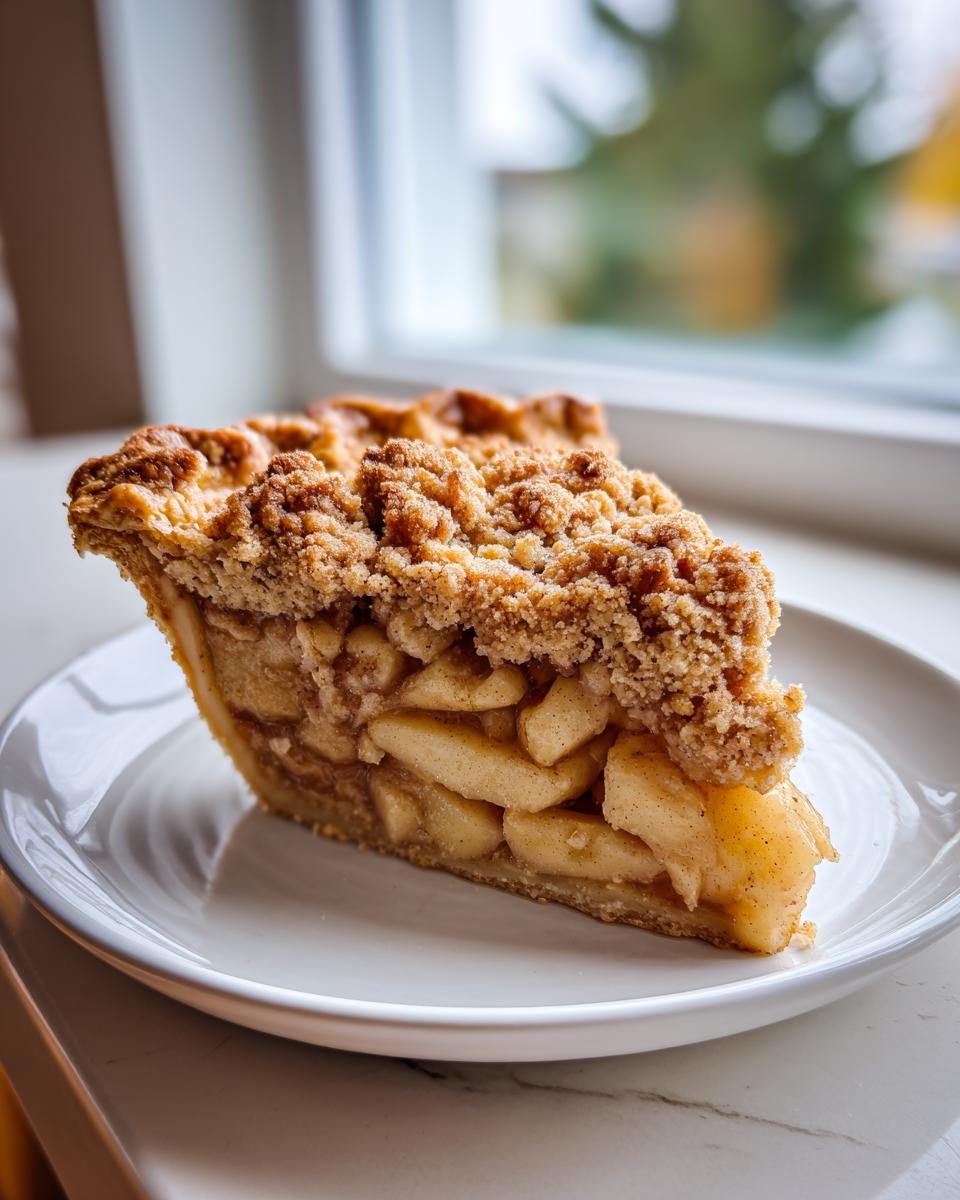
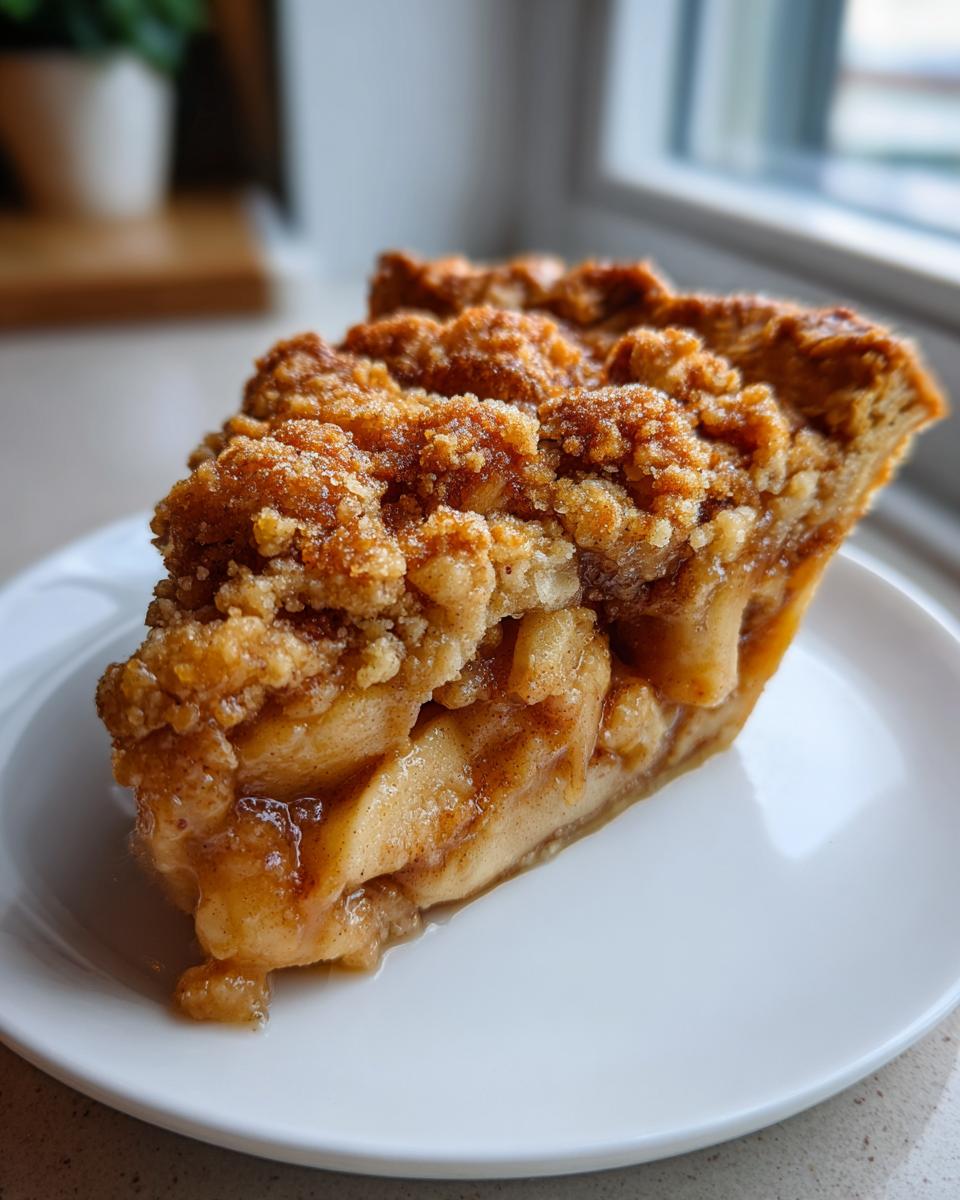
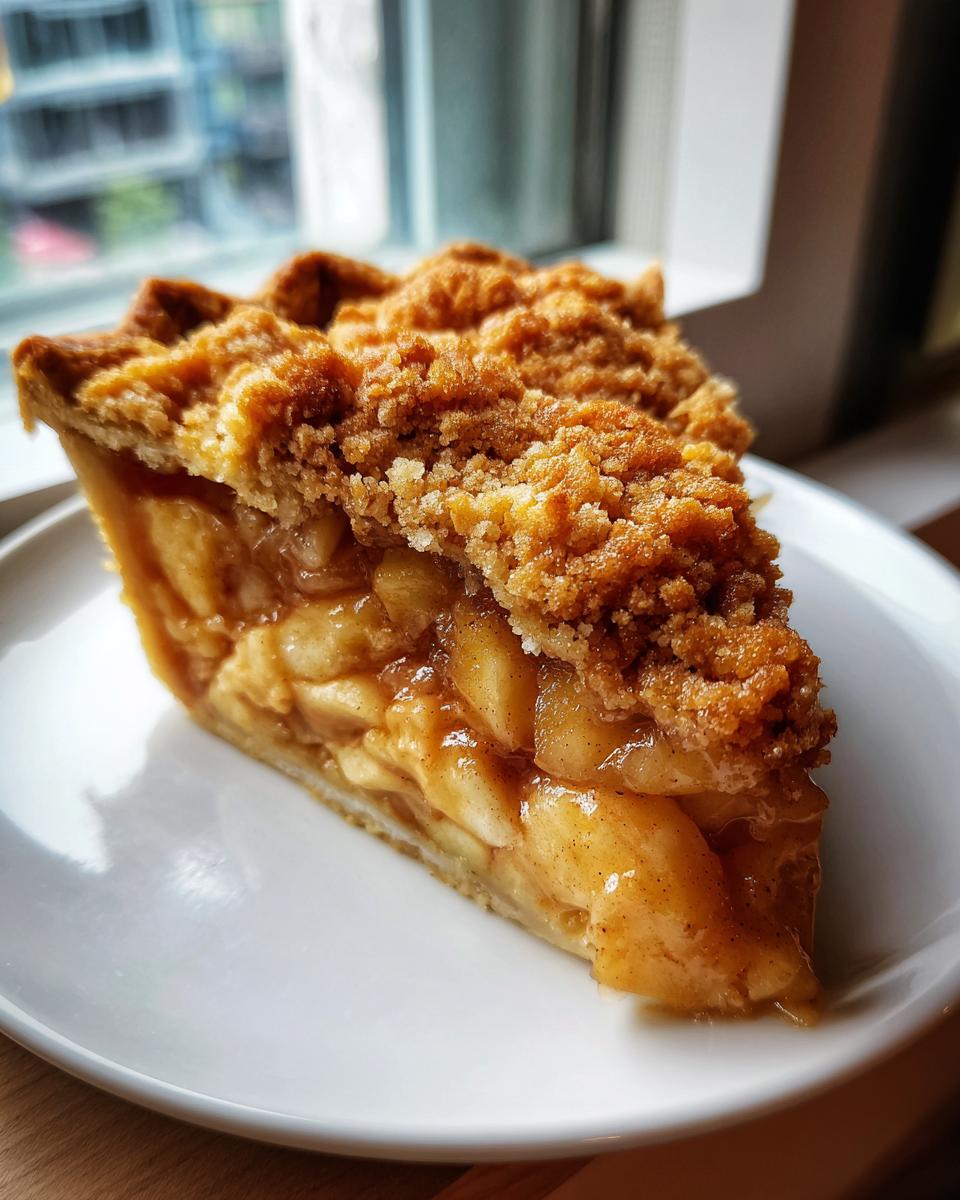
There’s nothing quite like the aroma of a pie baking, is there? For me, that smell is pure Ohio home, and it always means we’re getting ready for a celebration—or maybe just a Tuesday! I learned all my secrets for achieving that perfect slice from my grandmother, and today I’m sharing what I stand by as the ultimate dutch apple pie recipe. Forget those flat, boring crusts; this version focuses equally on being a genuine Homemade Dutch Apple Pie with an unbelievably flaky crust kissed with butter and that signature, crispy, buttery crumb topping. If you loved the technique in my apple pie cheesecake recipe, you’ll appreciate the structure here. Trust me, mastering this recipe means you’re officially in command of your dessert game!
- Why This dutch apple pie recipe is The Best Homemade Dutch Apple Pie
- Ingredients for Your dutch apple pie recipe
- How to Make This dutch apple pie recipe from scratch
- Tips for Success with Your Homemade Dutch Apple Pie
- Variations on the dutch apple pie recipe
- Serving Suggestions for this Warm Apple Dessert
- Storage and Reheating Instructions for Leftover dutch apple pie recipe
- Frequently Asked Questions about the Best Dutch Apple Pie
- Nutritional Estimates for This Comfort Food Desserts Slice
- Nutritional Estimates for This Comfort Food Desserts Slice
Why This dutch apple pie recipe is The Best Homemade Dutch Apple Pie
So, why am I shouting from the rooftops about my dutch apple pie recipe? Honestly, it comes down to texture you can’t get from a box. Most people rush pies, but we’re taking our time to make this truly shine. It hits all the right buttons for a classic comfort food dessert that looks picture-perfect on any holiday table.
- The filling isn’t runny; it’s packed with warmly spiced apples that hold their shape.
- It features that irresistible crunch factor that separates a pie from a mere *crumble*.
- We use a double batch of pastry dough to ensure the perfect cradle for all that delicious fruit.
If you like the richness of my apple dapple cake, you’ll love the balanced sweetness in this filling!
Achieving the Perfect Flaky Pie Crust
This is serious business, folks. The secret lives and dies with temperature. You absolutely *must* keep your butter ice cold—I’m talking frozen-solid nuggets! If your butter melts before it hits the oven, you get tough pastry, not flakes. Cold water and quick handling are your best friends here. Seriously, use a pastry cutter or your fingertips just long enough to get that coarse, pebbly look.
The Signature Buttery Crumb Topping
This is the part that makes it *Dutch*! We’re not messing around with a lattice here; we want big, crunchy clusters of sugary goodness. The secret to the ultimate Buttery Crumb Topping is using cold butter cut into those coarse pieces and making sure the brown sugar is packed tight when you measure it. When this bakes up, it turns into that wonderful sandy texture that crumbles perfectly when you slice it. It’s pure magic!
Ingredients for Your dutch apple pie recipe
Listen, if you try to eyeball ingredients for a pie—especially a star like this one—you’re asking for trouble. That’s why I’m going to lay this out clearly, because clarity equals success in the kitchen! We need three distinct parts for this amazing dutch apple pie recipe: the crust that cradles everything, the gooey spiced center, and that crunchy crown jewel on top. Make sure you have all your elements ready before you even look at the mixer. Having everything prepped keeps that crust dough happy and cold, which, remember, is the key to a perfect flaky pie crust!
For the Flaky Pie Crust (Double Crust)
You know I always insist on homemade, and this recipe requires enough dough for both the bottom and the top—though we won’t be using the top crust, of course, since that’s where the crumb goes! You’ll need the full recipe yield for a standard double crust, which means you’ll have some extra dough leftover, tucked away nicely in the fridge for another day. Just follow your favorite from-scratch pie dough instructions for the foundation of this pie.
For the Cinnamon Apple Filling
This is where the flavor really pops! For best results, grab about six large Granny Smith apples. I stress Granny Smith because they hold their shape beautifully and have that necessary tartness to cut through the sweetness. Peel, core, and slice those apples evenly to about 1/4 inch thick—uneven slices mean uneven baking, and we don’t have time for that!
- 6 large Granny Smith apples, peeled, cored, and sliced 1/4 inch thick
- 1/2 cup granulated sugar
- 1/4 cup packed light brown sugar (don’t skimp here!)
- 2 tablespoons all-purpose flour (this thickens up those juices)
- 1 teaspoon ground cinnamon
- 1/4 teaspoon ground nutmeg
- 1/8 teaspoon ground allspice
- 1 tablespoon fresh lemon juice
- 2 tablespoons unsalted butter, cut into small pieces (these dots go on top of the apples)
For the Buttery Crumb Topping
If you want that unbelievable crunch, the butter for this streusel must be straight from the very back of your fridge—it needs to stay cold! This mixture provides the wonderful texture needed for a great Crumb Topping Pie Recipe.
- 1 cup all-purpose flour
- 1/2 cup packed light brown sugar
- 1/4 cup granulated sugar
- 1/2 teaspoon ground cinnamon
- 1/4 teaspoon salt
- 1/2 cup (1 stick) cold unsalted butter, cut into cubes
How to Make This dutch apple pie recipe from scratch
Okay, now that we have all our components ready—the chilled bottom crust, the gorgeous spiced apples, and that magnificent crumb topping—it’s time for assembly! Baking this pie requires two different temperatures, which sounds fancy, but it’s really just a trick to get that bottom crust perfectly cooked while the topping gets golden brown on top. Remember, we are making a true Apple Pie from Scratch here, so a little attention to detail goes a long way toward that incredible, crunchy bite!
Preparing the Crust and Apple Mixture
First things first, let’s deal with those apples. In a really big bowl—the bigger the better so you aren’t flinging flour across the kitchen—gently toss your sliced apples with all the sugars, flour, spices, and lemon juice until they are completely, beautifully coated. Remember to be gentle! We want slices, not applesauce. While you’re doing that, make sure your bottom pie crust is settled in the 9-inch plate and chilling in the fridge. This step is critical for avoiding a soggy bottom, trust me.
Assembling and Baking the dutch apple pie recipe
Time to put it all together! Pull that chilled bottom crust out. Pour in all those spiced apples—pack them in nicely! Then, scatter those two tablespoons of butter pieces right over the top of the apples; they melt down and add richness. Now, take that crumb topping and sprinkle it evenly over everything. Don’t press it down! Pop the whole thing onto a preheated baking sheet and slide it into the oven. Bake hard for 15 minutes at 425 degrees Fahrenheit. Then, lower the heat right down to 375 degrees Fahrenheit and bake for another 40 to 50 minutes. If you see those beautiful edges browning too fast, just slip a ring of foil around them. When it’s done, the topping is golden, and the filling is bubbling thick. Don’t ignore the clock: you have to let this cool for a full three hours before slicing, or your lovely filling will just run out everywhere! It’s agony, but totally worth the wait for a perfect slice of pumpkin crunch that’s set properly.
Tips for Success with Your Homemade Dutch Apple Pie
Baking is seriously just chemistry that tastes good, right? And like any good science experiment, success comes down to controlling the variables. I’ve learned that the difference between an ‘okay’ pie and your new favorite Homemade Dutch Apple Pie is often just a small tweak in temperature or waiting five extra minutes. Don’t stress yourself out, though; these are just small things that help ensure you nail that double-whammy texture we’re after: flaky crust meets crunchy topping!
Ingredient Temperature Matters for the dutch apple pie recipe Crust
I know I bring this up a lot, but it’s the gospel truth for any great pie dough. If you’re trying to make a fantastic Flaky Pie Crust, your butter and water need to be colder than my Aunt Carol’s stare when you ask for seconds at Thanksgiving. Seriously, I mean it! If your butter warms up even a little bit while you’re cutting it into the flour, it starts melting into the flour instead of staying in those distinct little pieces. Those distinct pieces are what create steam pockets in the oven—that’s the *flakiness*! Keep your dough chilled between mixing steps, and maybe even chill your flour for 15 minutes beforehand if your kitchen is warm. It pays off ten times over!
Cooling Time: The Secret to a Set Filling
This is where most people panic and ruin a perfect bake. You pull the pie out, it smells incredible, and you cut into it immediately, only to watch all the beautiful spiced apples ooze onto your plate. Stop! That bubbling filling still needs time to decide what it wants to be when it grows up. I bake this pie until it’s bubbling thick, but then it needs a minimum of three glorious hours on the counter to cool completely. If you want a clean slice of this Cinnamon Apple Pie that holds together beautifully, you have to wait. It’s the hardest part of the whole process, but trust me, letting it cool lets those juices firm up, making for gorgeous plating later. If you’re looking to save time, you might want to check out my recipe for easy homemade marshmallows instead, as those are much quicker!
Variations on the dutch apple pie recipe
Part of the fun in baking, even with a perfect base like this dutch apple pie recipe, is making it uniquely yours! I love testing out little tweaks, especially when we’re diving deep into cozy Fall Apple Desserts season. You don’t have to reinvent the wheel, but a small switch can make this pie feel brand new for the next gathering you host. That wonderful, layered flavor you find in my easy, moist, old-fashioned fruit cake recipe? We can definitely borrow that philosophy right here in our pie!
The easiest way to switch things up is right there in the topping, but you can also play around with the spices for different warmth levels. Don’t feel locked into just cinnamon, nutmeg, and allspice if you’re feeling adventurous!
Alternative Spice Blends for a New Flavor Profile
If you’re tired of the classic cinnamon punch, try adding a small pinch of cardamom to the apple filling. Cardamom gives a beautiful, almost floral note that pairs amazingly well with the tart Granny Smiths. If you have some ground cloves, use just a tiny scraping—cloves are powerful! A little bit goes a long way to make it taste even richer and deeper. Think of it as making your Cinnamon Apple Pie flavor profile more sophisticated without adding any extra trouble.
Textural Tweaks to the Buttery Crumb Topping
This is my favorite area to experiment in! If you want your topping to be chunkier, don’t mix the butter into the flour mix quite as much; leave some bigger pea-sized chunks in there! For an even more interesting texture—almost like an Apple Crumble Pie hybrid—you can add about half a cup of rolled oats (not instant!) into the topping mixture along with the flour. The oats toast up beautifully and give a really satisfying chewiness that contrasts perfectly with the crispiness underneath. We tested adding chopped pecans once, and that made it instantly holiday-worthy, too!
Making This a Deep Dish Style
If you’ve got folks coming over and you need a showstopper, turn this into a Deep Dish Apple Pie! You’ll need a slightly larger or deeper pie dish—maybe a 10-inch plate or a deeper pie tin. If you use a deeper dish, you’ll want to increase your apple filling by about one cup’s worth, just to make sure it looks nice and tall before that topping goes on. Since it’s deeper, it will take about 10 to 15 minutes longer to bake. Just keep an eye on that crumb topping and cover it if it starts looking too dark while the center finishes cooking. That extra height always impresses people!
Serving Suggestions for this Warm Apple Dessert
We did all that hard work—that flaky crust, that perfectly spiced filling, that addictive crunchy topping—so now we have to serve it right! I firmly believe that a pie this good deserves the spotlight, and frankly, it’s never quite complete until it’s warm. Nothing beats the smell when you pull a slice out and the spices just bloom again in the heat. This is the ultimate reward for mastering your Warm Apple Dessert!
The best part about having that spectacular, slightly salty Buttery Crumb Topping is that it stays distinct and crunchy even when warmed up against the soft apples underneath. You absolutely need to serve this slightly warm. You can reheat individual slices briefly in a low oven or microwave for just a few seconds if you prefer, but I recommend letting the whole pie cool down for those three hours, slicing it up, and then warming *just* the plate you’re serving.
Presentation is everything, even for comfort food. When I serve this, I try to make sure everyone gets a generous scoop of something cold right on top. The contrast between the hot, spiced apples and the frozen cream is just heavenly. It really elevates the whole experience, making it feel like a fancy dessert from a restaurant, even though you made it right here in your kitchen!
The Classic Ice Cream Pairing
You cannot go wrong with high-quality vanilla bean ice cream. The richness of the cream melts slightly into the crevices of the crumb topping, creating this delicious, slightly softened layer that blends perfectly with the warm apple filling. If you happen to have any leftover sauce from my peppercorn sauce recipe, please don’t put it on the pie! Stick to the classics here.
Whipped Cream vs. Cream Cheese Frosting
While a dollop of freshly whipped heavy cream is always elegant and light, sometimes you need something a little heartier. If you want to lean into the richness, a spoonful of homemade whipped cream stabilized with a touch of powdered sugar is fantastic. Some people love swirling a tiny bit of cream cheese frosting (if you have any leftover from a cake, perhaps!) right onto the edge of the slice, but I try to keep the whipped cream simple so it doesn’t compete with the complex flavors of our spice blend in this dutch apple pie recipe.
Making It Special for Holidays
For real special occasions, I dust the plate lightly with powdered sugar around the slice (using a little sieve—it looks so professional!). If you want a bit of shine, a very light, thin drizzle of warmed maple syrup over the entire slice right before serving adds a beautiful glossy finish to this Holiday Pie Recipe. It makes the apples look even juicier!

Storage and Reheating Instructions for Leftover dutch apple pie recipe
Storing Your Homemade Dutch Apple Pie
Okay, let’s talk about what happens the morning after—because if you’re lucky enough to have leftovers of this incredible easy fudge recipe (wait, wrong recipe!), I mean, this pie, you need to store it correctly. Because our filling is nice and thick, thanks to that careful cooling time we waited for, it’s pretty sturdy! You can keep the pie covered loosely on the counter at room temperature for about a day. However, because of all that fruit filling, I always feel safer putting it in the fridge after 24 hours. In the fridge, covered well, this dutch apple pie recipe will stay fantastic for up to four days. Don’t let it sit uncovered, though, or that wonderful Buttery Crumb Topping will dry right out!
Reheating to Bring Back the Crunch
This is the most important part of reviving leftovers! When you reheat pie, the steam tries to sneak under the topping and make it soggy. We can’t have that! If you are just reheating a single slice, the absolute best way is to use your oven or toaster oven. Set it to about 350 degrees Fahrenheit. Place the slice directly on a baking sheet (that sheet you used for baking might work again!) or a piece of foil. Pop it in until it’s heated through—maybe 8 to 10 minutes. This gentle dry heat warms the apples underneath while crisping up the topping again. If you use the microwave, you’ll get soft crumb and hot apples, which is fine in a pinch, but it sacrifices that amazing texture we worked so hard for.
Can You Freeze Leftover Slices?
Yes, you absolutely can freeze slices! Once the pie is completely cooled—and I mean stone cold from the fridge—slice it up. Wrap each piece tightly in plastic wrap first, and then tuck that into a freezer-safe zip-top bag or container. It stays good for about two months, easy peasy. When you want to eat it, thaw the slice in the fridge overnight, and then follow those oven reheating instructions above to bring that glorious crust crunch back to life!
Frequently Asked Questions about the Best Dutch Apple Pie
I get so many messages from folks asking for just one more little detail about making their pie turn out perfectly. It’s totally normal! Baking is all about details, and when we’re aiming for the very Best Dutch Apple Pie, leaving things to chance just isn’t an option. Here are a few things that have come up repeatedly when people are conquering this Apple Pie from Scratch process.
Can I make this dutch apple pie recipe ahead of time?
Oh, yes, you totally can! I often prepare the dough a day ahead, wrap it up tightly, and keep it chilling in the fridge. Cold dough is happy dough, right? For the filling, you can slice and mix the apples, cover that bowl, and keep it in the fridge for up to 24 hours. I wouldn’t leave the spices sitting on the apples overnight, as they can start pulling too much liquid out. If you assemble the whole pie—crust, apples, and that gorgeous crumb topping—you can cover it tightly with plastic wrap and refrigerate it for up to 12 hours. Then, when you bake it, you might need to add about 10-15 minutes to the bake time since the whole thing is starting out cold. It won’t be quite the same as baking it right away, but it works in a pinch! If you’re looking for other make-ahead delights, my easy beer cheese dip freezes really well!
What apples work best for this dutch apple pie recipe?
I am sticking to my guns here: Granny Smith apples are absolutely the best choice for this dutch apple pie recipe. Why? Because they are firm and tart! If you use soft apples, like McIntosh, they turn into complete mush when baked. We want distinct bites of apple, not apple applesauce! The tartness of the Granny Smith also balances out all the rich brown sugar and that sweet Buttery Crumb Topping perfectly. If you really want a complex flavor, mix half Granny Smith with half Honeycrisp, but keep them firm!
How do I ensure the bottom crust is not soggy?
This is the eternal struggle of the pie baker! Look, you did the hard part by making a great crust, now we have to protect it. The absolute first thing you did right was put the bottom crust in the fridge to chill while you prepped the filling. The second thing, which is non-negotiable for me, is baking your pie on that preheated baking sheet. That initial blast of heat onto the bottom of the crust really sets the fat and starts cooking the dough before the moist filling has a chance to seep in. Also, make sure you are using the right amount of flour in your filling mixture—that flour is there to act like a sponge before the juices bubble up. If you want a truly amazing experience, try this pie as an Apple Crumble Pie hybrid by adding oats to the topping, but focus on that initial high heat for the bottom!
Nutritional Estimates for This Comfort Food Desserts Slice
Now, I always tell folks that when you’re baking something this wonderful—especially full of butter, sugar, and rich fruit—you aren’t eating it for its fiber content! We aren’t counting calories when we’re enjoying a classic Comfort Food Dessert like this, but I know some of you like to keep track. So, just remember these numbers are straight estimates based on the ingredients listed in the recipe, and they can change wildly depending on the size of your apples or exactly how much butter you managed to sneak into the topping!
Here is a general overview for one slice of this incredible Warm Apple Dessert:
- Serving Size: 1 slice
- Calories: 450
- Fat: 25g
- Carbohydrates: 58g
- Protein: 5g
- Sugar: 35g
- Sodium: 250mg
We use real butter and rich sugars to make this the Best Dutch Apple Pie, so it’s certainly a treat rather than an everyday snack! If you’re looking for lighter fare, be sure to check out my recipes for easy, healthy homemade salad dressing recipes!
PrintThe Ultimate Homemade Dutch Apple Pie with Perfect Flaky Crust and Buttery Crumb Topping

This recipe delivers the best Dutch Apple Pie, featuring a flaky, homemade crust, a thick filling of cinnamon-spiced apples, and a signature buttery, crisp crumb topping. It is a comforting dessert, perfect for holidays or fall gatherings.
- Prep Time: 35 min
- Cook Time: 65 min
- Total Time: 100 min
- Yield: 8 servings 1x
- Category: Dessert
- Method: Baking
- Cuisine: American
- Diet: Vegetarian
Ingredients
- 1 recipe for Flaky Pie Crust (enough for a double crust)
- 6 large Granny Smith apples, peeled, cored, and sliced 1/4 inch thick
- 1/2 cup granulated sugar
- 1/4 cup packed light brown sugar
- 2 tablespoons all-purpose flour
- 1 teaspoon ground cinnamon
- 1/4 teaspoon ground nutmeg
- 1/8 teaspoon ground allspice
- 1 tablespoon lemon juice
- 2 tablespoons unsalted butter, cut into small pieces
- For the Buttery Crumb Topping:
- 1 cup all-purpose flour
- 1/2 cup packed light brown sugar
- 1/4 cup granulated sugar
- 1/2 teaspoon ground cinnamon
- 1/4 teaspoon salt
- 1/2 cup (1 stick) cold unsalted butter, cut into cubes
Instructions
- Prepare the pie dough for a double crust. Roll out half the dough and fit it into a 9-inch pie plate. Trim and crimp the edges. Place the bottom crust in the refrigerator while you prepare the filling and topping.
- In a large bowl, combine the sliced apples, granulated sugar, brown sugar, flour, cinnamon, nutmeg, allspice, and lemon juice. Toss gently until the apples are evenly coated.
- Prepare the Buttery Crumb Topping: In a medium bowl, whisk together the flour, brown sugar, granulated sugar, cinnamon, and salt for the topping. Cut in the cold, cubed butter using a pastry blender or your fingertips until the mixture resembles coarse crumbs.
- Preheat your oven to 425 degrees Fahrenheit. Place a baking sheet on the lowest rack to catch any drips.
- Pour the apple mixture into the chilled bottom pie crust. Dot the top of the apples with the small pieces of butter reserved for the filling.
- Sprinkle the prepared buttery crumb topping evenly over the apples.
- Place the pie on the preheated baking sheet in the oven. Bake at 425 degrees Fahrenheit for 15 minutes.
- Reduce the oven temperature to 375 degrees Fahrenheit. Continue baking for an additional 40 to 50 minutes, or until the topping is golden brown and the filling is bubbling thickly. If the edges of the crust brown too quickly, cover them loosely with foil.
- Remove the pie from the oven and place it on a wire rack to cool completely, at least 3 hours, before slicing. This allows the filling to set.
- Serve your warm apple dessert with vanilla ice cream or whipped cream.
Notes
- For the flakiest crust, keep all ingredients cold when mixing the dough.
- If you want a deeper dish apple pie, use a 10-inch pie plate and increase the apple filling by about 1 cup.
- This pie is excellent for holiday pie recipes and tastes best when served warm.
Nutrition
- Serving Size: 1 slice
- Calories: 450
- Sugar: 35g
- Sodium: 250mg
- Fat: 25g
- Saturated Fat: 15g
- Unsaturated Fat: 10g
- Trans Fat: 0g
- Carbohydrates: 58g
- Fiber: 4g
- Protein: 5g
- Cholesterol: 60mg