
Stop dreaming about that beautiful, crackly artisan bread you find at the bakery counter! I promise you, achieving that incredible, professional-looking loaf in your own home kitchen is simpler than you ever thought possible. At Cookery Command, our whole mission is built around taking those intimidating baking techniques and simplifying them so you feel completely in command. This foolproof, no knead bread recipe is the absolute best way to get a magnificent, crusty loaf of bakery style bread using just four simple pantry staples. If you’ve ever felt overwhelmed before making your own homemade bread recipe, this is the one that will change everything for you. Get ready to pull something truly magical out of your oven!
- Why This No Knead artisan bread Recipe Delivers Bakery Style Bread At Home
- Simple Ingredients Bread for Your artisan bread
- How To Bake artisan bread: Step-by-Step Instructions for a Crusty Loaf
- Tips for Success with Your Homemade Bread Recipe
- Ingredient Notes and Substitutions for Rustic Bread
- Serving Suggestions for Your Crusty Loaf
- Storage and Reheating Instructions for artisan bread
- Frequently Asked Questions About Beginner Bread Baking
- Estimated Nutritional Data for Your Homemade Baked Goods
- Estimated Nutritional Data for Your Homemade Baked Goods
Why This No Knead artisan bread Recipe Delivers Bakery Style Bread At Home
Honestly, the beauty of this artisan bread recipe is how little you have to *do* to get such an amazing result. We’re talking minimal effort for maximum flavor payoff, which is exactly what you want when you’re starting out or just needing an easy weekend baking project. Trust me, this hands-off approach is what makes it so foolproof for everyone.
- It delivers that professional, bakery-quality texture without ever touching a mixer or really straining your arms.
- It requires practically nothing but flour, water, salt, and yeast—the simplest ingredients for bread you can find!
- It guarantees you’ll have a gorgeous, rustic loaf ready when you need it. See how easy it is compared to a much fussier homemade bread recipe.
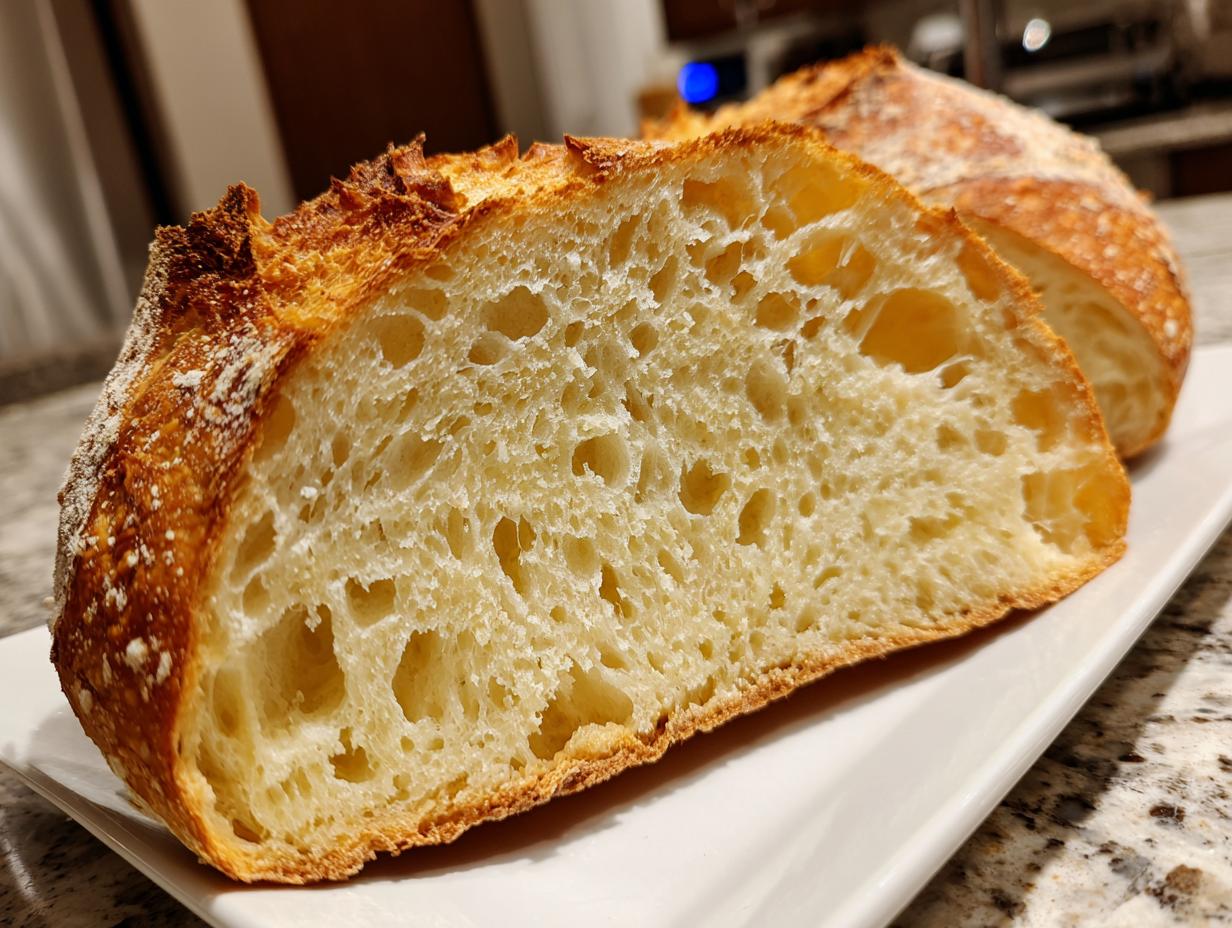
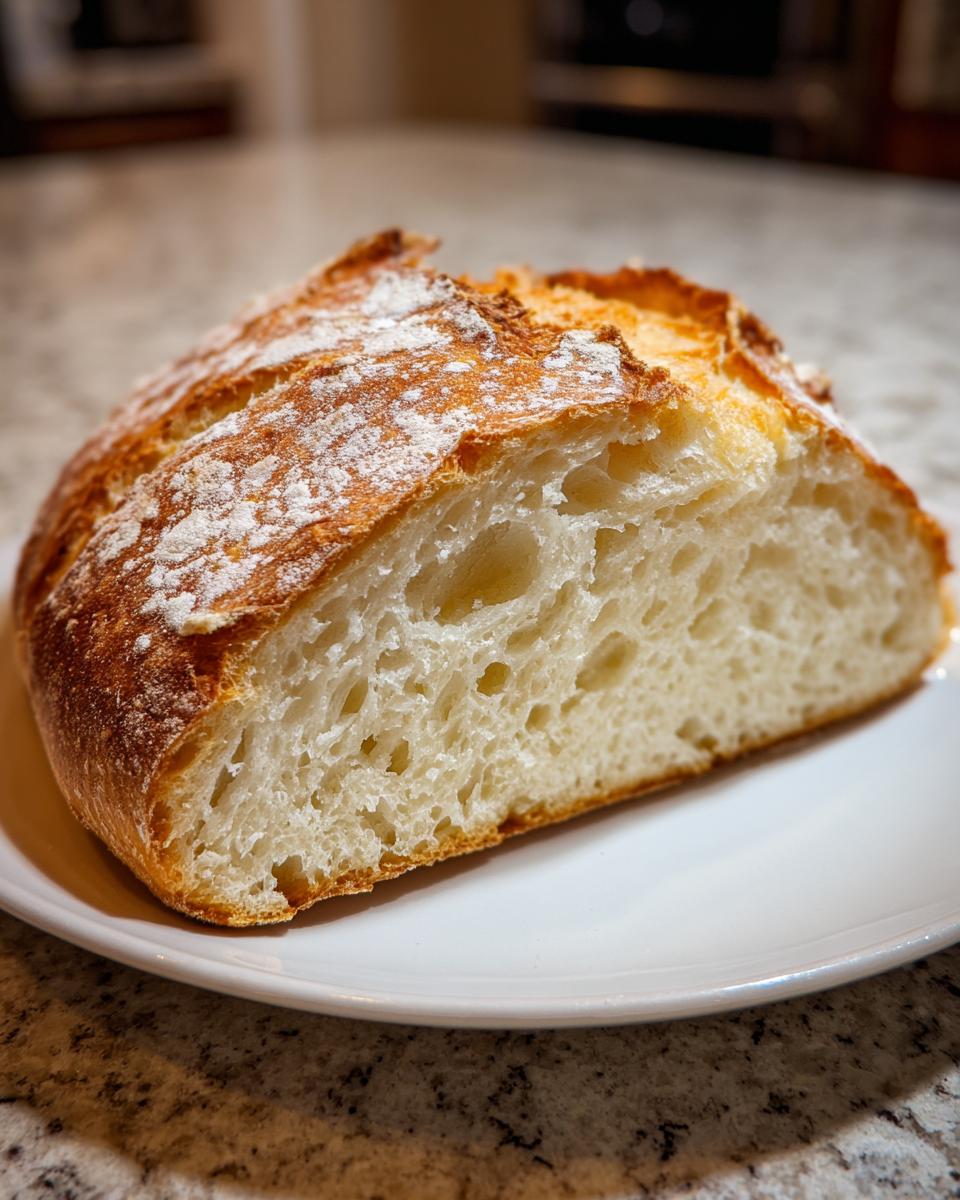
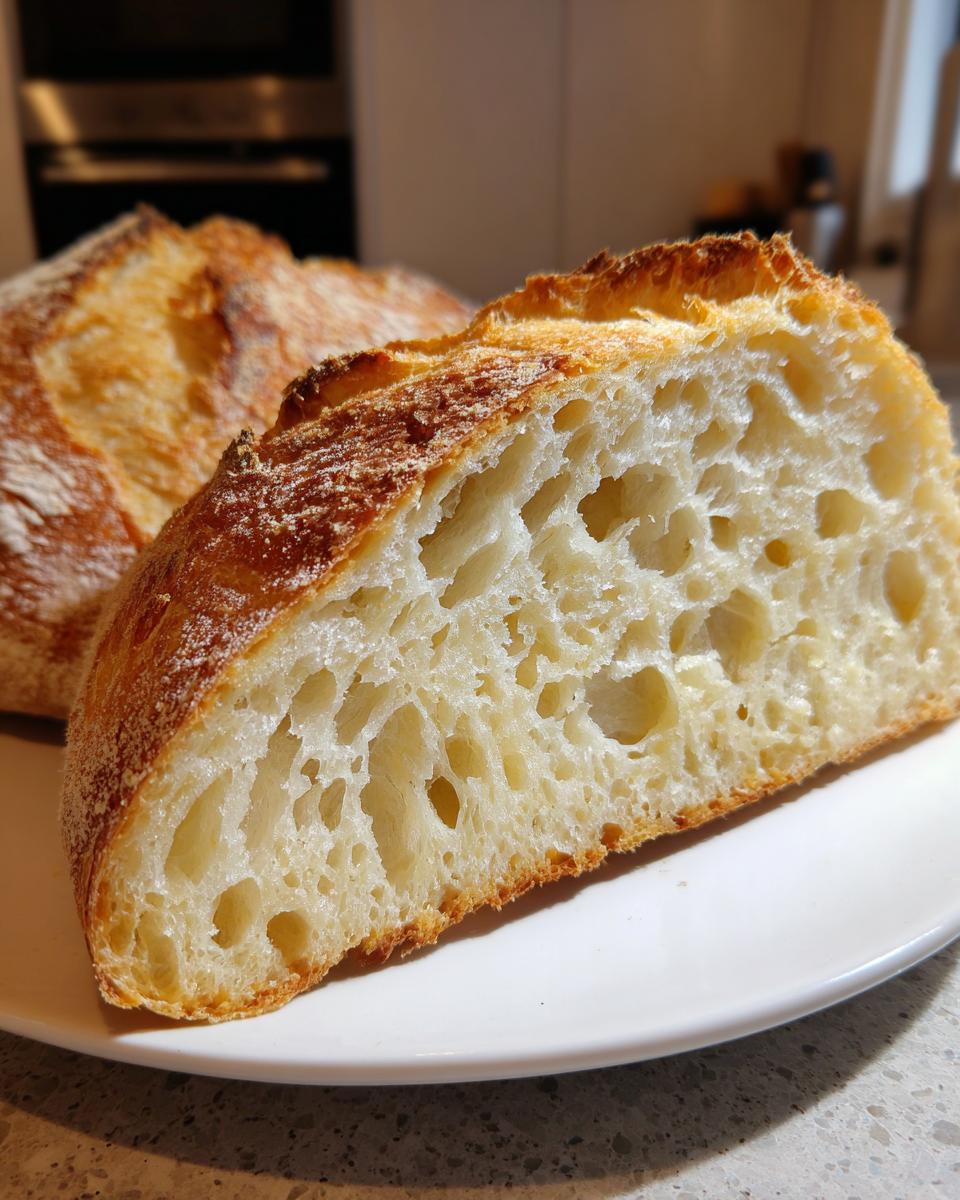
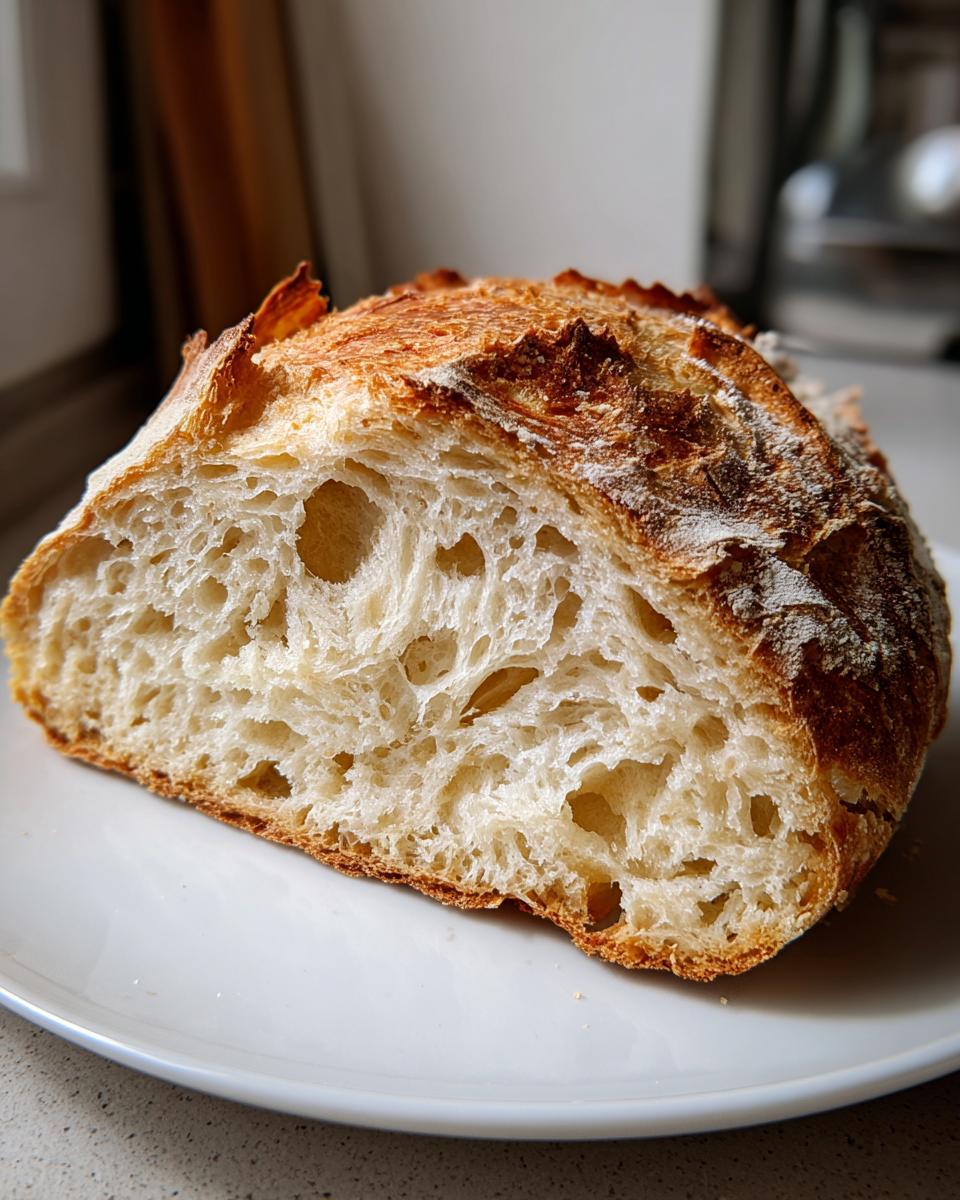
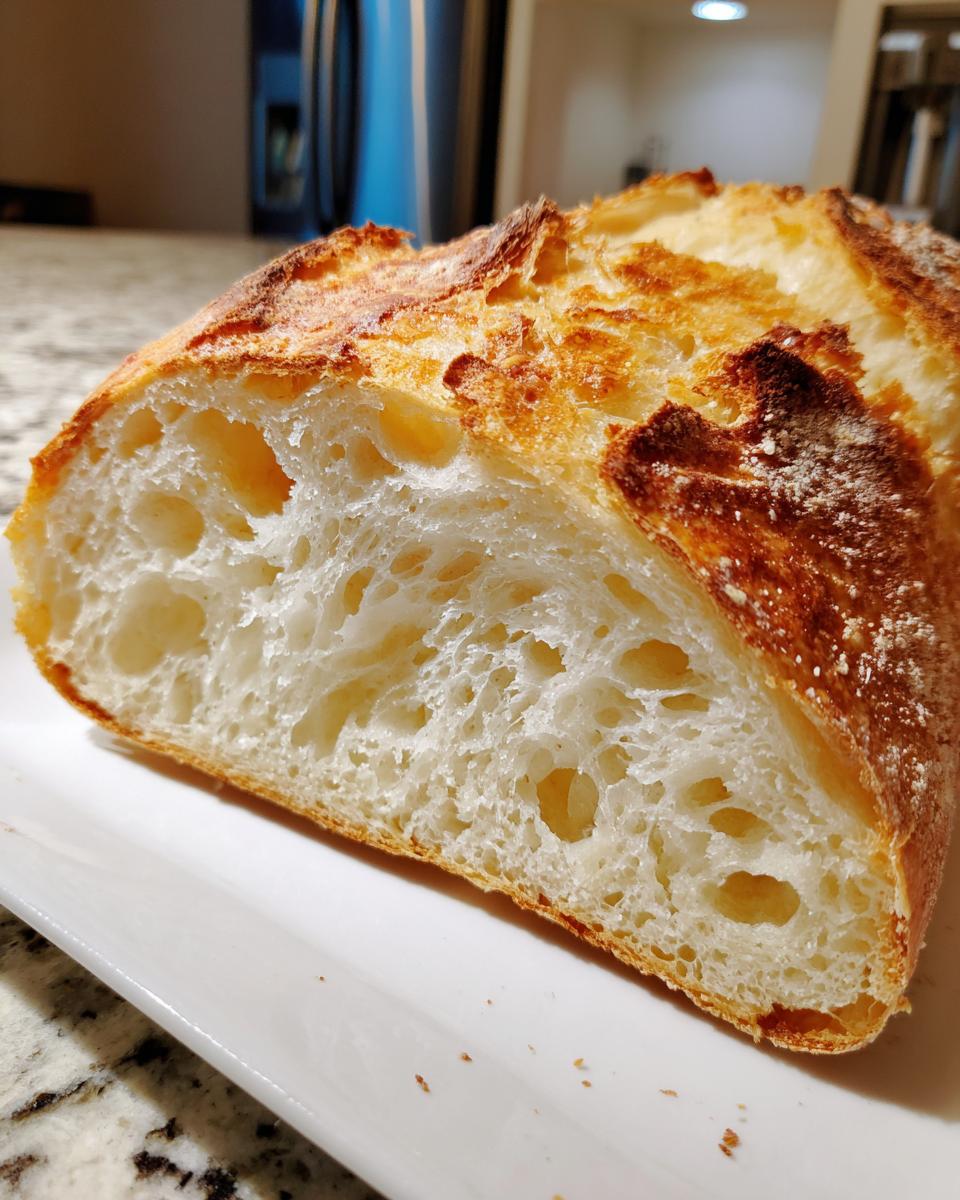
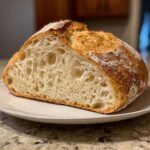
Achieving the Perfect Crusty Loaf Texture
The secret ingredient here isn’t actually an ingredient—it’s the Dutch oven! When you put that covered cast iron pot into the oven, it traps all the moisture released by the dough. That trapped steam is what keeps the exterior soft long enough to fully expand, and then BAM! When we take the lid off, the dough immediately crisps up into that gorgeous, crackly, golden crust that screams artisan bread. It’s pure magic, I tell you.
Flavor Development Through Long Fermentation
Since we skip the kneading, we have to make up for that flavor development in time, and boy, does it deliver! That 12 to 18-hour rest time at room temperature is crucial. This slow fermentation process allows the yeast to create complex, slightly tangy, nutty flavors you just don’t get in a quick, actively kneaded white bread recipe. It’s where the deep, satisfying taste of true, slow-made artisan bread comes from.
Simple Ingredients Bread for Your artisan bread
If the thought of a complicated ingredient list sends you running back to the store, you are in the absolute right place! This is where the magic of easy bread baking truly shines. Seriously, I’ve streamlined this recipe down to just four core, common pantry staples. That’s it! You don’t need fancy flours or obscure additives to get a beautiful bakery style bread. You just need these four things.
When I first tested this Homemade Bread Recipe, I kept trying to sneak in an extra thing—maybe some oil or maybe a different kind of sugar—but honestly, it just messes with the balance! The beauty is in its core simplicity. I keep these listed below so you can check your pantry right now.
- 3 cups All-Purpose Flour (Plain white flour is perfect here, stick to it for the best results!)
- 1 1/2 teaspoons Salt (Don’t skip the salt; it controls the yeast and adds flavor!)
- 1/4 teaspoon Instant Yeast (This is key! Instant yeast can be mixed directly with the dry ingredients.)
- 1 1/2 cups Cool Water (Yes, cool water, not warm. I’ll explain that bit later, but for now, just use what you’ve got that isn’t hot.)
See? Only four things to gather! Keep them nearby, and we can move on to mixing up the dough. It’s so satisfying knowing a truly rustic, artisan bread loaf is coming from just these basic items. If you’re looking to pair this incredible bread with something savory, check out my recipe for easy beer cheese!
How To Bake artisan bread: Step-by-Step Instructions for a Crusty Loaf
Okay, now for the fun part—or honestly, the *not* fun part that requires the most patience! Getting this artisan bread done is mostly waiting, which is perfect for busy schedules. Remember, this is a relaxed method, so we aren’t fussing over kneading; we are letting time do the hard work to build that amazing structure and develop the flavor in your homemade bread recipe.
Mixing and the Long Rest for artisan bread Flavor
First things first: grab a big bowl. Whisk your flour, salt, and that tiny bit of instant yeast together until they’re happy. Now, pour in the cool water and just mix it with a wooden spoon until it all comes together. Seriously, stop mixing when it looks shaggy, sticky, and messy. That’s your sign! Cover that bowl up tight. Now, you need to let it sit out on the counter for 12 to 18 hours. Yes, you read that right! This long rest is the backbone of building superb flavor for your crusty loaf.
Shaping and Preheating the Dutch Oven Bread
Once the dough has rested, it’s time to wake it up gently. Flour up your work surface, scrape the sticky blob out, and just fold it over itself a couple of times to make a rough ball. Don’t punch it down or overwork it—we want to keep those precious air bubbles! Let that dough ball rest on parchment paper for just 30 minutes while you properly heat up your oven. Put your Dutch oven, lid and all, into the oven and crank it up to 450°F (232°C). Let it preheat for a full 30 minutes! You need that Dutch oven screaming hot for that perfect texture when we bake bread.
Baking Your artisan bread for a Golden Crust
Now, be careful, that Dutch oven is hotter than the surface of the sun! Use the parchment paper as a sling to gently lower your dough right into the hot pot. Put the lid back on and pop it in for 30 minutes. This steamy phase builds the inside structure. After 30 minutes, take the lid off! This unleashes the steam and lets the outside start turning that beautiful color. Bake it uncovered for another 10 to 15 minutes until it’s deep golden brown everywhere. You’ve done it! If you want more tips on getting that perfect bake, check out my guide on crusty artisan bread.
Tips for Success with Your Homemade Bread Recipe
Even though this is the easiest artisan bread recipe ever, those small details really matter when you’re aiming for that perfect, crackly, bakery style bread. I’ve learned a few things over the years that prevent rookie mistakes—like that sinking feeling when you slice into your beautiful loaf too soon! If you follow these few extra tips, you’ll look like a seasoned baker every time. These little insights are what separate a good loaf from a truly phenomenal one.
Water Temperature Matters for artisan bread
You might be tempted to use warm water, especially when working with yeast, but for this loaf, stick to cool or room temperature water! Since this recipe relies on a very long, slow fermentation—that 12 to 18-hour rest—using warm water can actually wake the yeast up too fast. We want that sluggish, steady flavor development, not a quick rush to the finish line. Cool water keeps everything calm and allows those complex flavors we talked about to develop properly in the mixture.
The Importance of Cooling Down Your artisan bread
Oh, this is the hardest part! When that loaf comes out of the Dutch oven, it smells like heaven and you just want to tear into it immediately, right? Don’t! Resist the urge! If you slice into your bread when it’s piping hot, the interior crumb texture hasn’t quite set yet. It will steam itself apart and look gummy or doughy, even if it’s totally cooked. You need to let that crusty loaf cool completely on a wire rack—at least an hour, preferably more. This finishing step is non-negotiable for achieving that light, fluffy inside texture we crave in a perfect homemade bread recipe. If you’re looking for other cozy home bakes, you HAVE to try my recipe for easy fluffy homemade marshmallows!
Ingredient Notes and Substitutions for Rustic Bread
Because this recipe relies on such simple ingredients bread staples, people often ask me if they can swap things out. It’s a fair question! When you only have four things going into the bowl, every single one of them plays a super important role in achieving that perfect artisan bread texture. My standard answer is: yes, you *can* substitute, but know that it will definitely change the final character of your rustic bread loaf!
For instance, you can definitely try making this with some whole wheat in the mix. If you want a slightly more robust flavor and a denser interior crumb, try swapping out up to half of the all-purpose flour for whole wheat, like I mentioned in the ‘Notes’ section. Just know that any whole grain flour absorbs more liquid, so the dough might look a little drier than usual. Don’t try to add more water, though—that stickiness is your friend right now!
As for the yeast, we specifically call for Instant Yeast because it mixes right into the dry ingredients without needing that separate blooming step. If you only have Active Dry Yeast? You absolutely can use it, but you’ll need to proof it first, which is detailed in the FAQ section. The key takeaway for this specific Homemade Bread Recipe is that the simplicity is what makes it work so well. Think of this method as a blank canvas, and sticking close to the recipe gives you the most reliable result for that gorgeous crusty loaf.
If you ever need something to dip this wonderful bread into, you must try my recipe for easy homemade salad dressing recipes—though honestly, olive oil and flaky salt is usually my favorite pairing for this baker’s bread!
Serving Suggestions for Your Crusty Loaf
This is the moment every baker lives for! Pulling that beautiful, aromatic crusty loaf out of the oven is fantastic, but what do you do with it next? Because this artisan bread has such a wonderful, slightly complex, yeasty flavor from that long rest, it’s amazing all on its own. Seriously, just let it cool down (remember that rule!) and slice it thick. A little smear of good quality butter melting right into those air pockets of the interior crumb texture makes for the ultimate comfort food experience.
But let’s get creative, shall we? This homemade bread recipe works so wonderfully alongside savory dishes. I mean, the sound of ripping off a hunk of this rustic bread while you’re eating dinner? Pure joy! It’s perfect for soaking up every last bit of sauce or gravy from a main course. If you pair it with my creamy peppercorn sauce for steak, you won’t be disappointed—it makes the whole meal feel way fancier than it really is.
And for simple snacking? You simply cannot beat dipping this bread into something delicious. Forget those sad little store-bought slices. I have a fantastic recipe for a simple olive oil bread dip recipe that uses fresh herbs, garlic, and good flaky salt. It’s the perfect pairing for this no knead bread when you just want something rustic and absolutely satisfying. Honestly, once you start baking your own, you’ll find excuses to serve this incredible, easy bread with everything!
Storage and Reheating Instructions for artisan bread
Now that you have this gorgeous, crusty loaf sitting on your counter, we have to talk about keeping it perfect. The biggest enemy of any artisan bread once it comes out of that hot Dutch oven is moisture loss—or worse, moisture gain! We worked so hard to get that crackly crust, and nobody wants soggy bread the next day, right? For a homemade bread recipe this good, you want to treat the leftovers right so they taste almost as fresh as when they were first baked.
The absolute number one rule for storage is: do NOT put this bread in a plastic bag. I know, I know, it seems convenient, but trapping that fresh air inside is what turns your beautiful exterior soft and chewy (in a bad way!). If you plan on eating the loaf within two days, just leave it on the counter cut-side down on a wooden cutting board, or wrapped loosely in a clean kitchen towel. This lets the bread breathe while protecting the top crust slightly.
If you know you won’t finish it in 48 hours, slicing what you need and freezing the rest is the best move. Pop those slices into a freezer bag—make sure to squeeze out all the air—and they’ll keep for a couple of months easily. When you get a craving for that bakery style bread flavor later, just pop a slice right into the toaster oven or a 350°F oven for about 5 minutes. It comes back to life beautifully!
If you have a day-old loaf that’s gone a little stiff, don’t despair! A quick reheat can bring back a lot of that fresh texture. Wrap the whole loaf loosely in foil and bake it at 350°F (175°C) for about 10 minutes. If you want to re-crisp the crust, quickly unwrap it for the last two minutes of heating. It’s fantastic for dipping into soups or even making the best grilled cheese sandwich you’ve ever had! Speaking of comfort, if you need a sweet treat after all that yeast bread baking, check out my recipe for easy fudge recipe—no thermometer needed!
Frequently Asked Questions About Beginner Bread Baking
It’s totally normal to have questions when diving into bread making, especially when dealing with a long-fermentation no knead bread! Don’t sweat it if you’re wondering about yeast types or if your dough looks ‘wrong’—that’s half the battle of learning how to bake bread. I’ve gathered the most common concerns for beginners trying to achieve that perfect artisan bread result right here. We want you to feel totally confident taking command of this beginner bread recipe!
Can I use Active Dry Yeast instead of Instant Yeast in this artisan bread recipe?
Yes, you sure can! That’s a super common question since Active Dry Yeast is often what folks have lying around. The difference is that Instant Yeast (which we called for) can be mixed right into the flour. If you use Active Dry Yeast, you’ll need one extra tiny step first. You need to ‘proof’ it. Take about half a cup of your measured cool water (taken from the total amount), warm it very slightly (it should feel lukewarm, not hot—think bath water), and sprinkle the yeast on top. Let it sit for about 5 to 10 minutes until it gets foamy and bubbly. Once it’s foamy, treat it like the rest of your water and mix it into your dry ingredients. If it doesn’t foam up, your yeast is dead, so you’ll need to start over with fresh yeast!
My dough wasn’t sticky; did I do something wrong?
If your dough wasn’t super sticky and shaggy, you might have added a bit too much flour during handling, or maybe your flour was packed too tightly in the cup measure. Don’t worry, it happens! But let me tell you why stickiness matters for this crusty loaf: the stickiness means a high hydration level, and that high hydration is what creates those big, beautiful, irregular holes inside, giving you that amazing, light interior crumb texture we associate with bakery style bread. Less sticky means less water, which often leads to a tighter, denser crumb, even with no kneading. For next time, measure your flour lightly! If you’re already baking, just proceed; you’ll still get a great loaf, though it might be a touch firmer than the classic recipe intends. If you need a guaranteed soft interior, check out my potato croquettes recipe!
What if I don’t have a Dutch oven for this Crusty Loaf?
Aw man, the Dutch oven is the champion of steam, but if you don’t have one, we can absolutely improvise! The goal is to mimic that steamy, enclosed environment for the first half of the bake. You need something heavy that can hold heat. An oven-safe pot with a tight-fitting lid made of heavy metal (like a sturdy soup pot or even a heavy roasting pan with a lid) can work in a pinch. Place whatever you use on the center rack. Now, for the steam, place an empty, sturdy metal tray or broiler pan on the very bottom rack while the oven preheats. When you put your dough in its substitute pot, carefully pour one cup of boiling water into that hot bottom tray right before you close the oven door. That boiling water creates instant steam to help develop that amazing golden crust! Just be super careful when taking the water pan out later!
Estimated Nutritional Data for Your Homemade Baked Goods
I love sinking my teeth into a thick slice of this artisan bread, but since it’s simply flour, water, salt, and yeast, it’s quite the wholesome bake! I want to give you a heads-up on what you’re looking at, nutritionally speaking, for this amazing homemade bread recipe. Keep in mind, since this is a yeast bread made from scratch without added fats or sugars (besides what the yeast eats!), the numbers tend to be pretty straightforward.
Please remember that these figures are just estimates based on standard calculation tools for this particular simple ingredients bread recipe. Your actual values might shift slightly depending on the exact brand of flour you use, but this gives you a really good general idea for your daily tracking. Enjoying a slice of this crusty loaf is always a win!
- Serving Size: 1 slice (Approx. 1/15th of the loaf)
- Calories: 180
- Fat: 0.5g
- Sodium: 250mg
- Carbohydrates: 37g
- Protein: 6g
See? Not bad at all for something so delicious! If you’re looking for something sweet to balance out all that savory bread goodness, you should definitely bookmark my easy healthy homemade salad dressing recipes for later, although my easy fudge recipe—no thermometer is the cure for any serious sweet tooth!
PrintFoolproof No-Knead Artisan Bread (Bakery Style)
You can make bakery-style artisan bread at home with this easy, no-knead recipe. This method delivers a loaf with a crackly, golden crust and a soft, airy interior crumb using only simple pantry staples.
- Prep Time: 5 min
- Cook Time: 45 min
- Total Time: 13 hours 50 min
- Yield: 1 loaf 1x
- Category: Baking
- Method: No-Knead Baking
- Cuisine: American
- Diet: Vegetarian
Ingredients
- 3 cups All-Purpose Flour
- 1 1/2 teaspoons Salt
- 1/4 teaspoon Instant Yeast
- 1 1/2 cups Cool Water
Instructions
- In a large bowl, whisk together the flour, salt, and yeast.
- Pour in the cool water and mix with a wooden spoon until just combined. The dough will be very sticky and shaggy; do not knead it.
- Cover the bowl tightly with plastic wrap and let the dough rest at room temperature for 12 to 18 hours. This long rest develops the flavor.
- After the long rest, lightly flour a work surface. Gently scrape the dough out of the bowl. Fold the dough over itself a few times to form a rough ball. Do not overwork it.
- Place the dough ball on a piece of parchment paper, cover it loosely with plastic wrap or a clean kitchen towel, and let it rest for 30 minutes.
- While the dough rests, place a 5- to 6-quart Dutch oven, with the lid on, into your oven. Preheat the oven to 450°F (232°C). Allow the Dutch oven to preheat for at least 30 minutes.
- Carefully remove the hot Dutch oven from the oven. Lift the dough using the parchment paper and gently place it inside the hot pot.
- Cover the Dutch oven with the lid and place it back in the oven. Bake for 30 minutes.
- Remove the lid and continue baking for another 10 to 15 minutes, or until the crust is deep golden brown.
- Carefully remove the bread from the Dutch oven and let it cool completely on a wire rack before slicing to achieve the best interior crumb texture.
Notes
- Using cool water helps control the long, slow fermentation process, which builds flavor.
- A Dutch oven traps steam, which is essential for developing that signature crackly crust.
- You can substitute up to half of the all-purpose flour with whole wheat flour for a more rustic flavor.
Nutrition
- Serving Size: 1 slice
- Calories: 180
- Sugar: 0.5
- Sodium: 250
- Fat: 0.5
- Saturated Fat: 0.1
- Unsaturated Fat: 0.4
- Trans Fat: 0
- Carbohydrates: 37
- Fiber: 1.5
- Protein: 6
- Cholesterol: 0