
Some of life’s most profound memories are born in the warmth of a kitchen, and right now, you deserve a moment of cheesy, buttery comfort. Forget complicated doughs and long waits; I’m Emily Harrison, and I’m here to tell you that the absolute best homemade cheese bread doesn’t require advanced skills. This is the easiest, pull-apart version of cheesy bread you’ll ever assemble, perfect for when you need a reliable, show-stopping appetizer fast. I developed this method because I believe every meal should feel celebratory without demanding hours of work from the cook.
- Why This Easy Cheese Bread Recipe Is Your New Go-To
- Essential Ingredients for Buttery Cheese Bread
- How to Prepare This Easy Cheese Bread Recipe Step-by-Step
- Expert Tips for the Best Homemade Cheese Bread
- Serving Suggestions for Your Warm Cheesy Snack
- Storing and Reheating Your Leftover Cheese Bread
- Variations on Classic Garlic Cheese Bread
- Frequently Asked Questions About Making Cheese Bread
- Share Your Comfort Food Bread Creations
Why This Easy Cheese Bread Recipe Is Your New Go-To
When I’m hosting or just need a quick win against the dinner slump, this cheesy bread recipe always saves the day. It’s built entirely on speed and flavor, so you get maximum payoff with minimal effort. Seriously, you won’t find a more reliable, gooey side dish.
- So Fast: You aren’t kneading dough or waiting for rises. This is pure, delicious speed when you need it most.
- Crowd-Pleaser Factor: It’s an appetizer that disappears before you even set the main course down.
- Flavor Powerhouse: We pack it with garlic and Italian herbs—the aromatics alone will make your house smell incredible.
Quick Prep Time for Perfect Cheese Bread
We’re talking about 10 minutes of active work, tops! That’s practically instant gratification. If you’re looking for a Quick Cheesy Bread that doesn’t compromise on that lovely, buttery crust, this is it. You have time to mix up the butter while the oven preheats!
The Ultimate Cheesy Pull Apart Bread Experience
This isn’t just bread on a plate; it’s an interactive experience! Because of how we cut the loaf, everyone grabs their own molten chunk. That gooey, stretchy texture is what makes this Cheesy Pull Apart Bread absolutely addictive. Save your silverware; you’ll want to use your hands for this one.
Essential Ingredients for Buttery Cheese Bread
When building a foolproof recipe, the ingredients have to be spot-on. You don’t need a pantry full of fancy items here, just a few quality components handled correctly. We keep it simple so the butter and cheese truly shine through, which is why reliability is built right into this list.
Using soft, quality butter is non-negotiable; it’s what carries all that gorgeous garlic flavor deep into the bread. And grab that crusty loaf—stale bread is actually great here because it holds up to all the moisture we’re adding! Remember, this is foundational work for next-level flavor.
Selecting the Best Cheese Blend for Your Cheese Bread
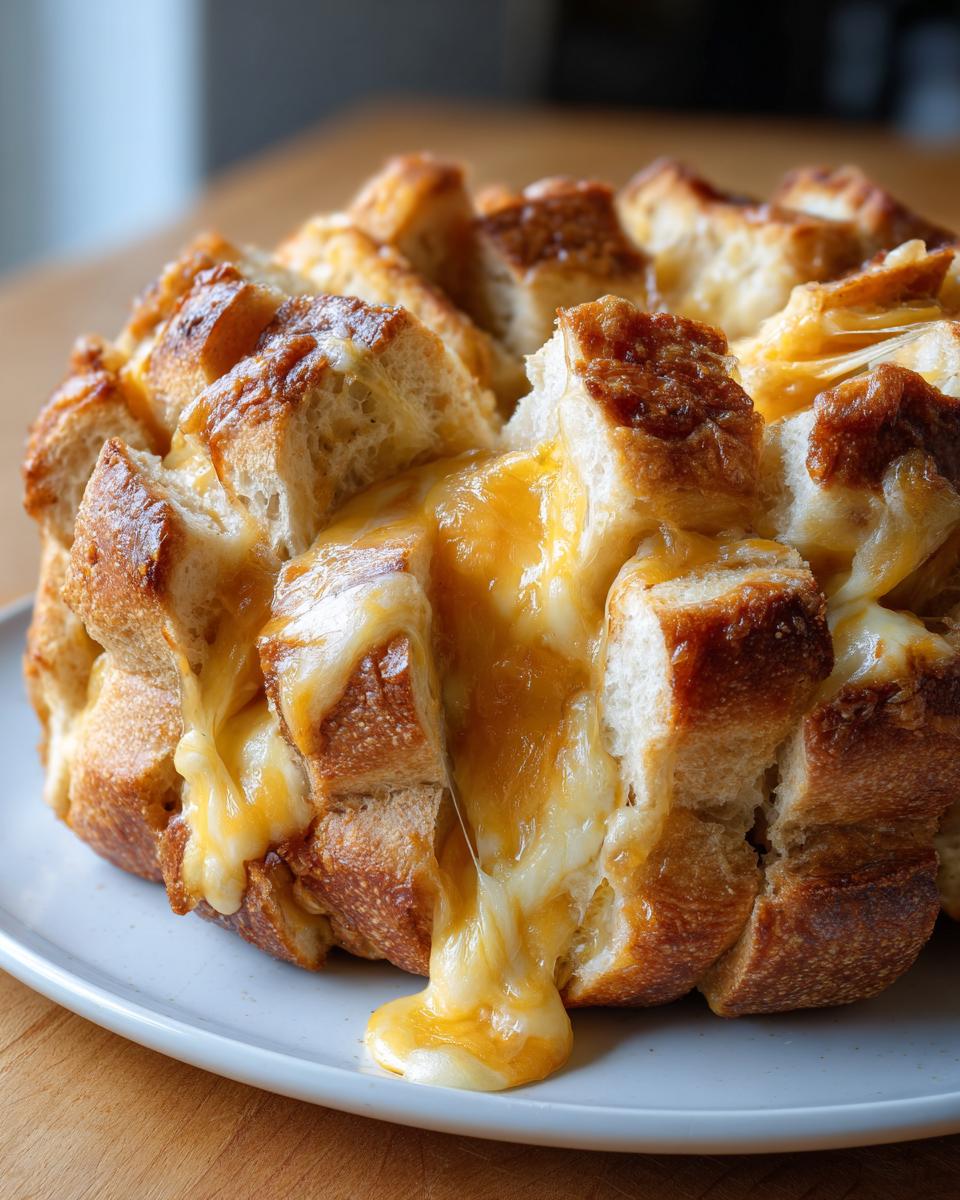
Listen, you can use any cheese you have, but for that classic, glorious cheese pull, you need a mix. I always insist on a 50/50 blend here. Mozzarella melts beautifully and gives you that epic stretch people rave about. But you need flavor, too!
That’s where sharp cheddar comes in. It adds a little tang and beautiful color. Using sharp cheddar in your Cheddar Cheese Bread base guarantees a richer taste than mild versions. If you use only Mozzarella Cheese Bread, it can sometimes be a little bland, so mix it up!
How to Prepare This Easy Cheese Bread Recipe Step-by-Step
Okay, this is where the magic happens, and trust me, it’s ridiculously straightforward. Follow these steps for the Easy Cheese Bread Recipe, and in about 22 minutes of total cooking time, you’ll have the best thing ever sitting on your table. The key isn’t complicated cooking; it’s all about preparing the bread to properly soak up all that buttery goodness. Preparing the base right makes this side dish as satisfying as a good main course, almost like pairing it with crispy oven-roasted potatoes.
Creating the Flavorful Garlic Butter Base for Cheese Bread
First things first, get that oven cranked up to 350 degrees Fahrenheit and line a baking sheet—you don’t want cheese runoff everywhere later! In a small bowl, we’re going to build our flavor bomb. Use softened butter (super soft, but not melted!). Combine it with your finely minced garlic, those dried Italian herbs, and just a pinch of salt. Mix it all up nice and smooth with a fork until it’s perfectly homogenized. You want every bite to taste the same!
The Critical Crisscross Cutting Technique
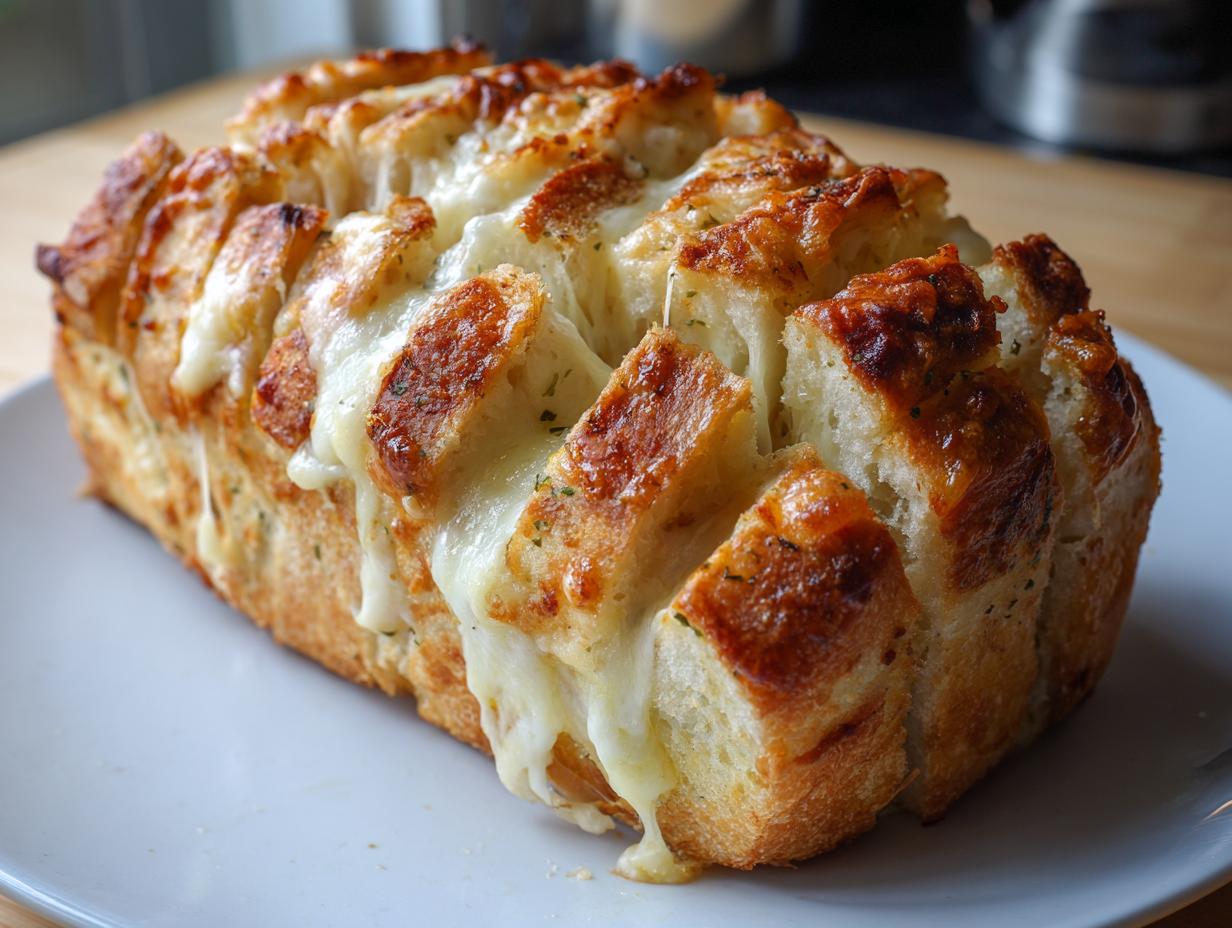
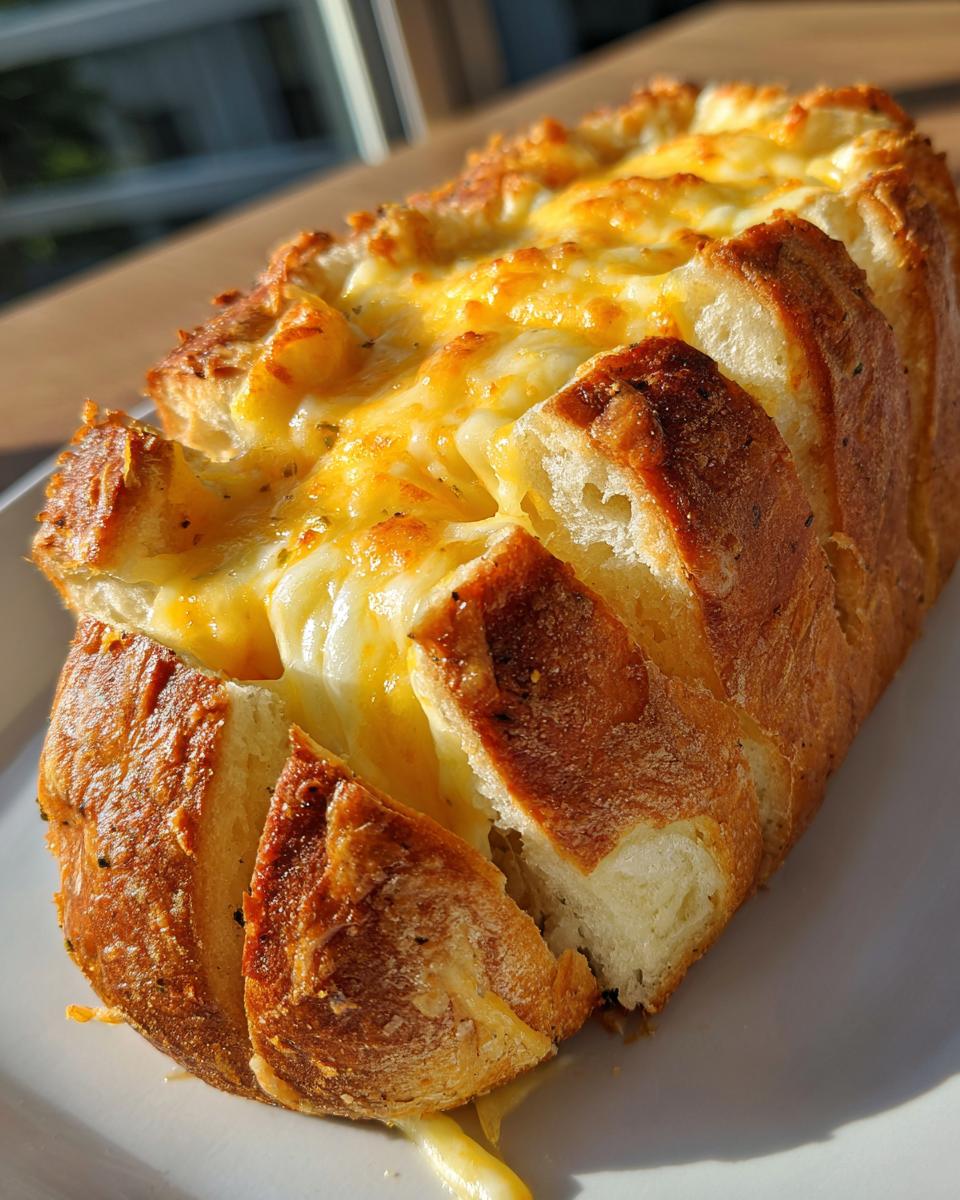
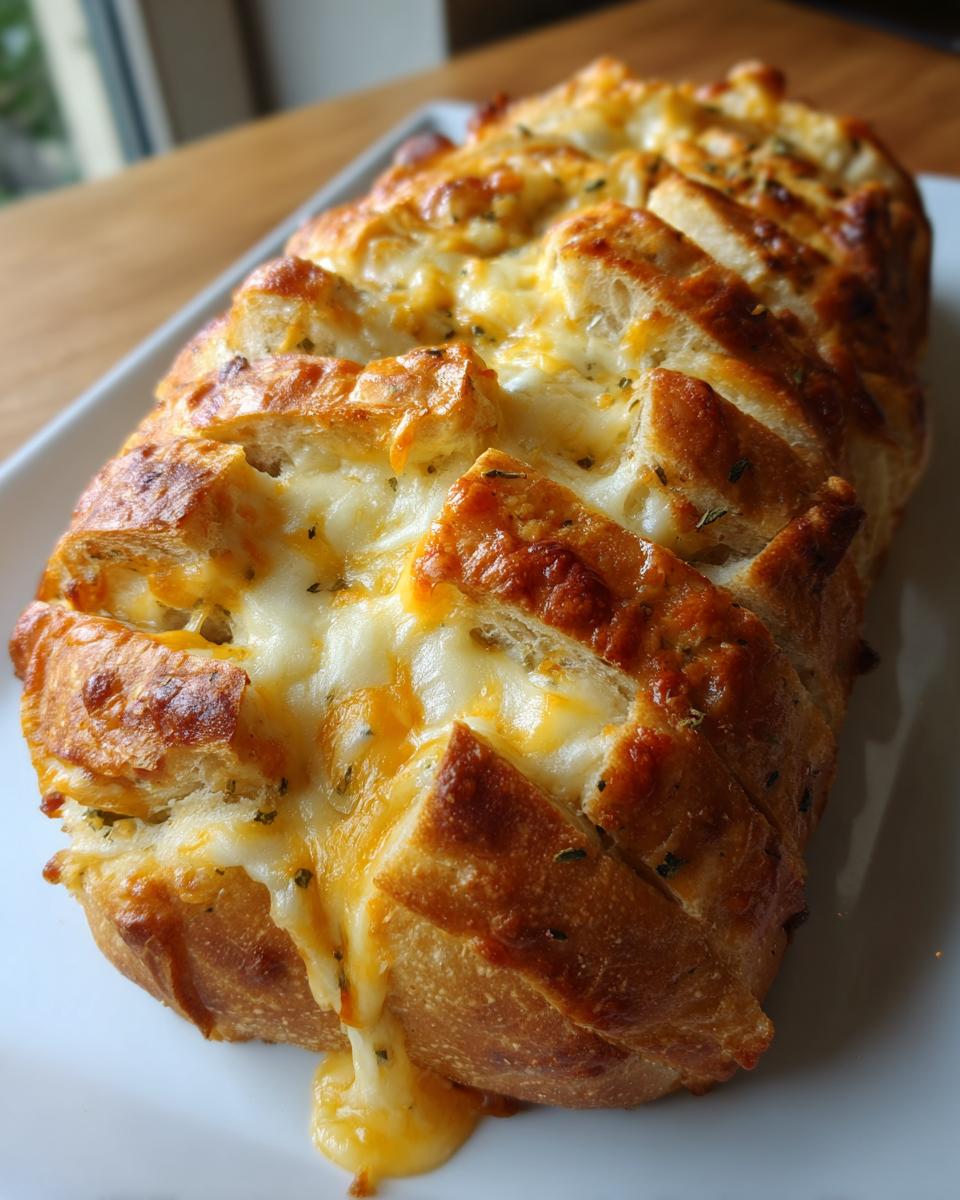
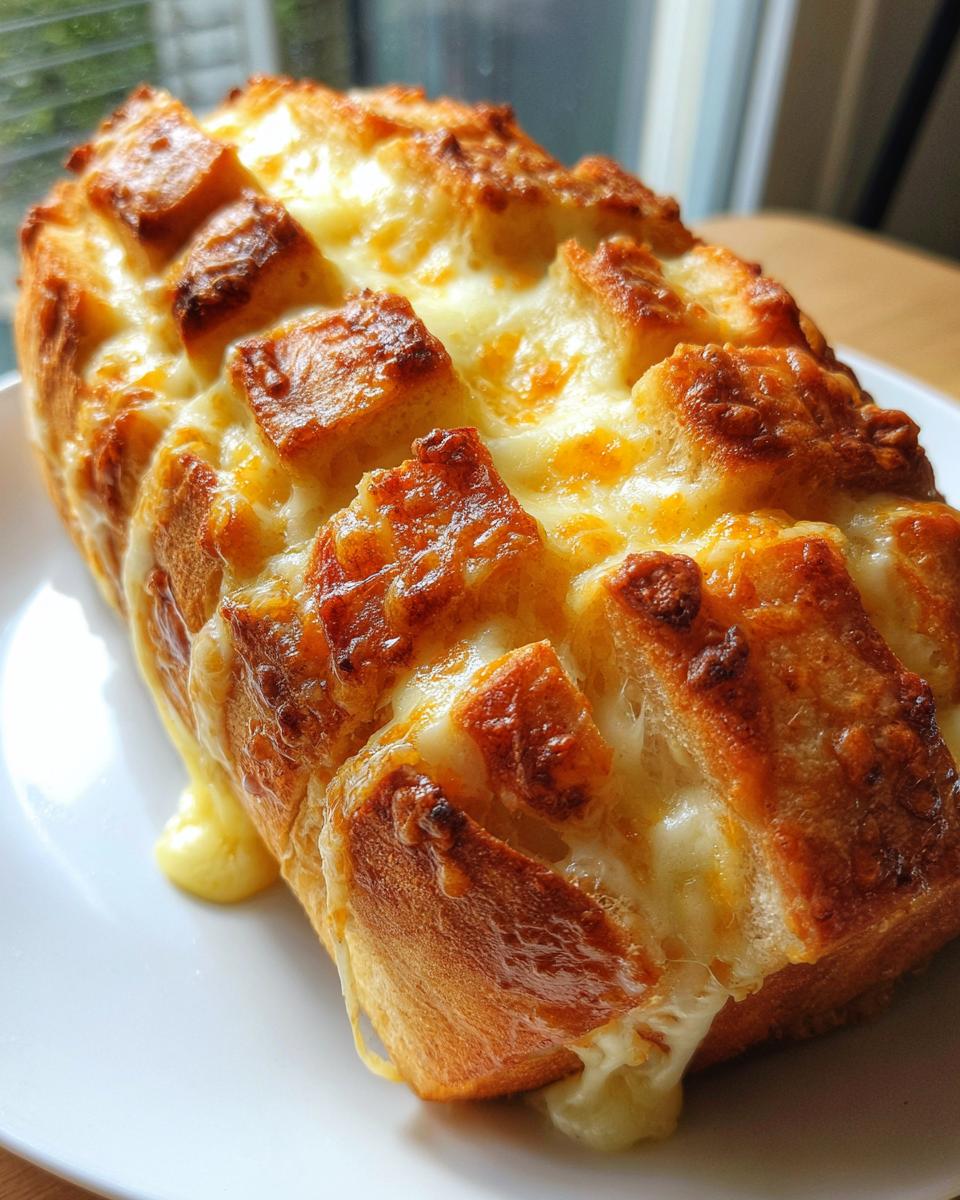
This step defines the “pull-apart” feature, so pay attention! Take your crusty loaf and start slicing it crosswise, but here is the secret: stop cutting about half an inch from the bottom crust. You are essentially slicing almost all the way through, but you must leave that bottom crust anchor intact. Then, turn the loaf and cut perpendicular slices just like before, creating that signature diamond or crisscross pattern. This keeps your loaf whole while creating deep pockets for the filling.
Baking Instructions: Wrapped vs. Unwrapped for Perfect Cheese Bread
Now, gently pry those cuts open—this is hard work, I know!—and spoon or even push that glorious garlic butter deep into every single crevice. Once buttered, stuff the shredded cheese generously into every gap, then wrap the whole thing tightly in aluminum foil. Bake it wrapped for 15 minutes. This traps the steam and melts that cheese perfectly. After 15 minutes, unwrap it carefully and let it bake for another 5 to 7 minutes until the top is golden brown and bubbly. A little crispness on top is essential!
Expert Tips for the Best Homemade Cheese Bread
I know this recipe is incredibly simple, but sometimes, pulling off the absolute best results for your Best Homemade Cheese Bread requires just one or two little extra steps. I always refer to my notes panel for these little flavor boosters because they take this from “good” to “serve this at every party” level.
For instance, when it comes to cheese, please, please opt for sharp cheddar if you can. That little extra bite cuts through the richness of the butter and garlic so nicely! I often pair this bread with something savory like my garlic parmesan chicken and potatoes because the mildness of the bread highlights the main dish.
Also, if you happen to have any extra melted butter sitting around after finishing the initial step, don’t waste it! Brush that extra richness over the top of the loaf halfway through the unwrapped baking time. It really helps that cheesy topping get extra bubbly and brown. For similar pull-apart inspiration, check out this brilliant garlic crack bread idea.
Serving Suggestions for Your Warm Cheesy Snack
Once this gooey goodness comes out of the oven, the question becomes: what should I serve it with? Because this cheesy bread is so rich and satisfying, it pairs beautifully with anything that needs a sturdy, flavorful partner. It’s truly the ultimate Warm Cheesy Snack for a movie night, but it steps up beautifully as a Dinner Side Bread, too.
When I make a big pot of soup, this bread is the required dipping tool! It’s amazing alongside something hearty and brothy, like a beautiful creamy sausage and gnocchi soup. The soup soaks right into the bread where the cheese hasn’t claimed all the territory.
If you are serving it as an appetizer at a party, keep the other snacks lighter since this bread is pretty filling. Maybe some veggie sticks or a bright, acidic dip to cut through the butter. For dessert later, keep things simple so everyone can enjoy the memory of that cheesy bread—maybe just some lovely Italian butter cookies.
Honestly, though, this bread is so good, it really doesn’t need much accompaniment. If you want to serve it alongside a saucier dish where you need something to mop up every last drop, this pull-apart style works perfectly. For some amazing inspiration on appetizers, take a look at this crack bread concept!
Storing and Reheating Your Leftover Cheese Bread
I truly hope you have leftovers, because that means the bread was a huge hit! But let’s be real—this cheesy bread is best right out of the oven when it’s piping hot and gooey. If you do manage to have some left over, you need to store it correctly so you can recapture that glory later on. Don’t just foil-wrap it loosely—that traps too much steam and makes it soggy.
The best method is to let it cool completely on the counter first. Once cooled, wrap the entire loaf tightly in plastic wrap, and then place that wrapped loaf into an airtight container or a heavy-duty zip-top bag. This traps enough moisture to keep the interior soft, but not so much that the crust dissolves. It generally stays great at room temperature for a day or maybe two.
Now for reheating! This is crucial. If you want to save that slightly crisp exterior, the microwave is absolutely your enemy here. Just one zap and it turns chewy and rubbery. Pop the foil-wrapped loaf back into a 350-degree oven for about 10 minutes. If you want that top incredibly crisp again, unwrap it for the last 3 minutes of heating time. That warm, buttery cheese bread coming out of the oven is almost as good as the first time!
If you are really pressed for time and only have one slice, you can use the microwave sparingly—maybe 15 seconds max—but honestly, the oven is worth the extra wait for that melty texture.
Variations on Classic Garlic Cheese Bread
One of the best things about starting with a fantastic base recipe, like this easy cheese bread, is how easily you can customize it! You don’t need to rewrite the whole thing; just swap out a couple of elements to create something totally new for your next gathering. I love having a few tricks up my sleeve so I never serve the same thing twice in a row.
Think about the flavors that complement garlic and mozzarella. This is where you can really get creative with spices or even textures. It’s all about building layers on that rich, buttery foundation.
Swap Out the Herbs for a Different Vibe
The recipe calls for standard dried Italian herbs, which are wonderful, but you can tailor the flavor profile based on what you’re serving alongside it. For example, if you’re craving something brighter, skip the Italian mix and use a teaspoon of dried dill and maybe a little bit of dried rosemary. This gives it an almost woodsy feel that is fantastic.
If you’re feeling bold, lean into that savory side by adding a pinch of smoked paprika to the butter mixture. Or, if you want something super fresh, you can always fold in a tablespoon of fresh chives right after you take the bread out of the oven while it’s still hot. This is how you turn a standard side into an Italian Herb Cheese Bread masterpiece! For more savory inspiration, check out my recipe for the ultimate cheesy sausage hash brown egg bake—it shares some of these comforting, savory notes.
Add-Ins for Extra Heartiness
If you need this Cheesy Pull Apart Bread to be substantial enough to stand on its own, you need protein! Pre-cooked bacon bits are incredibly easy to toss in with the cheese. Just make sure they are crispy before you stuff them in there so they don’t get soggy during baking.
Another great addition is finely chopped sun-dried tomatoes—the oil-packed kind works best. Drain them well and dice them small so they distribute evenly. They add a gorgeous pop of color and a salty, slightly acidic counterpoint to all that richness. Just mix them in with the cheese right before stuffing the loaf!
Experimenting with Your Cheese Selection
While the Cheddar/Mozzarella combo is my go-to for flavor and stretch, don’t be afraid to swap out one of those cups for something stronger. Pepper Jack turns this into spicy cheese bread instantly, which is amazing if you love a little kick. For a sharper, saltier flavor that screams “gourmet,” try Gruyère or aged white Cheddar.
Just remember that softer cheeses (like Monterey Jack) melt faster, and hard cheeses (like Parmesan) melt slower. If you use Parmesan, make sure you mix it with the butter so it has a chance to absorb some moisture before hitting the intense heat of the oven.
Frequently Asked Questions About Making Cheese Bread
I know you might have a few lingering questions, because when you are making something this comforting and delicious, you want it to be absolutely perfect! I’ve gathered the most common things people ask me when they are trying this recipe for the first time. Getting these little details right takes all the guesswork out of baking for you.
Don’t hesitate to test out variations once you master the basic technique. If you ever want to branch out into yeast doughs later, I have a fantastic one for a soft honey whole wheat bread that might interest you!
Can I use pre-shredded cheese for this cheese bread?
Oh, I really wish you could, but for this specific recipe, I strongly advise against it. Pre-shredded cheeses are coated in anti-caking agents, which is usually potato starch or cellulose. What this does is stop the cheese from melting into that wonderfully gooey, unified mass we are aiming for. It tends to make the cheese separate or look a little dry. Please, grate your block cheese fresh! It melts so much better and gives you that superior, melty effect every single time.
Can I prepare this Cheesy Pull Apart Bread ahead of time?
Yes! This is one of my favorite tricks for busy days. You can complete Step 1 through Step 4—that is, mix the garlic butter, cut the bread, butter the insides, and stuff it all with cheese. Once it’s fully assembled and stuffed, wrap the whole loaf tightly in foil and place it in the freezer. It freezes beautifully! When you are ready to bake it, just add about 10 minutes to the first covered baking time, maybe checking it closer to 25 minutes covered before unwrapping to brown.
What kind of bread works best for this cheese bread?
You want a loaf that has a sturdy crust but a relatively soft interior that can absorb all that butter. A French baguette is fantastic because it slices well and has great structure. A sturdy Italian loaf or even a thick sourdough works wonders too! Just avoid anything too soft or thin, like standard sandwich bread, because it will turn mushy once all that butter soaks in. We need structure to support being the Best Homemade Cheese Bread!
Share Your Comfort Food Bread Creations
Now that you have this foolproof, buttery, garlicky creation, I truly want to see it in your kitchen! Creating this cheese bread brings me so much joy, and seeing your successful bakes is the best part of my day. I know it’s going to be the highlight of whatever meal or gathering you bring it to.
Did this recipe earn five stars on your family rating chart? Don’t keep that success to yourself! If you loved how easy this was, please leave your star rating right below this post. It helps other home cooks trust the process here at Cookery Command.
And if you snap a picture of that amazing pull-apart action—the molten cheese stretches and the golden crust—I’d love for you to tag me on social media! Seriously, tag me! I’m always looking for ideas for what my readers pair their comfort food sides with. What did you serve this cheesy bread alongside? Was it soup? Pasta? Or just eaten all by itself?
Let me know in the comments! If you’re looking for other simple ideas to round out your appetizer spread, check out my guide to easy appetizers and snacks. Now go enjoy that warm, cheesy goodness!
PrintEasy Cheesy Pull-Apart Garlic Bread
Make this warm, buttery, and cheesy pull-apart bread. It is a simple appetizer or side dish perfect for any gathering.
- Prep Time: 10 min
- Cook Time: 22 min
- Total Time: 32 min
- Yield: 8 servings 1x
- Category: Appetizer
- Method: Baking
- Cuisine: American
- Diet: Vegetarian
Ingredients
- 1 loaf crusty bread (like French or Italian bread)
- 1/2 cup unsalted butter, softened
- 4 cloves garlic, minced
- 1 teaspoon dried Italian herbs
- 1/4 teaspoon salt
- 1 1/2 cups shredded cheese (Mozzarella and Cheddar blend recommended)
Instructions
- Preheat your oven to 350 degrees Fahrenheit. Prepare a baking sheet with parchment paper.
- In a small bowl, combine the softened butter, minced garlic, Italian herbs, and salt. Mix until you have a smooth garlic butter.
- Take the loaf of bread and cut deep, crosswise slices, stopping about half an inch from the bottom crust so the loaf stays intact. Cut perpendicular slices to create a diamond or crisscross pattern.
- Gently open the cuts in the bread and spread the garlic butter mixture deep into the crevices. Use a spoon or knife to push the butter down into the cuts.
- Stuff the shredded cheese generously into all the cuts and over the top of the loaf.
- Wrap the entire loaf tightly in aluminum foil.
- Bake for 15 minutes wrapped in foil to melt the cheese thoroughly.
- Unwrap the foil and bake for an additional 5 to 7 minutes, or until the top is golden brown and bubbly.
- Let the bread cool for 5 minutes before serving warm. Instruct your guests to pull apart the pieces.
Notes
- Use sharp cheddar cheese for a stronger flavor profile in your homemade cheese bread.
- For extra richness, brush the top with melted butter halfway through the unwrapped baking time.
- This recipe works well as a dinner side bread or a party cheese bread appetizer.
Nutrition
- Serving Size: 1 slice
- Calories: 240
- Sugar: 1
- Sodium: 350
- Fat: 16
- Saturated Fat: 9
- Unsaturated Fat: 7
- Trans Fat: 0
- Carbohydrates: 18
- Fiber: 1
- Protein: 8
- Cholesterol: 40