
You know, sometimes you want that incredible, seared tuna steak you get at a fancy spot, but you really only have about fifteen minutes before you need to sit down for dinner. That feeling—wanting big flavor and professional results without turning weeknight cooking into a huge ordeal—is exactly what built Cookery Command. I’m Emily, and I believe that beautiful, high-quality seafood shouldn’t feel complicated. That’s why this pan-seared tuna steak recipe is my absolute go-to. We use one simple, high-heat technique to create that beautiful dark crust while keeping the center perfectly tender. Trust me, you’re going to be shocked at how easy it is to achieve that beautiful restaurant style tuna look right on your stovetop.
- Why This Pan-Seared Tuna Steak Recipe Works Every Time
- Ingredients for the Perfect Tuna Steak with Garlic Herb Butter
- Equipment Needed for a Restaurant Style Tuna Steak
- How to Prepare Your Tuna Steak: Step-by-Step Searing Instructions
- Tips for the Best Seared Tuna Steak Results
- Variations: Blackened Tuna Steak and Other Flavor Profiles
- Serving Suggestions for Your Tuna Steak Dinner
- Storage and Reheating Instructions for Leftover Tuna Steak
- Frequently Asked Questions About Cooking Tuna Steak
Why This Pan-Seared Tuna Steak Recipe Works Every Time
If you’ve ever struggled with tuna that ends up dry or mushy, I get it. Cooking fish perfectly can feel intimidating! But the success of this seared tuna steak recipe boils down to two non-negotiable steps: making sure that surface is bone-dry and cranking the heat up past medium. This method gives us that amazing, savory crust you expect from a professional kitchen, all while keeping the interior buttery and tender. It’s pure technique, not magic, and that’s the kind of cooking I love to teach at Cookery Command. It just flat-out works.
- It’s seriously fast—total time is under fifteen minutes!
- You get that desirable, dark restaurant-quality crust.
- It delivers fantastic protein in a healthy, low carb tuna meal.
Quick Prep & Cook Time for Your Easy Tuna Dinner
Seriously, look at those numbers: 5 minutes prep and only 5 minutes cooking! This is the definition of an easy tuna dinner. You barely have time to wash your hands before you’re plating up a gourmet meal. It’s the perfect quick seafood recipe for when you need something impressive fast, maybe even for a busy weeknight when you don’t want to compromise on quality.
Ingredients for the Perfect Tuna Steak with Garlic Herb Butter
When we talk about achieving that melt-in-your-mouth center, the quality of what you start with matters so much. For this recipe, I need nice, thick cuts—aim for about an inch thick when you buy your tuna steak. Thick steaks can handle the high heat needed for a good sear without overcooking the middle. Beyond the fish itself, the magic really comes from the fresh additions for that incredible sauce. Here’s what you’ll need:
- 2 (6-ounce) tuna steaks, about 1 inch thick
- 1 tablespoon olive oil (use one with a high smoke point!)
- 1/2 teaspoon salt
- 1/4 teaspoon black pepper
- 4 tablespoons unsalted butter
- 2 cloves garlic, minced finely
- 1 tablespoon fresh parsley, finely chopped
- 1 teaspoon fresh thyme leaves
Ingredient Notes and Flavor Substitutions
Don’t skimp on the fresh herbs here; dried parsley just won’t give you that bright pop when it hits the butter, you know? Also, I always season generously right before the fish hits the pan—no earlier. If you’re feeling like switching gears and moving away from the garlic butter toward something a little more Asian-inspired, you can skip the butter and herbs entirely. Instead, after the sear, just toss in 2 tablespoons of soy sauce, 1 teaspoon of fresh grated ginger, and 1 teaspoon of honey. Basting with that soy ginger tuna mixture in the last minute is just heavenly.
Equipment Needed for a Restaurant Style Tuna Steak
Okay, let’s talk gear for a second, because this is where a lot of people get tripped up when they try to make amazing tuna steak at home. You don’t need a giant arsenal of fancy gadgets, but you do need the *right* pan. If you want that beautiful, dark, mahogany crust that screams restaurant style tuna, you absolutely need heavy metal on that stovetop. That means a cast iron skillet is my top recommendation, hands down.
A cast iron pan holds high heat beautifully and distributes it evenly across the bottom. When you put olive oil in that screaming-hot pan, you want the oil to stay hot even when the cold fish hits it. If your pan isn’t heavy enough, the temperature drops too fast, and you end up steaming your gorgeous fish instead of searing it—and nobody wants that sad, pale tuna!
So, here’s the short, essential list. Don’t feel overwhelmed; this is simple stuff:
- A heavy-bottomed skillet (Cast iron is the best for searing!)
- Tongs (Don’t use a fork, you’ll pierce the fish!)
- Paper towels (These are absolutely critical for drying the surface!)
- A spoon for basting once the butter hits the pan.
Gathering these few things before you even start prepping the fish makes the cooking process feel calm, confident, and totally under control. You’ve got this!
How to Prepare Your Tuna Steak: Step-by-Step Searing Instructions
Now that the gear is ready and the ingredients are out, let’s get cooking! Remember, this isn’t like cooking chicken; this tuna steak recipe moves fast. The goal here is a gorgeous, opaque crust on the outside and a cool, almost raw center. Think of it as cooking the fish in two distinct zones. First, we focus everything on that sear. Second, we introduce the flavor. If you happen to be planning on making a dipping sauce later, our easy 5-minute creamy garlic aioli goes just perfectly with this fish.
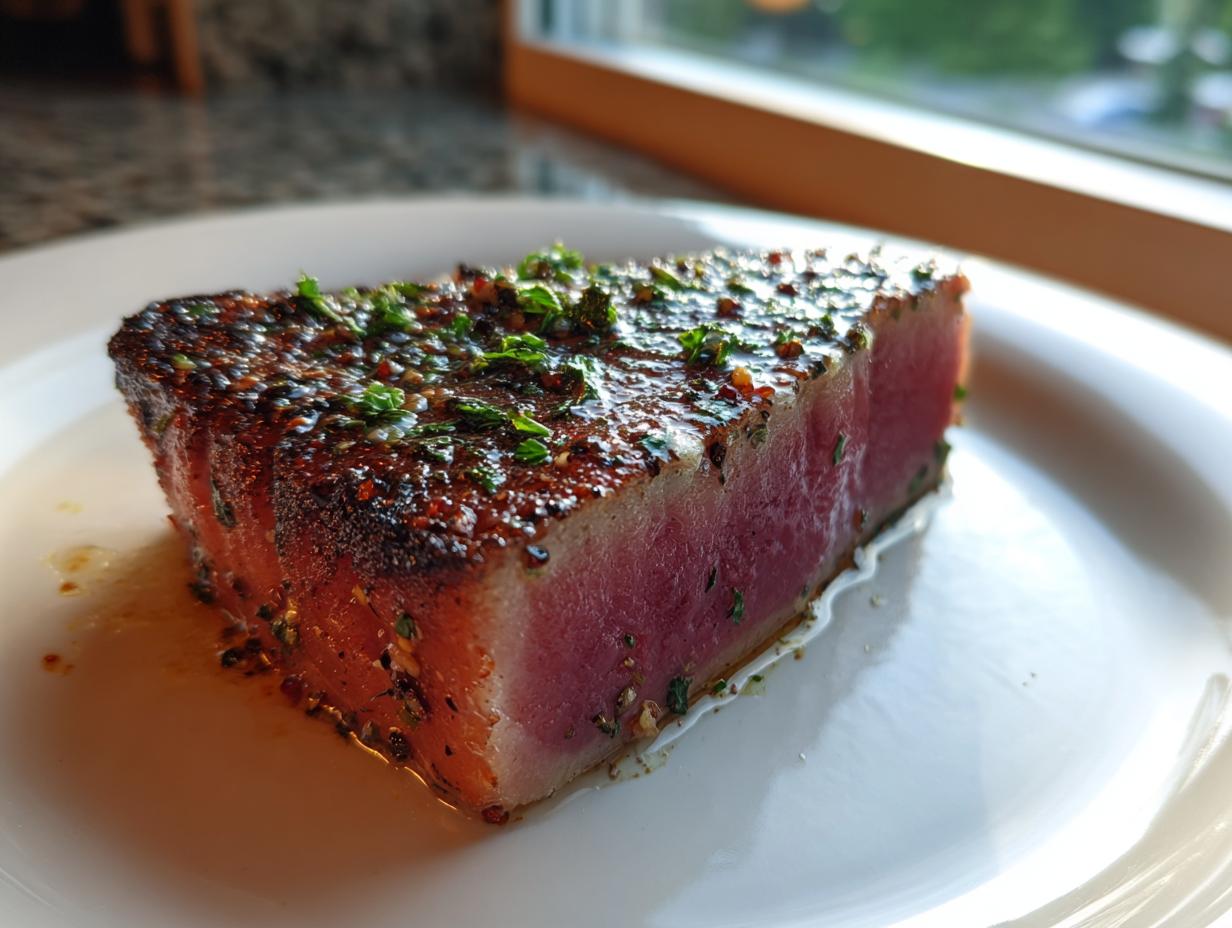
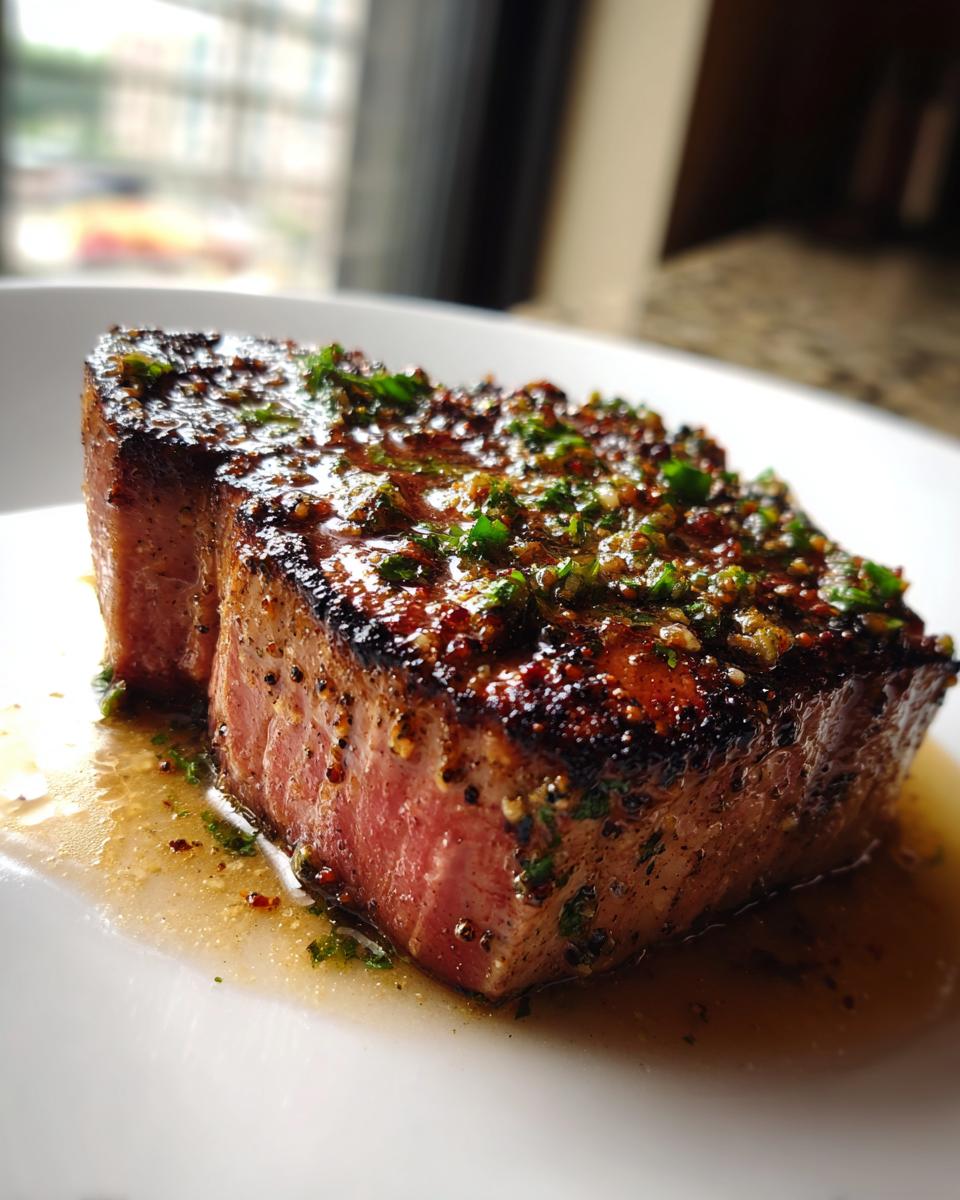
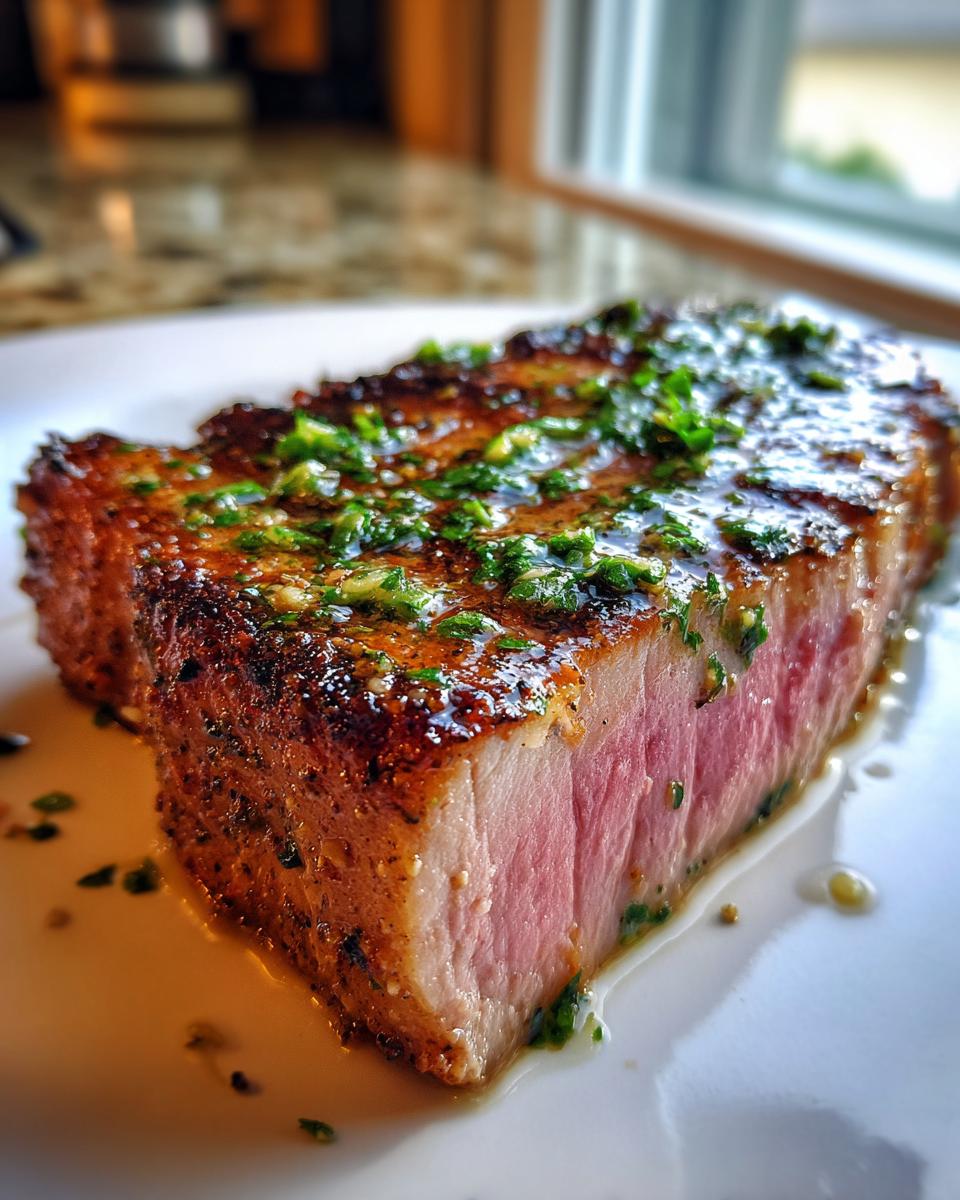
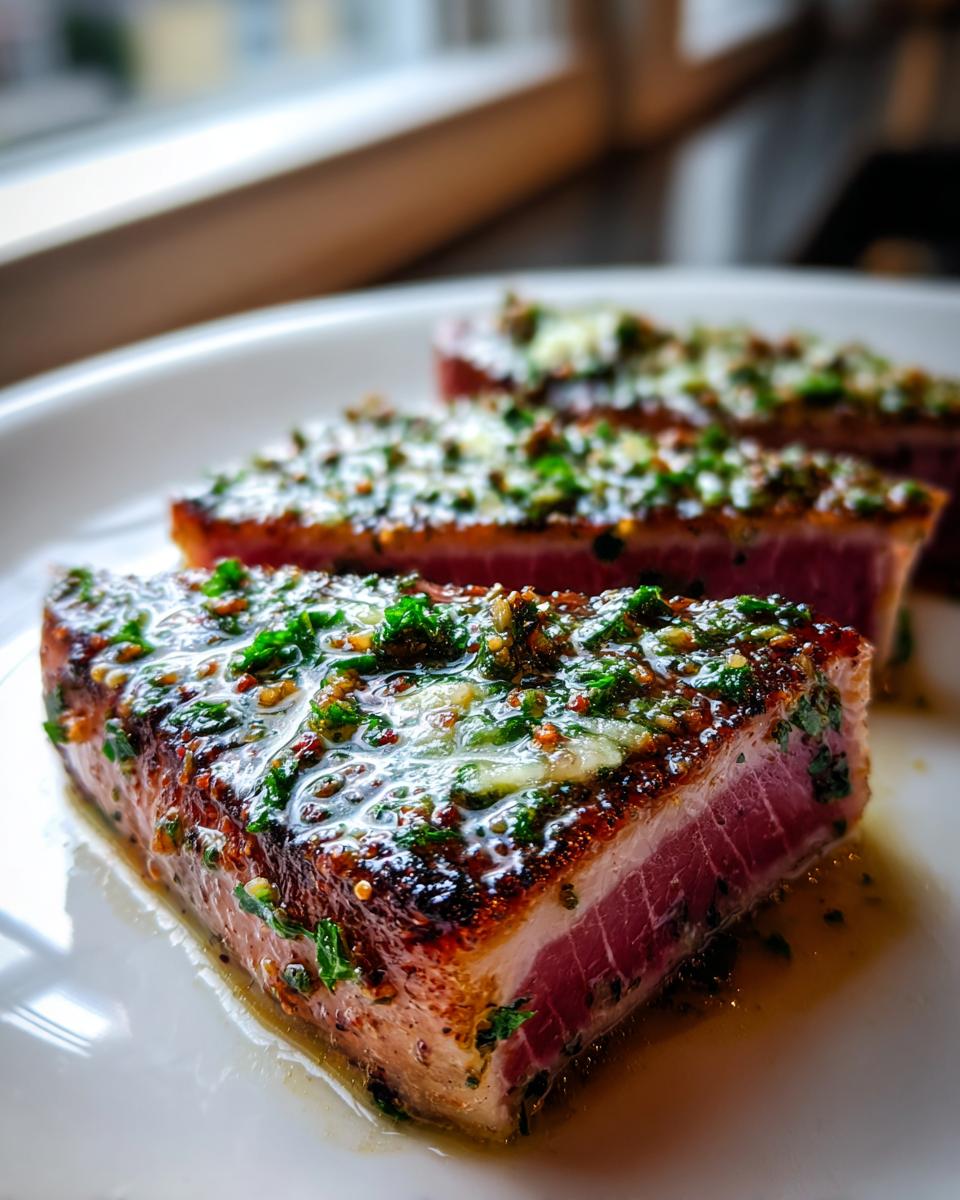
First things first: take those beautiful steaks and pat them down. I mean *really* pat them. Use a thick stack of paper towels and get every drop of surface moisture gone. Moisture is the enemy of a good sear! Once dry, hit both sides with salt and pepper. Don’t be shy with the seasoning.
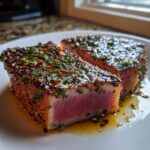
Next, get that heavy skillet ripping hot over high heat. Add your oil—it should shimmer or just maybe start to smoke a tiny bit before you gently lay the tuna in. Don’t drop it; place it away from you. This is our initial sear phase. After about a minute and a half, you’ll see a lovely crust starting to form on the bottom edge. Resist the urge to peak or move it around! We want stillness for that perfect crust.

The Critical Step: Achieving the Perfect Tuna Steak Sear
For a typical one-inch thick tuna steak aimed at that perfect rare center, I go for 1.5 to 2 minutes per side on screaming-hot dry heat. If you push it past two and a half minutes per side, you start sacrificing that juicy interior. If you’re worried, use a quick-read thermometer—aiming for 120°F internally gives you that ideal tender tuna steak texture. Once you flip it, immediately drop the heat down to medium-low, because the next step requires flavor, not brute force high heat.
Basting with Garlic Herb Butter for Maximum Flavor
Once the heat is lowered, drop in your butter right alongside the steaks. As that beautiful, fragrant butter melts and foams up, toss in your minced garlic, parsley, and thyme. Tilt that pan gently toward you so the butter pools up, and take a spoon and just start scooping that melted, herby goodness over the top of the fish. Do this continuously for maybe 30 seconds. This basting coats the top of the steak with all that flavor from the garlic butter tuna goodness we created. Don’t leave it too long, though! As soon as it looks glazed, scoop the steaks out immediately and put them on a cutting board to rest.
Tips for the Best Seared Tuna Steak Results
We’ve seared it and we’ve basted it, but now comes the moment where home cooks often sabotage their efforts—don’t rush the rest! If you slice into that beautiful tuna steak the second it comes off the heat, all those delicious juices you worked so hard to keep inside will just run out onto your cutting board. That is a tragedy, my friends. You need to let the fish relax for at least three minutes. Think of it as letting the internal structure settle down after that intense blast of heat.
When you do finally slice it, make sure you’re cutting against the grain. Look closely at the lines of the muscle fibers in the fish and slice perpendicular to them. This shortens those fibers right up, which is what guarantees you get that incredibly melt-in-your-mouth, tender tuna steak experience we are aiming for. It really makes all the difference between chewing and just enjoying the flavor!
Pro tip: This high-heat searing technique transfers beautifully if you want to try a grilled tuna steak next time! Just make sure your grill grates are clean and very, very hot before laying that seasoned fish down. If you’re looking for ideas on boosting flavor *before* it even hits the pan or grill, you absolutely have to check out my guide on a great 30-minute soy-citrus marinade. It takes things up a notch!
And hey, if you want a little more reading on getting that perfect crust just like the pros do it, I highly recommend checking out the tips found over at Simple Glow Meals. They have some fantastic confirmation on getting that flawless sear outside of this garlic butter recipe, which is always useful to know!
Variations: Blackened Tuna Steak and Other Flavor Profiles
While my heart belongs to the rich, simple flavor of that garlic herb butter, I know some of you love a bit of heat! That’s why it’s essential that this basic pan seared fish technique is adaptable. If you’re craving something bold, let’s talk about turning this into a killer blackened tuna steak. It uses the exact same high-heat searing method, but we swap out the salt and pepper for a robust spice blend.
To do this one, you need a good quality Cajun or Blackening seasoning. Don’t just use plain paprika; you want that cayenne kick and smokiness! Pat your tuna super dry—this is even *more* important for blackening, as the spices need a dry surface to cling to. Press that seasoning blend firmly into both sides of the steak until it’s completely coated in a dark crust of spice.
Now, here’s the quick change for the cooking: when you put the steak into the shimmering hot oil, you have to watch it like a hawk. Blackening spices tend to burn faster than plain salt and pepper, so reduce the cook time slightly—maybe 90 seconds per side for rare. You’ll get this incredible, spicy exterior that’s absolutely dynamite. If you’re looking for other ways to move away from seafood while keeping a fast, flavorful skillet meal going, you might enjoy my bright coconut lime chicken skillet recipe!
And if you want the absolute best, most foolproof guidance on getting that spicy, crusted exterior that makes blackened tuna steak so famous, seriously dive into the steps shared by the folks at Viral Cooking. They really nail that specific crust technique, which is great knowledge to have in your back pocket when you’re whipping up an easy tuna dinner!
Serving Suggestions for Your Tuna Steak Dinner
So you’ve got this gorgeous, perfectly seared tuna steak resting on the board, smelling like heaven via that garlic butter. Now what? Since this whole dish comes together in minutes, you need sides that can keep up with that lightning pace! We aren’t looking for something that takes 45 minutes in the oven; we want vibrancy, freshness, and maybe something that keeps those carbs low since this is such an inherently healthy tuna recipe.
For me, the best approach is usually something green and light to cut through the richness of the butter or whatever glaze you used. If you need something incredibly fast and easy, you can’t beat perfectly steamed vegetables. My recipe for perfectly steamed broccoli with a lemon herb drizzle is ready in the time it takes your tuna to rest—seriously! It keeps things green, crisp, and fits perfectly within any low carb tuna meal plan.
If you want something with a little more zing and texture, a fresh salad is always a winner. I love throwing together my family’s 15-minute authentic Greek salad. The tang from the onions and the salty feta are phenomenal companions to that mildly rich fish. It feels gourmet, but it takes no time at all.
Remember, you can serve this hot, sliced on top of a big salad, or even let it cool slightly and use the leftovers cold the next day sliced over greens. If you’re looking for a huge variety of ideas—from roasted potatoes to tangy slaws—to pair with your seafood, you should definitely browse the amazing inspiration collected by the folks at Foodiosity for tons of pairing options.
Storage and Reheating Instructions for Leftover Tuna Steak
Ah, leftovers! Because this tuna steak recipe cooks so quickly and aims for that beautiful rare center, dealing with leftovers requires a little special attention. Unlike chicken or beef, reheating seared tuna is tricky business. My biggest piece of advice, and please internalize this, is: Do not try to reheat it! If you toss that beautiful, slightly pink steak back into a hot pan or microwave it, you’re going to go straight from ‘tender’ to ‘rubbery shoe leather’ in about ten seconds flat. We are just not going back there.
So, how do you enjoy those extra portions? The best thing you can do is embrace it cold! Leftover tuna is absolutely fantastic sliced thinly over a fresh salad the next day. Think of it like high-quality canned tuna, but way, way better, since it’s already been seasoned with that lovely garlic herb flavor.
If you absolutely must warm it up for cozy comfort food vibes, you have to be extremely gentle. I mean surgical precision gentle! The goal isn’t to cook it more; it’s just to take the chill off. You can try briefly dipping the slices into a shallow pan of barely simmering broth or even just letting them sit for a minute or two on a plate set over a pot of barely simmering water—like a tiny makeshift steamer. That gentle warmth is enough to make the flavors pop again without ruining the texture.
When storing, always keep your leftover tuna steak in an airtight container in the fridge. It should hold up well for about two days if it was properly cooled right after you finished your first meal. Just remember, the magic of this dish is its quick cook time, which means leftovers are best served chilled or slightly warmed, never aggressively reheated. Keep that tender center intact!
Frequently Asked Questions About Cooking Tuna Steak
I get so many questions after people try this recipe for the first time—which is great! It means you guys are cooking! Mastering how to cook tuna steak is really about understanding how quickly this fish cooks. It’s leaner than beef, so it demands a bit more respect in the pan. Whether you’re using fresh or frozen, a few core concepts will always lead you to that incredible, tender result, whether you are searing it or grilling it.
Here are some of the questions I hear most often about getting restaurant-quality results for your tuna steak recipe at home, especially if you are working with Ahi!
What thickness is best for a perfect seared tuna steak?
This is crucial! You want slabs that are at least one inch thick, but ideally inch-and-a-quarter. If the steak is too thin, say half an inch, by the time you get a decent sear—that gorgeous dark crust—the entire inside will be cooked through and hard. We want that contrast! Thicker cuts allow you to blast the outside on high heat for literally just a minute or two per side while leaving the center cool and pink. That thickness is the secret weapon for any great ahi tuna recipe.
Can I use frozen tuna steaks for this recipe?
You absolutely can, as long as you thaw them correctly! Never try to sear a partially frozen tuna steak; it will steam for sure. The best way to thaw is to always use the refrigerator method. Place the vacuum-sealed steaks in the fridge the night before you plan to cook them. If you’re in a pinch, you can use the cold-water method: seal the steaks in a leak-proof plastic bag and submerge that bag in a bowl of cold tap water, changing the water every 30 minutes until thawed. Once thawed, though, you must proceed immediately to drying them thoroughly with paper towels before seasoning!
What if I don’t have a cast iron skillet? Can I still get a good sear?
I really, really push for cast iron because it just holds heat like nothing else, but if you don’t have one, use the heaviest stainless steel skillet you own. The key again is the heat saturation. Heat the pan completely empty over high heat until you almost think it’s too hot—then add the oil. If you use a thin aluminum pan, you risk the heat dropping too much when the fish goes in, resulting in steaming rather than true searing. Just be ready to watch closely since non-cast iron can sometimes transfer heat a little unevenly.
What internal temperature means a perfect tuna steak?
If you are using a thermometer—and I highly recommend one for confidence—you are aiming for the difference between a hot sear and a warm center. For a perfect rare or tender tuna steak, pull it off the heat when your thermometer reads 120°F. That residual heat will carry it up a few degrees, leaving you with that lovely, cool, pink center. If you push it past 130°F, you’re moving into medium territory, and honestly, for tuna, that’s just too firm for my taste. We want the least amount of cooking possible while still getting that crust!
When you’re looking for other great seafood recipes that cook quickly, you might want to check out my technique for making crab and shrimp stuffed salmon—it uses similar principles of high heat to keep the inside moist!
Can I grill this recipe instead of pan-searing?
Yes! The flavor profile—especially if you use a marinade instead of the quick butter—is fantastic on the grill. If you decide to try a grilled tuna steak, make sure your grates are absolutely spotless and oiled well to prevent sticking. You’ll want to grill over very high direct heat, roughly 2 minutes per side for rare, just like searing. The main difference is you won’t get that all-over crust you get from the flat surface of a skillet, but you will get those beautiful, caramelized grill marks!
PrintPerfect Pan-Seared Tuna Steak with Garlic Herb Butter
Create restaurant-style tuna steaks at home using this simple pan-searing method. This recipe features a rich garlic herb butter that coats the tender, perfectly cooked fish.
- Prep Time: 5 min
- Cook Time: 5 min
- Total Time: 13 min
- Yield: 2 servings 1x
- Category: Dinner
- Method: Pan Searing
- Cuisine: American
- Diet: Low Fat
Ingredients
- 2 (6-ounce) tuna steaks, about 1 inch thick
- 1 tablespoon olive oil
- 1/2 teaspoon salt
- 1/4 teaspoon black pepper
- 4 tablespoons unsalted butter
- 2 cloves garlic, minced
- 1 tablespoon fresh parsley, chopped
- 1 teaspoon fresh thyme leaves
Instructions
- Pat the tuna steaks completely dry using paper towels. Season both sides evenly with salt and pepper.
- Place a heavy-bottomed skillet, such as cast iron, over high heat. Add the olive oil. The oil should shimmer slightly before adding the fish.
- Carefully place the tuna steaks in the hot skillet. Sear for 1.5 to 2 minutes per side for rare to medium-rare, achieving a dark crust. Adjust time based on desired doneness.
- Reduce the heat to medium-low. Add the butter to the skillet. As the butter melts, add the minced garlic, parsley, and thyme.
- Tilt the pan slightly and use a spoon to continuously baste the melting garlic herb butter over the top of the tuna steaks for about 30 seconds.
- Remove the tuna steaks immediately from the pan and place them on a cutting board. Let them rest for 3 minutes before slicing against the grain.
Notes
- For a restaurant-style result, ensure your pan is very hot before adding the oil and fish. This creates the necessary crust quickly.
- If you prefer a soy-ginger flavor profile, substitute the garlic herb butter with 2 tablespoons of soy sauce, 1 teaspoon of grated fresh ginger, and 1 teaspoon of honey mixed together, basting the fish with this glaze in the last minute of cooking.
- Tuna cooks fast. Use an instant-read thermometer if you are unsure; 120°F is ideal for rare.
Nutrition
- Serving Size: 1 steak
- Calories: 320
- Sugar: 0.5
- Sodium: 350
- Fat: 18
- Saturated Fat: 9
- Unsaturated Fat: 9
- Trans Fat: 0
- Carbohydrates: 1
- Fiber: 0
- Protein: 38
- Cholesterol: 75