
Oh, if there’s one thing that smells like pure, unadulterated autumn comfort, it’s the scent of cinnamon and frying apples! Seriously, nothing beats cracking into a fresh, hot batch of apple fritters. But let’s be honest, most recipes result in greasy hockey pucks or apples that have completely dissolved into mush. That’s where we step in! Our goal is simple: we want you to nail that bakery-style texture—crispy and golden on the outside, wonderfully tender and fluffy inside—every single time, right on your own stovetop. Our founder, Emily Harrison, spent years in professional test kitchens learning exactly what makes baked goods fail or succeed, and she poured all that technical know-how into this classic recipe so you never have a flop.
- Why This Is the Best Apple Fritters Recipe You Will Make
- Gathering Ingredients for Classic Apple Fritters with Glaze
- How to Make Easy Apple Fritter Recipe Instructions
- Crafting the Signature Apple Fritters with Glaze
- Alternative Methods: Baked Fritters and Air Fryer Apple Fritters
- Tips for Success: Mastering Homemade Apple Fritters
- Storage and Reheating Instructions for Leftover Treats
- Frequently Asked Questions About Apple Fritters
- Serving Suggestions for Your Sweet Apple Treats
- Serving Suggestions for Your Sweet Apple Treats
Why This Is the Best Apple Fritters Recipe You Will Make
If you’ve ever been disappointed by soggy, heavy fritters, I get it! That is why I put so much work into perfecting this recipe. This isn’t just another batch of homemade apple fritters; this is the best apple fritters recipe because it uses a tried-and-true technique developed right here at Cookery Command. We focus on guaranteed results, ensuring you get that incredible contrast: shatteringly crisp edges framing a light, fluffy center bursting with warm apple flavor. You deserve homemade treats that taste better than the ones you buy, and I promise this one delivers. If you love this technique, you might want to check out my recipe for apple pie filling—it uses similar principles!
Achieving Crispy Apple Fritters Texture Every Time
Listen to me on this one point: oil temperature dictates everything when we talk about crispy apple fritters. If your oil dips even slightly below 360 degrees Fahrenheit, you’re letting the batter soak up fat instead of instantly crisping up. That’s the secret to avoiding greasy results! Make sure you use a reliable thermometer—I know it sounds overly technical, but trust me, keeping that heat steady is the non-negotiable step for success. It’s this precision that allows us to transform simple pantry ingredients into truly remarkable treats.
Gathering Ingredients for Classic Apple Fritters with Glaze
Okay, let’s talk about getting everything ready! Having your ingredients lined up—what we call *mise en place* in my test kitchen days—is half the battle won, especially when deep frying. You want everything measured out so you can move fast once that oil hits the right temperature. Making these apple fritters with glaze is super straightforward once the shopping’s done. Here is everything you’ll need for about 10 to 12 glorious treats:
- For the Fritter Batter:
- 2 cups all-purpose flour (no need for fancy stuff here!)
- 2 teaspoons baking powder (this gives us that needed lift)
- 1 teaspoon ground cinnamon (shake it in!)
- 1/2 teaspoon salt
- 1/4 cup granulated sugar
- 1 large egg, lightly beaten
- 1/2 cup milk
- 1 teaspoon vanilla extract
- 2 medium apples, peeled, cored, and diced small
- Vegetable oil, for frying (use a neutral oil with a high smoke point!)
- For the Vanilla Glaze:
- 1 cup powdered sugar
- 2 tablespoons milk
- 1/2 teaspoon vanilla extract (yes, more vanilla, it’s worth it!)
Ingredient Notes and Apple Selection for Apple Fritters
The apples are the star, right? Don’t just grab any apple off the counter. Since we are frying, we need an apple that is firm enough to hold its shape and toss in a little tartness to cut through that sweetness. My go-to recommendation for the best apple fritters recipe is the Granny Smith. They are tart, they are crunchy when raw, and they stay wonderfully toothsome even after a short swim in hot oil, preventing those dreaded mushy apple fritters.
If you happen to only have sweeter apples, like Honeycrisp, that’s okay! Just use slightly less sugar in the actual batter, or think about adding just a tiny splash of lemon juice to the diced apples to mimic that tart tang. You want the apple pieces to be small—think tiny dice, not huge chunks—so they distribute evenly throughout the batter and you get apple in every bite.
How to Make Easy Apple Fritter Recipe Instructions
Alright, deep breaths. This is where the magic happens, and honestly, making these easy apple fritter recipe steps is fast, maybe 15 minutes prep total! Because we are deep frying, we have to be smart about how we combine things. Remember everything we talked about regarding texture? That starts right now.
First, grab your wet ingredients (egg, milk, vanilla) and whisk them gently in one bowl. In your large bowl, you already have your dry ingredients whisked, right? Now, pour that wet mix right into the dry. Here’s the crucial part for getting those beautiful, fluffy apple fritters, so pay close attention!
Mixing the Batter for Fluffy Apple Fritters
You absolutely, positively cannot overmix this batter. I mean it! If you grab a whisk and stir until everything looks perfectly smooth, you’re developing the flour’s gluten. Gluten is lovely in bread, but it makes fritters tough and chewy instead of light and airy. We want lumps! We want streaks! Mix it just until the flour mostly disappears—maybe 10 or 12 gentle strokes with a spatula. A few pockets of dry flour are totally fine because the apples are going in next, and they’ll help finish the job.
Once the batter is barely mixed, gently fold in those diced apples. Use a folding motion, not a stirring one, until the apples are kind of just suspended in the thick batter. Seriously, stop mixing the second you see the last bit of dry flour disappear. That’s how we get those light, ethereal, *bakery-style* textures!
Frying Technique for Perfect Apple Fritters
Now for the oil. You need a good 2 inches of a neutral oil—vegetable or canola works great—in a heavy-bottomed pot. Using your thermometer (yes, you need one for this!), heat the oil slowly until it hits a steady 360 degrees Fahrenheit. If you’re worried about temperature spikes, check out these tips on cinnamon butter I wrote about; managing heat is always key!
Once that temperature is locked in, you carefully drop spoonfuls of the batter right into the oil. Don’t try to make them neat circles! These are supposed to look rustic and irregular—that’s what makes a traditional apple fritter! Fry them for about 2 to 3 minutes on the first side until they look deep golden brown. Flip them carefully using tongs or a slotted spoon, and fry the second side for another 2 minutes. They cook fast! As soon as they come out golden, pull them out immediately using the slotted spoon and set them right onto a wire rack lined with paper towels. Dab them gently to soak up the excess oil, but resist the urge to press them flat, or you’ll deflate all your hard work. If you want more detailed frying secrets, check out this guide on apple fritters.
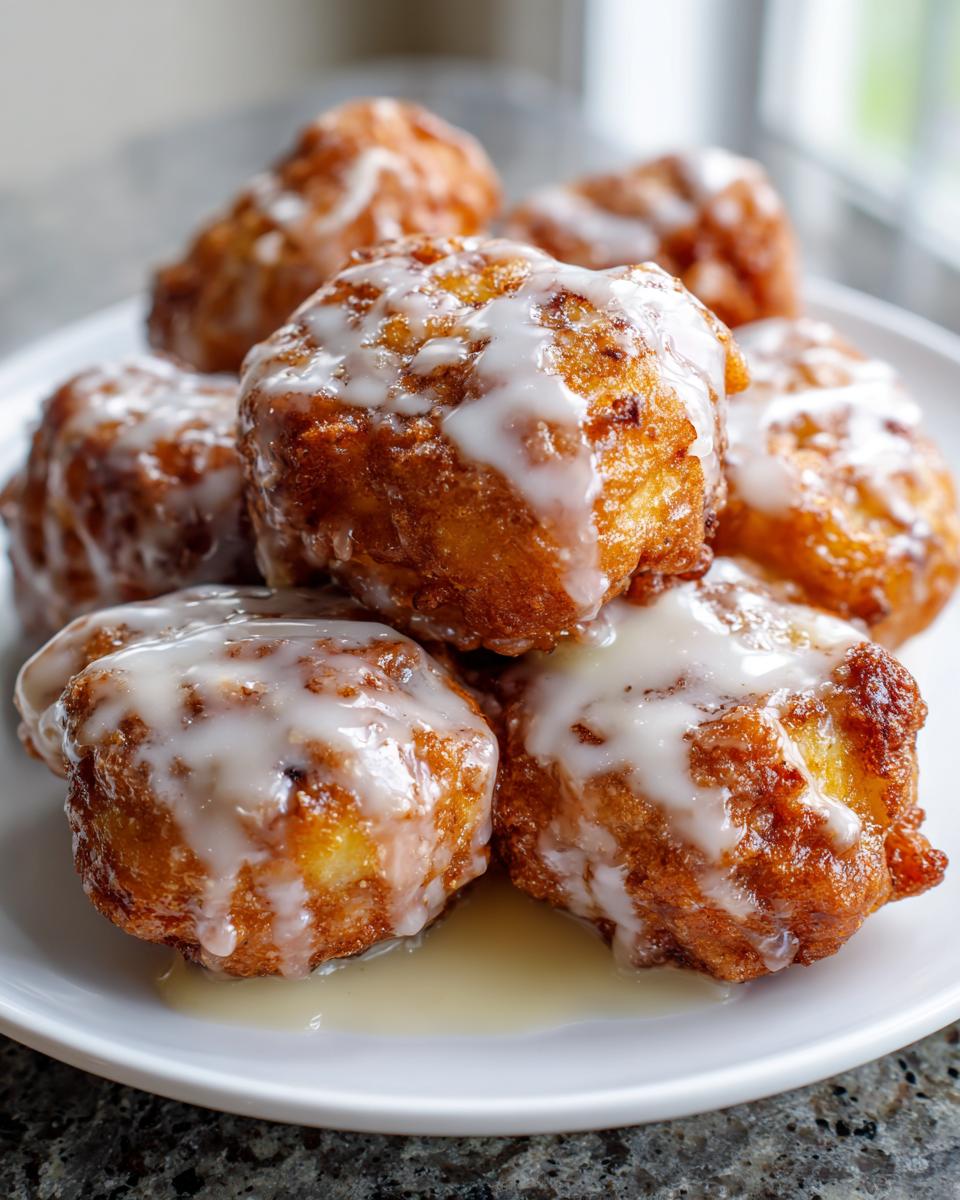
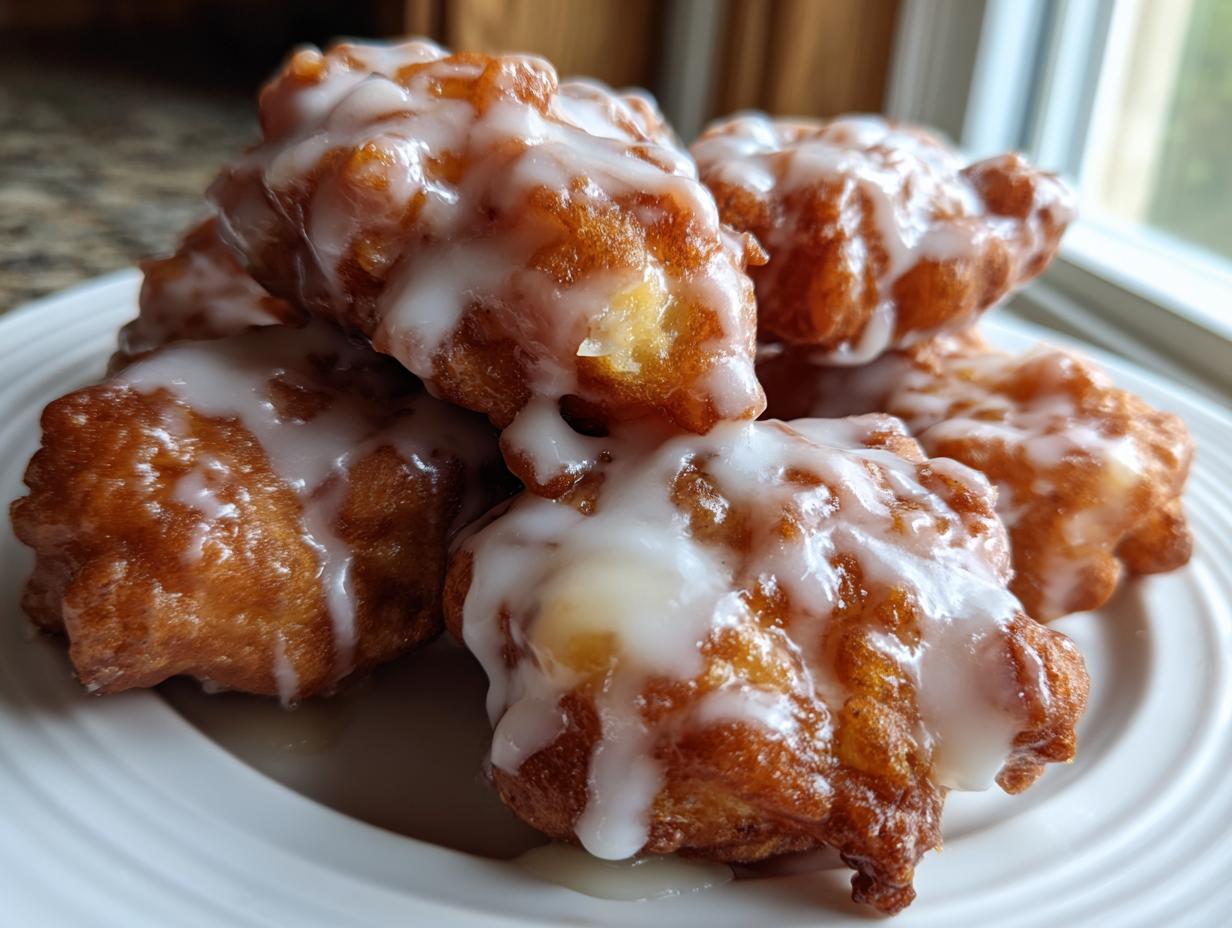
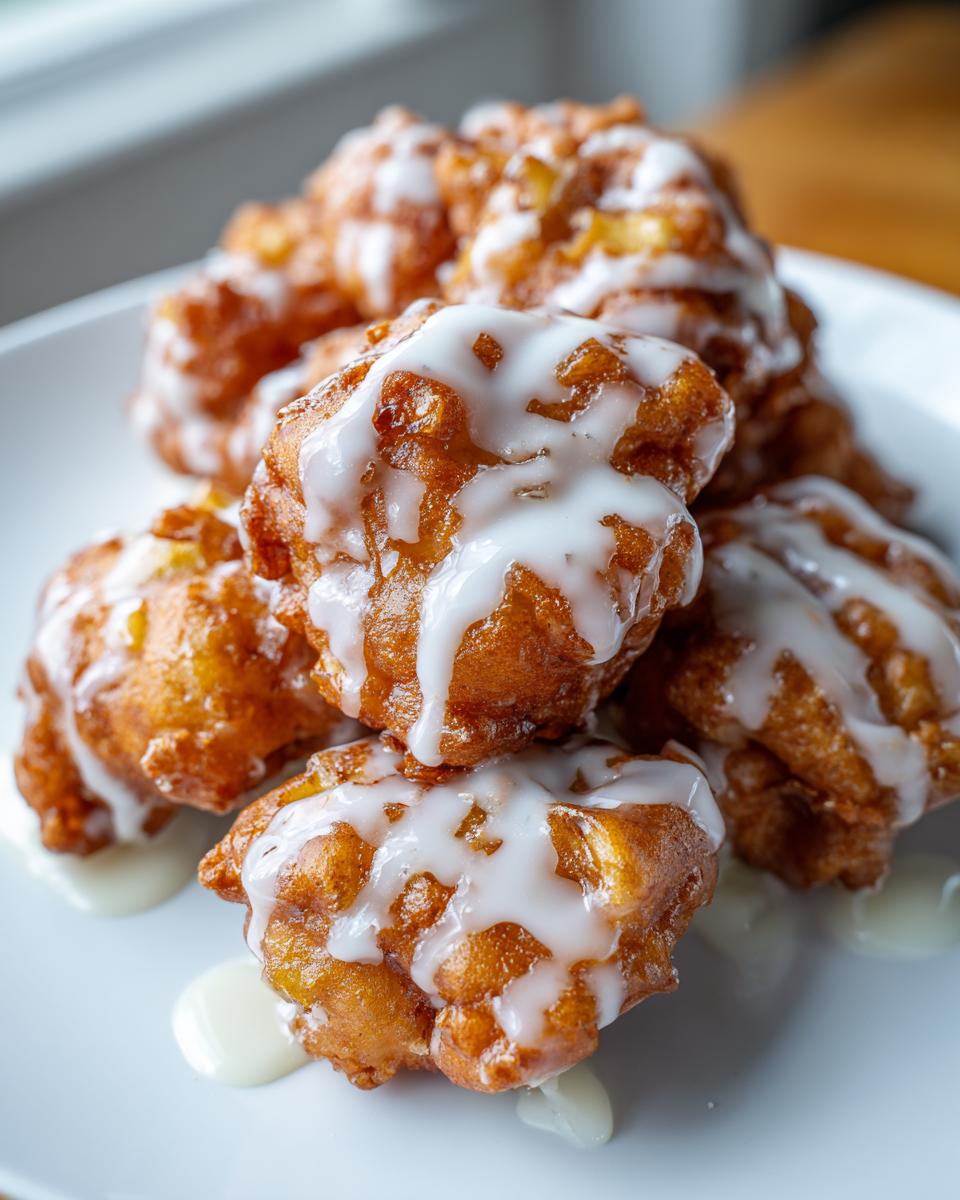
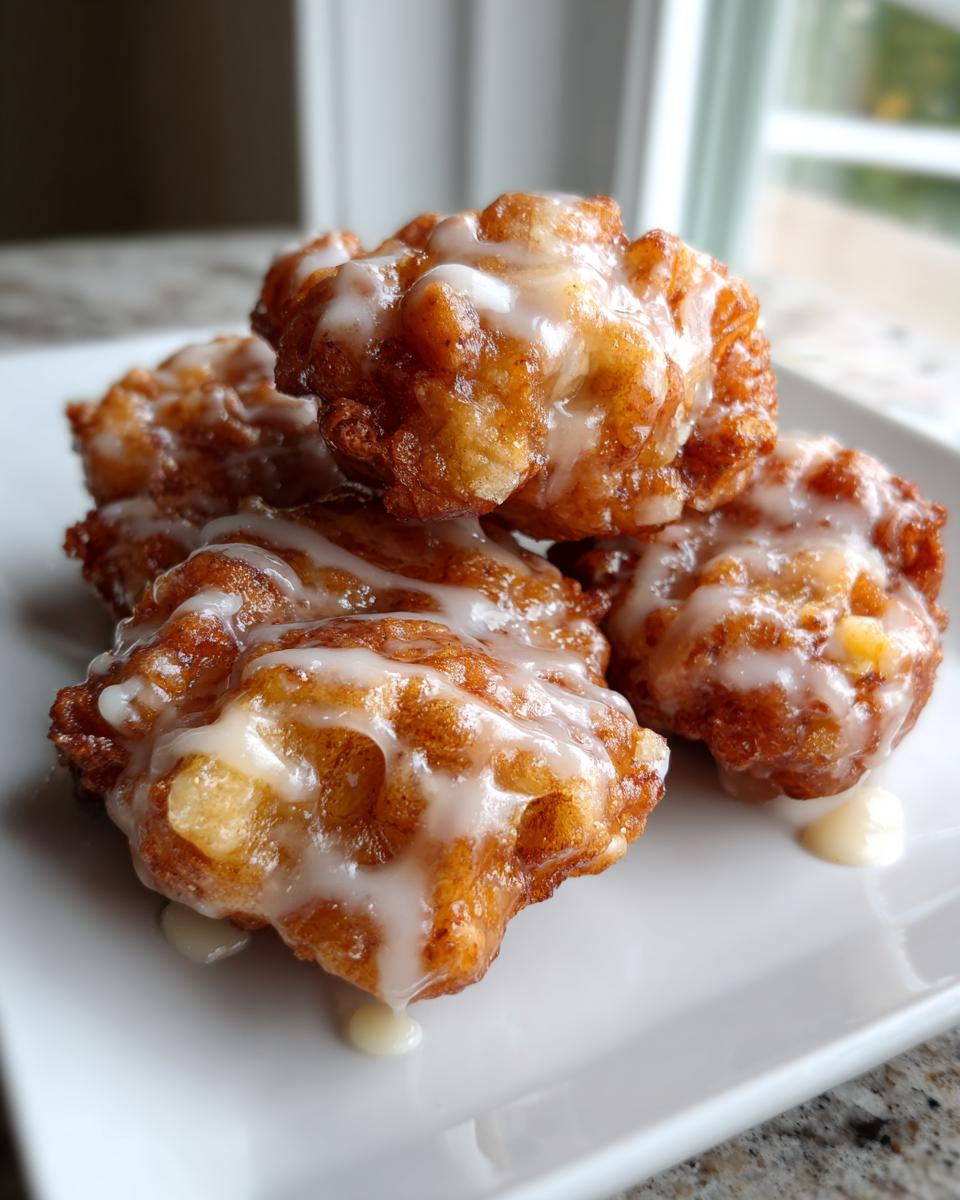
Crafting the Signature Apple Fritters with Glaze
We have the crispy, tender fritters right here, golden brown and still warm—now we need that perfect crowning touch! A good glaze is what takes these from a home bake to a true bakery-style experience. My recipe favors a simple, bright vanilla glaze because it complements the cinnamon and apple beautifully without overpowering them. You only need three things: the powdered sugar, a touch of vanilla, and milk.
In a small bowl, whisk your powdered sugar until there are no little clumps—I always sift it if I’m feeling fancy, but really, just whisking hard works if you’re in a rush! Slowly, I mean *drop by painful drop*, add that milk and the vanilla extract. Honestly, this is where people go wrong! If you dump the milk in, you’ll end up with sweet apple-flavored soup instead of a drizzleable glaze. Remember, we are aiming for a thick enough consistency that it clings to the fritter but thin enough that it actually drips down the sides.
When the glaze is looking perfect—it should flow off your whisk in a slow ribbon but stay mostly together—it’s time to glaze! You want to work while the fritters are still warm, but not piping hot. If they are too hot, the glaze melts right off and disappears into the dough, and you’re left with just a sticky mess. Wait maybe five minutes after they come out of the oil. I usually hold the fritter with tongs and use a spoon to drizzle the glaze right over the top, letting gravity do the work pulling it down the sides. If you’re making a big batch, you can even dunk the tops right into the bowl and let them set on fresh parchment paper. Honestly, watching that glaze set up is so satisfying; it gives you that final, slightly hardened shell that contrasts perfectly with the soft interior. If you love homemade sugary toppings, check out my directions on vanilla buttercream for ideas on other delicious sweet finishes!
For those who love that sticky-sweet texture, this simple glaze is everything. If you want to see how closely you can get this flavor profile with a slightly softer product, take a peek at this recipe for soft cinnamon apple fritters, but for me, the crisp exterior requires this slightly firmer glaze set!
Alternative Methods: Baked Fritters and Air Fryer Apple Fritters
I know, I know. Deep frying is classic, it’s what gives us that authentic texture, but sometimes you just don’t want the cleanup, or maybe you’re trying to keep things a little lighter on a Tuesday morning! That’s totally fine, and honestly, we’ve spent time testing ways to get that classic taste without the oil bath. While nothing perfectly mimics the immediate, sharp crispness of deep frying, we can get remarkably close with your oven or your air fryer. It’s a different kind of treat, but it’s still absolutely delicious, packed with apples, and hits that comfort craving!
When moving to the oven, you’re essentially baking a thick, fruit-laden dough, so the temperature needs to be managed carefully. For a standard oven bake, I usually suggest preheating to about 375°F and using parchment paper, just like I use for my easy baked apple recipe. You’ll get a softer, cake-like outcome, which is still fantastic, especially once you hit it with that vanilla glaze.
The air fryer is closer to the real deal because it circulates that super-hot air so intensely. Remember, the surface area needs to cook fast! If you’re using the air fryer, you’ll want to reduce the temperature slightly from what you’d use for deep frying, usually around 350°F, and definitely cook them in batches so they have space around them to crisp up. Trust me, crowding the basket is the number one way to steam your food instead of crisping it!
Tips for No Fry Apple Fritters Recipe Success
If you’re aiming for those great no fry apple fritters recipe results, here are my favorite tricks from the test kitchen simulations:
- The Butter Brush: If you are baking the fritters on a sheet pan, you need surface crispness. Once they are scooped onto the tray, take a pastry brush and lightly swipe the tops with melted butter before they go into the oven. This helps encourage browning and stops the tops from looking too matte or dry.
- Apple Coating: Before folding the apples into the batter, toss them in a tiny bit of your cinnamon-sugar dry mix first. This coating helps insulate the apples slightly and keeps them from getting too mushy while the dough cooks around them.
- Air Fryer Crisp Boost: For air fryer versions, a quick spritz of cooking spray right before they finish cooking (the last 3 minutes) helps achieve that final golden color you are looking for. It adds just enough surface energy to mimic the frying action. If you want to see amazing results using this method, definitely look up the guide from Dynamic Dishes!
Tips for Success: Mastering Homemade Apple Fritters
Even with the perfect recipe, sometimes you just need that little nudge of confidence, right? I’ve made enough batches of these fritters to know exactly what to watch out for. My biggest learning curve when I was first developing this recipe—which I was determined to make the **best apple fritters recipe**—was realizing that batter consistency changes based on the humidity in the air. If it was a rainy day, I often had to add an extra tablespoon of milk because the flour was already holding onto more moisture. Learn to feel your batter!
Don’t be afraid to experiment slightly with flavor, either. While this recipe calls for classic cinnamon, sometimes I’ll mix in a tiny bit of cardamom for a warmer, more intense flavor. And if you are looking for something fun, you can easily turn these into apple fritter bites! Just use a small, quarter-sized scoop of batter instead of a tablespoon. They cook even faster, and they are amazing for little hands or when you just want a tiny sweet snack. I have a fun recipe for cinnamon rock candy that hits a similar spicy-sweet note if you love that profile!
Here are my final must-know tricks to ensure your homemade apple fritters turn out bakery-perfect:
- Keep Your Spices Fresh: Old cinnamon stops smelling like anything! Make sure the spice in your batter is vibrant—it really impacts the final flavor of these cinnamon apple fritters.
- Portion Control: Try to keep your battered portions roughly the same size before dropping them in the oil. This is key to getting an even bake time. If you have huge ones next to tiny ones, the small ones burn while you wait for the big ones to cook through.
- The Apple Sinking Problem: If you find your diced apples always sink directly to the bottom of the bowl and stick there, you haven’t mixed enough *after* adding the apples. While we don’t want to overmix the *gluten*, you do need to gently fold those apples until they are suspended throughout the batter, not just clumped at the base.
Remember, making these fritters is supposed to be fun! Don’t stress if the first two aren’t picture-perfect. They’ll probably taste amazing anyway because they’re hot and fresh!
Storage and Reheating Instructions for Leftover Treats
So, you made a huge batch of these incredible treats—congratulations! But maybe you couldn’t quite finish them all in one sitting, which is totally understandable because they are dangerously good. The good news is, leftover apple fritters are still delicious the next day, provided you store them correctly. This is important: these are fried goods, and the absolute worst thing you can do is put them in the refrigerator! The cold air makes them stiff and stale almost instantly.
If you have apple fritters with glaze, you need to store them at room temperature. Pop them into a cake carrier or an airtight container, but here’s the trick: place a paper towel on the bottom of the container first. That paper towel is going to wick away any condensation that tries to make your crispy shell soggy. They should stay great like this for a good 24 hours.
If you happen to have ones *without* glaze—maybe you saved some back before they hit the sugary bath—those can be stored similarly, but they often stay better under a loose layer of plastic wrap on the counter. The glaze really helps seal in moisture for the un-fried dough underneath.
Waking Up Those Crispy Edges: Reheating Fritters
Now, when it comes time to eat them the next day, we must bring back that beautiful, crispy texture we worked so hard for. Forget the microwave! Microwaving turns the exterior soft and the whole thing rubbery in about 10 seconds flat. We need gentle, dry heat to re-crisp the surface.
Your best bet, hand down, is either your oven or your air fryer. If you are using the oven, set it to about 300°F. Lay the fritters out in a single layer on a baking sheet—don’t crowd them! Pop them in for maybe 5 to 7 minutes. You’re just warming them through and drying out the surface again. This works magic! If you want to go the air fryer route—which is faster—set it to about 325°F and check them after just 3 minutes. They come out tasting nearly fresh-made, trust me!
If you do reheat them, wait until they are warm—almost hot—before applying any extra glaze, or just dust them with a little fresh powdered sugar. It makes all the difference!
Frequently Asked Questions About Apple Fritters
I get so many questions about these sweet treats after people try them the first time! It’s only natural; getting that perfect balance between being crispy apple fritters and having that wonderfully soft interior takes a little practice. Below are the most common things I hear bakers asking when they try making these homemade apple fritters for the first time. Don’t hesitate to reach out if your question isn’t covered here!
What is the best oil temperature for frying apple fritters?
This is probably the most important question, hands down! The absolute sweet spot for getting those bakery style apple fritters without having them turn greasy is maintaining a steady 360 degrees Fahrenheit. If you are reading this thinking, “I don’t have a thermometer,” please, please invest in one, even a cheap digital one! If the oil is too cool, the batter sits there too long and soaks up oil like a sponge, leading to heavy, soggy results. If the oil is smoking, it burns the outside before the inside cooks, leaving you with raw batter pockets. Keep it locked on 360°F for the best outcome!
Can I use pre-made apple pie filling in this easy apple fritter recipe?
That’s a great shortcut question! While you *can* use pre-made filling if you’re desperate for some quick weekend breakfast desserts, I strongly advise against it if you want the best texture. Most commercial pie fillings are extremely wet and loaded with thickening agents like cornstarch or flour. If you dump that into our batter, you risk two things: adding too much liquid, which ruins the ratios, and creating odd, gummy pockets inside your fritter. For the best, most natural sweet apple treats, stick to fresh, firm apples that you dice yourself. They release moisture slowly and evenly as they cook.
Why do my apples sink to the bottom of the batter?
Ah, the dreaded sinking apple phenomenon! This happens for two main reasons. First, if your diced apples are too heavy or too large, gravity wins. Make sure your pieces are small—no bigger than a standard chocolate chip. Second, and this is more common, you’ve mixed the batter too long when combining the wet and dry ingredients. When you overmix, you build too much gluten structure, which becomes dense and heavy, causing the fruit to naturally migrate downward. Remember what I said about leaving some lumps? That light, slightly shaggy batter holds onto those apple pieces much better. If you want to try another great recipe, check out the link for banana bread, because managing heavy additions is a universal baking challenge!
Are these recipes easily adaptable for air fryer apple fritters?
Yes, they absolutely are! While deep frying is the traditional path to the crispiest texture we are aiming for, the air fryer is a fantastic method for no fry apple fritters recipe fans. The key difference is that you need to pre-coat the batter slightly. Instead of dropping raw spoonfuls, you can gently spray both sides of the batter pieces with a neutral cooking oil spray before placing them in the basket. You’ll likely cook them at a slightly lower temperature—around 325°F—and for a longer total time than deep frying, maybe 12-15 minutes, flipping halfway through. They won’t have the same thick, craggy crust as the fried ones, but they’ll be wonderfully fluffy inside!
How can I make smaller apple fritter bites?
This is super fun for parties or just controlling portions! To make apple fritter bites, simply use a small measure like a teaspoon or a tiny cookie scoop (about half the size of a tablespoon) when dropping the batter into the oil. Since they are smaller, they will cook much faster—usually closer to 90 seconds to 2 minutes per side. They cook so quickly, which makes them even easier to manage temperature-wise, and they look adorable covered in that vanilla glaze! If you need tips on managing leftovers neatly, I wrote about refrigerator storage for non-fritters, but remember, these keep best covered on the counter!
Serving Suggestions for Your Sweet Apple Treats
We’ve done the hard work—the mixing, the frying, the glazing—and now we have these stunning Cinnamon apple fritters ready to go! How you serve them really elevates the experience from a quick snack to a decadent dessert moment. Since these fritters already pack a heavy punch of sweetness and cinnamon spice, you don’t need much else, but a few pairings really take them over the top.
For a cozy breakfast or brunch situation, forget the plain table sugar and serve these while they are still warm alongside a really strong, hot black coffee. The bitterness of the coffee cuts right through the richness of the fried dough and the glaze beautifully. If you’re having them for dessert, well, then we have to go full indulgence! A simple scoop of really good vanilla bean ice cream—the kind with the flecks of vanilla seed—is mandatory. The cold, creamy texture next to the warm, gooey apple center is just everything.

You could also set up a little “glaze bar.” While our vanilla glaze is amazing, sometimes people want options! Have a side bowl of softly whipped cream, maybe dusted with a little extra cinnamon on top, or even a drizzle of caramel sauce if you have some lying around. If you enjoyed these comforting flavors, you might also want to check out my recipe for fluffy oatmeal pancakes for another fantastic, warm breakfast treat that feels very homey!
Serving Suggestions for Your Sweet Apple Treats
We’ve done the hard work—the mixing, the frying, the glazing—and now we have these stunning Cinnamon apple fritters ready to go! How you serve them really elevates the experience from a quick snack to a decadent dessert moment. Since these fritters already pack a heavy punch of sweetness and cinnamon spice, you don’t need much else, but a few pairings really take them over the top.
For a cozy breakfast or brunch situation, forget the plain table sugar and serve these while they are still warm alongside a really strong, hot black coffee. The bitterness of the coffee cuts right through the richness of the fried dough and the glaze beautifully. If you’re having them for dessert, well, then we have to go full indulgence! A simple scoop of really good vanilla bean ice cream—the kind with the flecks of vanilla seed—is mandatory. The cold, creamy texture next to the warm, gooey apple center is just everything.
You could also set up a little “glaze bar.” While our vanilla glaze is amazing, sometimes people want options! Have a side bowl of softly whipped cream, maybe dusted with a little extra cinnamon on top, or even a drizzle of caramel sauce if you have some lying around. If you enjoyed these comforting flavors, you might also want to check out my recipe for fluffy oatmeal pancakes for another fantastic, warm breakfast treat that feels very homey!
PrintClassic Deep-Fried Apple Fritters with Vanilla Glaze
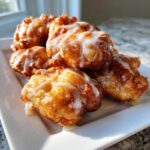
Make bakery-style apple fritters that are crispy outside and tender inside. This recipe uses fresh apples and a simple vanilla glaze for a comforting, classic treat.
- Prep Time: 15 min
- Cook Time: 15 min
- Total Time: 30 min
- Yield: 10-12 fritters 1x
- Category: Dessert
- Method: Deep Frying
- Cuisine: American
- Diet: Vegetarian
Ingredients
- 2 cups all-purpose flour
- 2 teaspoons baking powder
- 1 teaspoon ground cinnamon
- 1/2 teaspoon salt
- 1/4 cup granulated sugar
- 1 large egg, lightly beaten
- 1/2 cup milk
- 1 teaspoon vanilla extract
- 2 medium apples, peeled, cored, and diced small
- Vegetable oil, for frying
- 1 cup powdered sugar (for glaze)
- 2 tablespoons milk (for glaze)
- 1/2 teaspoon vanilla extract (for glaze)
Instructions
- In a large bowl, whisk together the flour, baking powder, cinnamon, salt, and granulated sugar.
- In a separate small bowl, mix the egg, 1/2 cup milk, and 1 teaspoon vanilla extract.
- Pour the wet ingredients into the dry ingredients. Mix gently until just combined; do not overmix. The batter will be thick.
- Fold in the diced apples until they are evenly distributed throughout the batter.
- Pour vegetable oil into a deep, heavy-bottomed pot or deep fryer to a depth of about 2 inches. Heat the oil to 360 degrees Fahrenheit. Use a thermometer to check the temperature.
- Carefully drop spoonfuls of the batter into the hot oil, making sure not to crowd the pot. You are aiming for irregular, rustic shapes, like traditional apple fritters.
- Fry for 2 to 3 minutes per side, turning once, until the fritters are deep golden brown and cooked through.
- Remove the fritters with a slotted spoon and place them on a wire rack lined with paper towels to drain excess oil.
- While the fritters cool slightly, prepare the glaze: Whisk together the powdered sugar, 2 tablespoons milk, and 1/2 teaspoon vanilla extract until smooth. Add more milk, a drop at a time, if the glaze is too thick.
- Dip or drizzle the warm apple fritters generously with the vanilla glaze. Let the glaze set before serving.
Notes
- For the crispiest apple fritters, ensure your oil temperature stays steady at 360 degrees Fahrenheit. If the oil is too cool, the fritters will absorb too much oil and become greasy.
- Use firm, tart apples like Granny Smith for the best texture, as they hold their shape well during frying.
- If you want apple fritter bites, use a small cookie scoop to drop the batter.
Nutrition
- Serving Size: 1 fritter
- Calories: 280
- Sugar: 22g
- Sodium: 250mg
- Fat: 15g
- Saturated Fat: 4g
- Unsaturated Fat: 11g
- Trans Fat: 0g
- Carbohydrates: 35g
- Fiber: 2g
- Protein: 4g
- Cholesterol: 35mg