
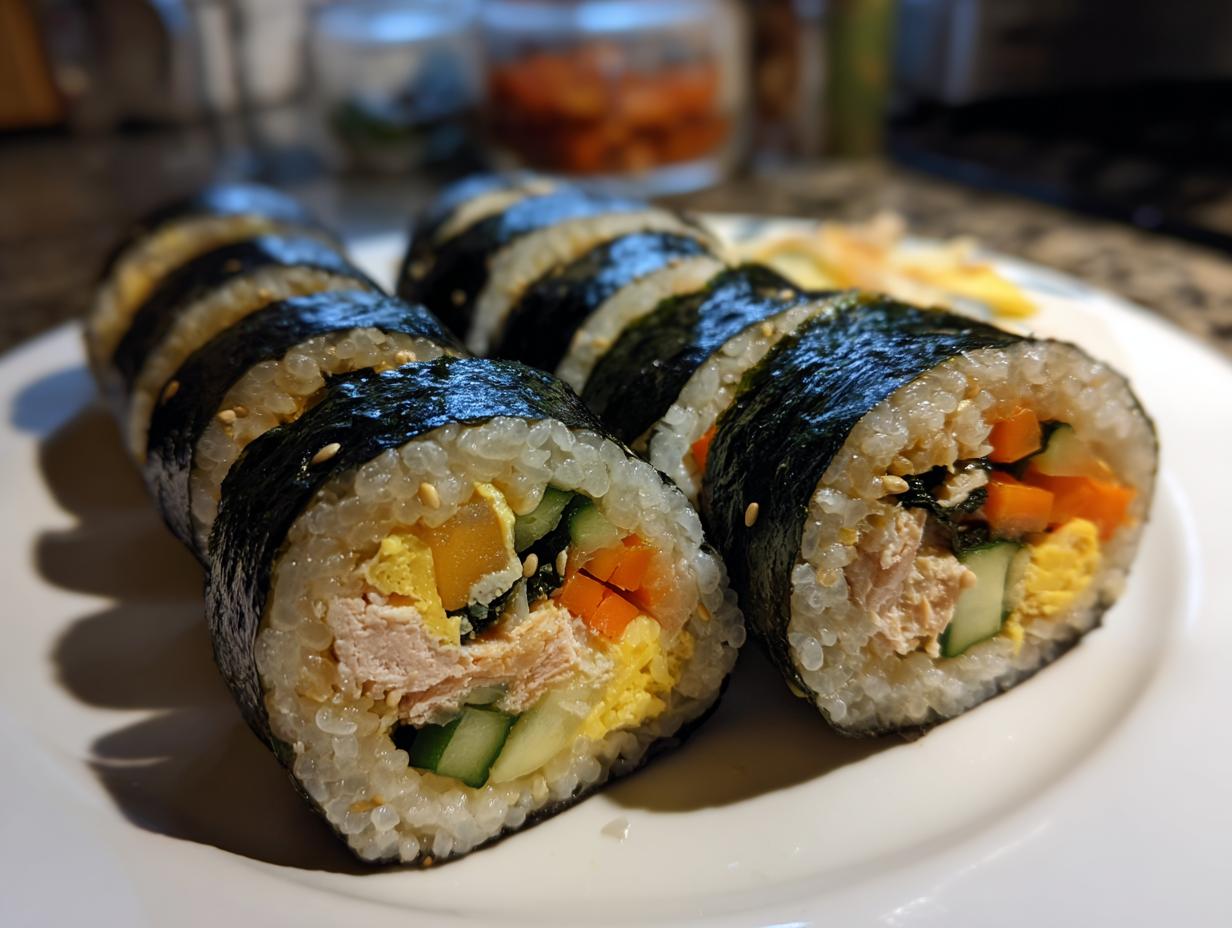
Do you ever get that intense craving for perfectly seasoned rice wrapped around creamy, savory fillings? I know I do! Forget the often-bland, slightly dried-out rolls you grab at the grocery store because today, we are mastering the real deal: authentic, totally satisfying Tuna Kimbap. This recipe cuts through the complexity. We want flavor that sings, and that’s what happens when you bring authentic Korean flavors into your own kitchen with confidence. That’s the Cookery Command way—taking time-honored techniques and making them foolproof for you. This is going to be your new favorite way to make those vibrant, portable rolls, perfect for packing or just snacking right here at home. If you’re looking for genuinely great quick, healthy lunch recipes, you’ve found it!
- Why This Homemade Tuna Kimbap Beats Store-Bought
- Essential Ingredients for Perfect Tuna Kimbap
- How to Make Tuna Kimbap at Home: A Homemade Kimbap Tutorial
- Kimbap Making Tips and Tricks for the Best Tuna Kimbap
- Variations: Making Spicy Tuna Kimbap
- Serving Suggestions for Savory Korean Finger Food
- Storage and Make Ahead Picnic Food Korean Style
- Frequently Asked Questions About Tuna Kimbap
- Share Your Homemade Tuna Kimbap Creations
Why This Homemade Tuna Kimbap Beats Store-Bought
Seriously, once you try rolling your own, you’ll never look back! Those pre-packaged rolls just can’t compare once you taste the difference homemade ingredients make. We control everything here, which means maximum flavor and texture in every single bite. It’s worth that extra little bit of time, trust me.
- The rice is perfectly seasoned with sesame oil and salt—no bland, dry rice here!
- You get to use really good quality tuna, not that watery stuff that stores sometimes use.
- Flavor control! You decide exactly how much creamy mayo or how much fiery spice goes into that amazing filling.
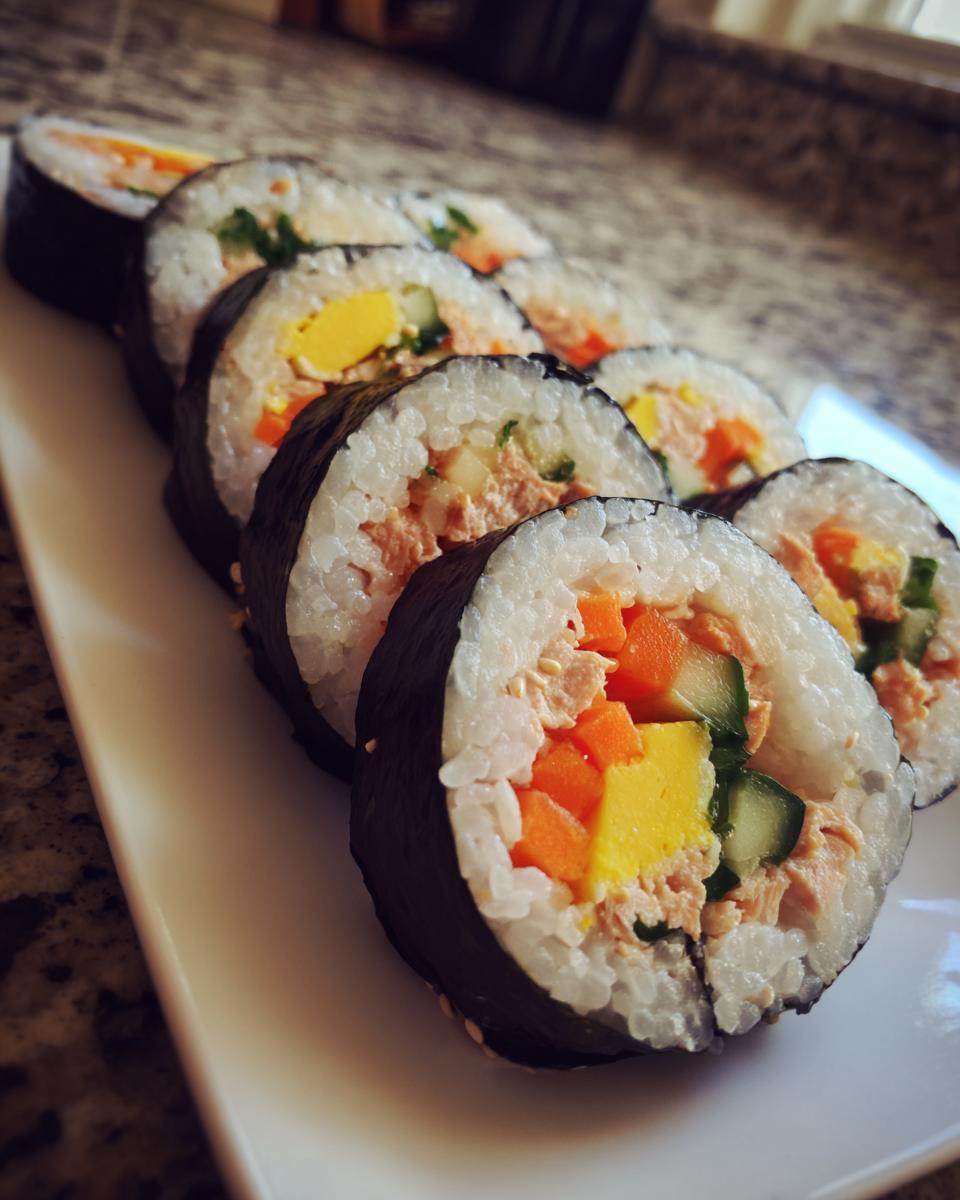
- It’s vibrant! Layering in fresh cucumber and carrot makes the roll look alive before you even cut it.
- It’s shockingly fast. While the recipe notes take about 35 minutes total, with prep you’re looking at something near that fast quick 15 minute kimbap feel.
- Ultimate customization: Add kimchi, swap the veggies, or double the spicy kick!
Easy Korean Lunch Box Ideas That Impress
Kimbap is practically built for lunch boxes, isn’t it? It travels beautifully, doesn’t need reheating, and always looks way more exciting than a standard sandwich. If you are putting together an easy Korean lunch box idea for school or work, laying these rolls out makes you look like a superstar chef with minimal effort. Because the moisture is sealed inside, they stay fresh until lunchtime rolls around. Just make sure you cut them with a slightly damp knife so they don’t stick together in the container!
Essential Ingredients for Perfect Tuna Kimbap
You know, the secret to making amazing Tuna Kimbap that tastes better than anything you buy is actually right here in quality control over the fillings. Everything needs a little prep—the veggies need to be julienned nicely, and the tuna must be drained until it feels almost dry. We aren’t making soup, we are making rolls! Making sure you have these fresh components ready sets you up for success before you even touch that rolling mat. For a deeper dive into what makes these ingredients shine, check out my guide on kimbap ingredients explained.

Kewpie Mayo Kimbap Filling Recipe Notes
The tuna mix is the heart and soul of this roll, and here is where you can really upgrade the flavor instantly. Please, if you can find it, grab the Japanese mayonnaise—Kewpie! It’s richer, tangier, and has that perfect mouthfeel that just sings with the canned fish. Regular mayo works in a pinch, but Kewpie is worth hunting down. If you want to kick up the heat and make it truly special, this is where you add your spice. I use a tablespoon of Sriracha, but if you have Gochujang lying around, that works beautifully too, bringing a lovely fermented depth to the filling.
Tips for Seasoning Your Tuna Kimbap Rice
This is non-negotiable for delicious Tuna Kimbap: the rice cannot be just plain, warm rice! It needs seasoning to stand up against the savory fillings. As soon as the short-grain rice is cooked and slightly cool—not hot, or it will steam the nori and make it tear—you mix in the salt, the sesame seeds, and most importantly, that warm, nutty sesame oil. Mix gently with a rice paddle or spatula; we don’t want mush, we want separated, flavorful grains that hold together just enough to wrap perfectly.
How to Make Tuna Kimbap at Home: A Homemade Kimbap Tutorial
Alright, deep breath! Rolling your own sushi or kimbap can look intimidating, but once you get the rhythm down, you’ll see how satisfying it is. Think of this as a fun project, not a test! The key to a successful Tuna Kimbap roll isn’t just what you put inside, it’s how you respect the seaweed wrapper. You need a bamboo rolling mat for the best results—if you don’t have one, don’t freak out just yet, but I highly recommend getting one because it makes the process so much smoother. Remember, we aren’t trying to make a thick, clumsy log; we want a firm, compact roll that stays together when you cut it. Check out my guide on how to roll your own kimbap for visualization, and let’s build this beauty layer by layer!
Step-by-Step Assembly for Your Tuna Kimbap
First, lay your bamboo mat flat. Place one sheet of nori down with the shiny side facing down—that rough side is what grips the rice best. Now, grab about a cup of your seasoned rice. You want to gently spread this rice over most of the seaweed, but you absolutely must leave a strip about an inch wide bare at the furthest edge. This bare edge acts as the seal! Don’t press the rice too hard, or your rolls will be dense bricks. You just want enough gentle pressure to cover the surface.
Next comes the fun part: layering your fillings right across the rice, keeping everything organized in a neat, straight line about an inch up from the edge closest to you. Put down your delicate ingredients first—like the perilla leaf if you’re using it—then stack your denser items: egg strips, carrots, cucumber, and that glorious tuna mixture goes right down the middle. Don’t overstuff! Seriously, that’s rule number one in rolling anything!
Now, use your thumbs to lift the edge of the mat closest to you, bringing that edge up and over the fillings. Tuck the edge of the mat right under the fillings, ensuring the first layer of rice overlaps the fillings. Once you have that initial tuck, pull the mat away from you while gently pressing down on the roll with your fingers to keep everything tight. Keep rolling forward until you reach that bare strip of seaweed. Lick your finger—yes, really!—and moisten that dry edge lightly with water. Finish rolling and give it one last firm squeeze with the mat to seal it up and set that beautiful cylinder shape.
Kimbap Making Tips and Tricks for the Best Tuna Kimbap
Wow, you rolled it! That’s the hardest part done, but we need to make sure you get those picture-perfect slices without the whole thing unravelling or looking jagged. My grandmother always said that the true test of a good cook isn’t just in the making, but in the presenting! These Tuna Kimbap tips are things I learned the hard way, so save yourself the grief and follow these tricks for amazing results every single time. They make all the difference between a good roll and a show-stopping platter.

Achieving Clean Cuts When Slicing Kimbap
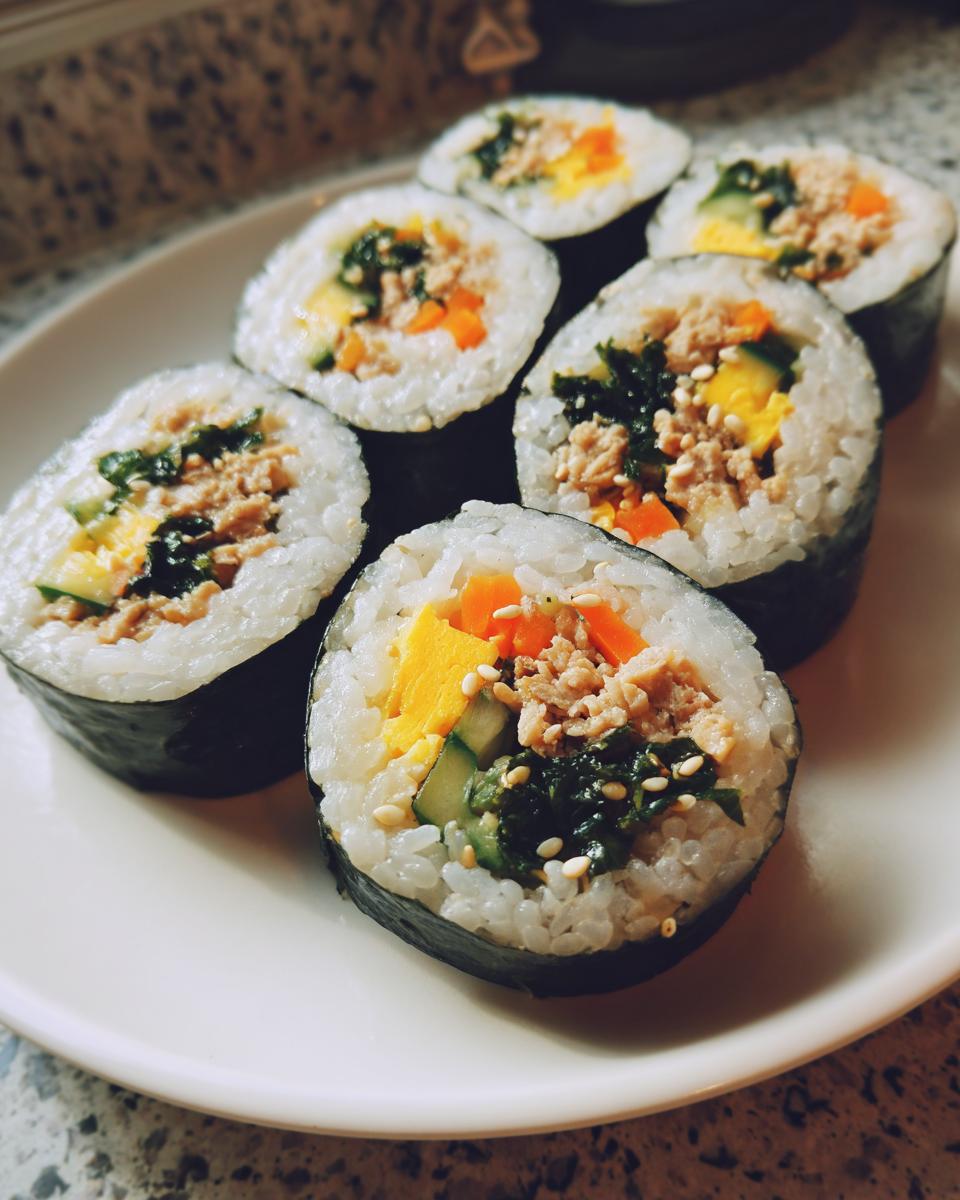
This is where so many people get frustrated, so pay close attention! Rule number one: Let it rest! After brushing your finished roll with sesame oil and sprinkling those seeds on top, let the roll sit untouched for at least five minutes. This resting time allows the rice to set up around the fillings, giving the structure stability. If you cut it immediately, the rice just squishes out the sides.
Rule number two involves your knife. You need a long, very sharp knife—think thin slices are best. Before you make a single cut, take a clean dish towel, soak it in water, and wring it out so it’s just damp, not dripping wet. Wipe the edge of your sharp knife with that damp cloth. This tiny bit of moisture prevents the sticky rice from clinging and dragging the seaweed as you slice through. Cut in an easy, gentle rocking motion rather than pressing straight down. You should cut through in one or two easy motions. Wipe the knife again between cuts if you notice any sticking, and you’ll have beautiful, clean slices ready to serve!
And hey, if you happen to have leftovers, tossing them with an easy dipping sauce like my creamy garlic aioli is a fantastic way to enjoy them later!
Variations: Making Spicy Tuna Kimbap
Okay, so while the classic Tuna Kimbap is pure comfort food, I totally get why so many of you are looking for a little more *zing*. You’re not alone! The spicy version, often called Spicy Tuna Kimbap, is seriously addictive, and it’s almost as quick to assemble as the original. Since the tuna filling is so central to the flavor profile, modifying it is super easy.
If you want to turn up the heat and pack a flavor punch, you just need to adjust that tuna bowl we mixed together earlier. You have two great options here, depending on what you have on hand or what spice profile you prefer. We’re adding these directly to the mayonnaise mixture with the green onions.
First, you can use Sriracha. It gives you a bright, sharp heat that blends beautifully with the tangy mayo. Just start with one tablespoon and mix it in, but feel free to add a little more until it’s exactly as spicy as you want! For those who love a deeper, slightly sweeter heat, Gochujang—that wonderful Korean chili paste—is your best friend here. It thickens the mix a little and gives you that really traditional, savory spice foundation instead of just pure chili burn. Either way, you end up with a fantastic Spicy Tuna Kimbap that is miles better than anything you’d grab on the run. Trust me, once you give the Spicy Tuna mayo filling a try, you might never go back to the original!
Serving Suggestions for Savory Korean Finger Food
So, you’ve rolled up a beautiful batch of homemade Tuna Kimbap. Now what? While these rolls are totally delicious all on their own—and honestly, I’ve eaten a whole roll standing right over the cutting board—they really shine when served up alongside other classic Korean side dishes. Think of them as the star of your spread of savory Korean finger food!
If you are serving this for a party or just want a fuller meal, you need some banchan! Pickled radish (danmuji) is mandatory, as it cleanses the palate perfectly between bites of the rich rice and tuna. Some quick-steamed spinach seasoned with garlic and sesame oil is always a winner. And if you want something truly crunchy to contrast the soft rice, some quick-fried anchovies are perfect.
For dipping, you don’t need anything complicated. A very simple sauce elevates the flavor without overpowering the delicate sesame oil finish of the roll. My go-to is just a splash of soy sauce mixed with a tiny bit of rice vinegar and a sprinkle of toasted sesame seeds. However, if you’re feeling extra decadent, my easy creamy garlic sauce makes an absolutely killer dipping companion for these savory rolls. Just try it once; you’ll see the light!
Storage and Make Ahead Picnic Food Korean Style
One of the biggest reasons I love making Tuna Kimbap is that it’s the ultimate make-ahead dish! If you’re planning for school lunches next week or packing up for a big park outing, knowing how to store these rolls correctly is vital. You want them to taste just as good hours later as they did fresh off the mat, right? The key here is managing moisture and keeping that rice from getting rock hard in the fridge.
The best way to store them—especially if you are making them for make ahead picnic food Korean style—is to wrap the entire uncut roll tightly in plastic wrap first. This traps any remaining humidity and keeps everything snug until you slice it. You can store the uncut rolls in the refrigerator for up to 24 hours. After that, the rice starts to get firm, and honestly, it just loses that soft, pillowy texture we love so much.
If you absolutely must slice them beforehand, I recommend brushing them with that extra bit of sesame oil right before you seal them up in an airtight container. Try to eat them within 12 hours if they are pre-cut. If you find they’ve dried out slightly? Don’t throw them away! You can quickly toss those leftover slices in a very lightly oiled pan for just a minute or so, just enough to warm them through and soften the rice again. It works like a charm and brings that freshness right back!
Frequently Asked Questions About Tuna Kimbap
I know when I first tried making kimbap, I had a million little questions swirling around! It’s only natural. You want to make sure the rice isn’t too sticky, or that you don’t accidentally tear the seaweed wrapper. Don’t sweat it! I’ve gathered the most common things folks ask when they’re ready to make their first batch of this delicious Tuna Kimbap at home, so you can bake in the confidence before you even start prepping.
Can I make tuna kimbap without blanching the vegetables?
You absolutely *can* skip blanching the carrots and cucumbers, but I really discourage it, especially for the carrots. If you use raw carrots and cucumbers straight from the fridge, they will be hard and crunchy, which is a jarring texture contrast against the soft rice and creamy tuna filling. Blanching the carrots for just 30 seconds in boiling water softens them perfectly, allowing them to bend nicely when you roll the kimbap without breaking. The cucumber should at least have the seeds scooped out so it releases excess water, but raw is more often used there than with carrots.
What is the best way to store leftover tuna kimbap?
The best way to store any leftover Tuna Kimbap is to keep it whole, not sliced! If you slice it first, the rice grains on the cut ends dry out really fast, and that section gets hard. Take the entire roll, wrap it very tightly in plastic wrap like a little present, and pop it in an airtight container in the fridge. This keeps the moisture locked in around the rice and filling. Don’t keep it longer than 24 hours if you can help it, because honestly, fresh is always best, but this method keeps them nice for a lunch box the next day!
Can I substitute the canned tuna with fresh cooked fish?
That’s a great question if you’re trying to avoid canned goods, but I have to warn you: the texture will change significantly! Classic Chamchi Kimbap relies on the specific texture of oil-packed canned tuna mixed with mayonnaise—it gets that creamy, almost paste-like consistency that holds everything together. If you use freshly grilled or steamed fish, it will flake apart when you try to roll it, making it very hard to manage inside the roll. Stick to well-drained canned tuna for the authentic experience here.
Do I really need a bamboo rolling mat?
While I mentioned you *can* manage without one (maybe using a clean kitchen towel or just careful hand pressure), I really, really suggest getting a cheap bamboo mat. It’s the secret weapon that gives you that tight, uniform shape. Without it, you end up wrestling with the seaweed, and you often get rolls that feel loose or uneven. Since this is one of the key tools for any homemade kimbap tutorial, it’s a small investment for making the entire process 100 times easier and cleaner!
Share Your Homemade Tuna Kimbap Creations
Now that you’ve rolled up your very first batch of flawless Tuna Kimbap, I absolutely want to see what you made! Honestly, seeing your kitchens in action is the best part of my job here at Cookery Command. Did you go classic and simple? Or did you unleash the heat with that spicy tuna mayo filling?
Don’t be shy! Head down to the comments below and tell me everything. Did you try the Kewpie mayo? How spicy did you make your batch? Drop your star rating so others know how much you loved this recipe!
If you snapped a picture of your beautifully sliced rolls or your kiddo happily munching on them for lunch, I would love, love, love to see it! Tag me on social media or you can always reach out directly through my contact page. Sharing your success stories is what keeps this whole cooking command center running. Happy rolling, everyone!
PrintEasy Homemade Tuna Kimbap (Chamchi Kimbap)
Make authentic Tuna Kimbap at home that tastes better than store-bought. This recipe focuses on a quick, flavorful tuna filling and perfectly seasoned rice for satisfying Korean seaweed rice rolls.
- Prep Time: 25 min
- Cook Time: 10 min
- Total Time: 35 min
- Yield: 4 rolls (approx. 24 pieces) 1x
- Category: Main Course
- Method: Rolling
- Cuisine: Korean
- Diet: Vegetarian
Ingredients
- 4 cups cooked short-grain rice (slightly cooled)
- 4 sheets roasted seaweed (nori or gim)
- 4 perilla leaves (optional, washed and dried)
- 2 teaspoons sesame oil (for rice)
- 2 teaspoons sesame seeds (for rice)
- 1 teaspoon salt (for rice)
- 2 cans (5.3 oz each) tuna in oil, drained well
- 2 tablespoons Japanese mayonnaise (Kewpie preferred)
- 1 tablespoon Sriracha or Gochujang (for spicy variation)
- 2 tablespoons finely chopped green onion
- 1 large carrot, julienned
- 1 small cucumber, seeded and julienned
- 4 eggs, cooked into thin omelets and sliced
- 4 pickled radish strips (danmuji), optional
- Sesame oil for brushing the finished rolls
Instructions
- Prepare the rice: In a large bowl, mix the cooked rice with 2 teaspoons sesame oil, 2 teaspoons sesame seeds, and 1 teaspoon salt. Mix gently until combined. Set aside.
- Prepare the fillings: If using, quickly blanch the julienned carrots and set aside. Cook the eggs into thin sheets, let cool, and slice into strips.
- Make the tuna filling: Drain the canned tuna thoroughly. In a separate bowl, mix the tuna, mayonnaise, chopped green onion, and Sriracha (if making the spicy version) until creamy.
- Assemble the kimbap: Lay one sheet of seaweed on a bamboo rolling mat. Brush the entire surface lightly with sesame oil.
- Layer the ingredients: Spread about one cup of seasoned rice evenly over two-thirds of the seaweed sheet, leaving a 1-inch border at the top edge.
- Place the fillings in a line across the center of the rice: Lay down one perilla leaf (if using), followed by strips of egg, carrot, cucumber, pickled radish, and a generous line of the tuna mixture.
- Roll the kimbap: Lift the edge of the mat closest to you and roll tightly over the fillings, pressing down gently to secure the shape. Moisten the top edge of the seaweed with a little water to seal the roll.
- Finish the roll: Brush the outside of the finished roll lightly with sesame oil and sprinkle with sesame seeds.
- Slice and serve: Using a sharp, damp knife, slice the roll into bite-sized pieces. Repeat with remaining ingredients.
Notes
- For a quick lunch box, you can prepare the fillings the day before and assemble the kimbap in the morning.
- Use Kewpie mayonnaise for a richer, tangier tuna filling flavor.
- If you do not have a rolling mat, you can carefully use a clean kitchen towel to assist in rolling.
- To make the rolls slice cleanly, let them rest for 5 minutes after rolling before cutting.
Nutrition
- Serving Size: 1 roll (6 pieces)
- Calories: 350
- Sugar: 4
- Sodium: 450
- Fat: 15
- Saturated Fat: 3
- Unsaturated Fat: 12
- Trans Fat: 0
- Carbohydrates: 40
- Fiber: 2
- Protein: 15
- Cholesterol: 80