

Okay, let’s talk about French desserts. Most people hear “French Pastry” and immediately think their spatula is going to spontaneously combust from the sheer pressure, right? I get it! Things like perfectly laminated dough seem like a mountain to climb. But I’ve cracked the code on the most beautiful, impressive-looking dessert that’s secretly a total breeze, and it’s this gorgeous apple tart. Seriously, forget spending hours on a double-crust pie! We’re making a rustic French style—the Tarte aux Pommes—and using store-bought puff pastry so you can be relaxing with a glass of wine instead of wrestling with butter. This recipe is all about looking incredibly fancy while actually being super easy. Trust me, this is the **apple tart** you need in your life.
- Why This Easy Apple Tart Recipe is Your New Favorite
- Ingredients for the Perfect Rustic Apple Tart
- Step-by-Step Instructions for Your Classic French Apple Tart
- Tips for No-Fail Apple Tart Success
- Serving Suggestions for Your Impressive Apple Tart
- Storage and Reheating Instructions for Leftover Apple Tart
- Frequently Asked Questions About This Apple Tart Recipe
- Estimated Nutritional Breakdown for One Serving of Apple Tart
- Share Your Beautiful Apple Tart Creation
Why This Easy Apple Tart Recipe is Your New Favorite
Why mess around when you can have perfection in under an hour? This recipe cuts out all the fuss. It’s designed for speed without sacrificing that amazing flavor we crave.
- It’s Faster Than Pie: Since we use ready-made puff pastry, we skip the fussy chilling and rolling typical of homemade crusts. Hello, **Quick Apple Tart**!
- Stunning Presentation: The simple, overlapping apple circles on the golden, flaky pastry always look like something from a fancy bakery window.
- Flavor Focus: It lets the apples and cinnamon shine. This is truly a **Simple Apple Dessert** that tastes complex.
- No Fuss Crust: You get that incredible, buttery flakiness without any stress.
Ingredients for the Perfect Rustic Apple Tart
You don’t need a treasure trove of rare ingredients for this stunning bake; the magic is really in the quality of what you use. Since we’re keeping things easy, we start with the pastry. You’ll need exactly 1 package (14.1 ounces) all-butter puff pastry, thawed—that’s the secret shortcut! For the filling, think about four medium apples; I love using a blend, maybe two tart Granny Smiths and two sweet Honeycrisps for the ultimate flavor contrast.
We mix those apples up with sugar, a touch of flour to manage the juices, and that irreplaceable cinnamon. Don’t forget the lemon juice; it keeps things bright! Then, we have our optional finishing touch: a little apricot jam or jelly warmed up if you want that gorgeous shiny glaze on your final **apple tart**.
Ingredient Notes and Substitutions for Your Apple Tart
Okay, listen up, because choosing the right apple makes all the difference between a good tart and the Best Apple Tart ever. Granny Smith brings the necessary tartness that cuts through the sweetness, while Honeycrisp or Fuji hold their shape really well when they bake. If you want them to completely melt away, use McIntosh, but I prefer them to have a little bite!
Now, about the crust: if puff pastry just isn’t your thing, this recipe is flexible! If you prefer a homemade Buttery Crust Tart, feel free to use your favorite tried-and-true 9-inch shortcrust recipe instead. Just make sure to press it into the pan. And that flour we add? It’s tiny, but crucial—it helps thicken any liquid the apples give off so you don’t get a soggy bottom. That cinnamon, by the way, is non-negotiable; it’s what makes this flavor profile sing!
Step-by-Step Instructions for Your Classic French Apple Tart
I know those instructions can look intimidating when they’re all listed out, but honestly, this is where the fun starts! We are keeping this incredibly straightforward because we’re relying on that fantastic store-bought puff pastry. Don’t overthink the art; we’re going for rustic elegance here, not museum perfection. Just set your timer and trust the process. Once you see it coming out of the oven, you’ll realize how easy it was to make something so stunning.
Preparing the Apples and Assembling the Apple Tart
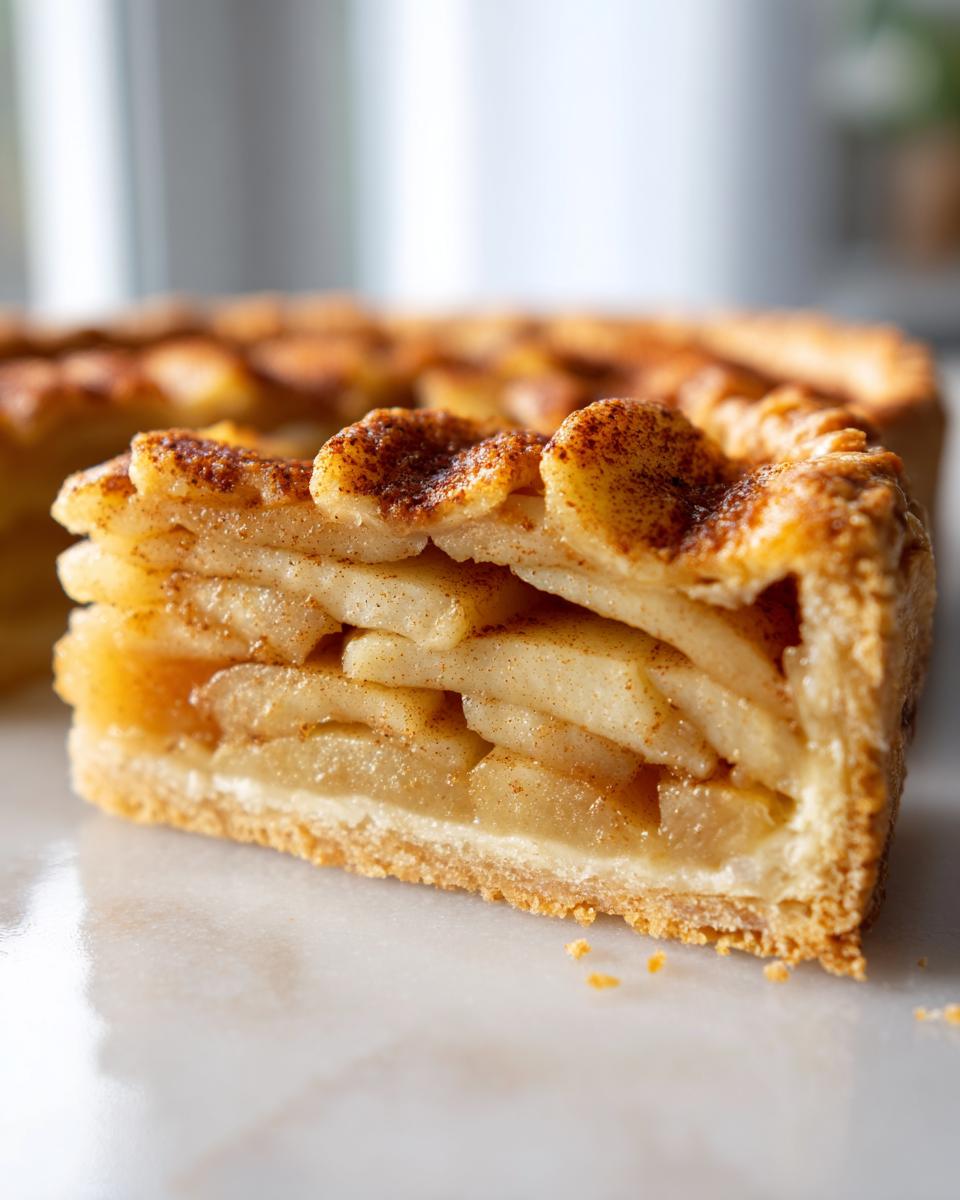
First things first: get your oven warming up to 400°F (200°C) and line one of those flat baking sheets with parchment paper. If you use a proper tart pan with a removable bottom, skip the baking sheet for now, but parchment is your friend! Next, grab those apples. Peel, core, and slice them super thin—I aim for about 1/8 inch thick so they cook evenly. If they’re too chunky, they won’t soften nicely in the short baking time we give them.
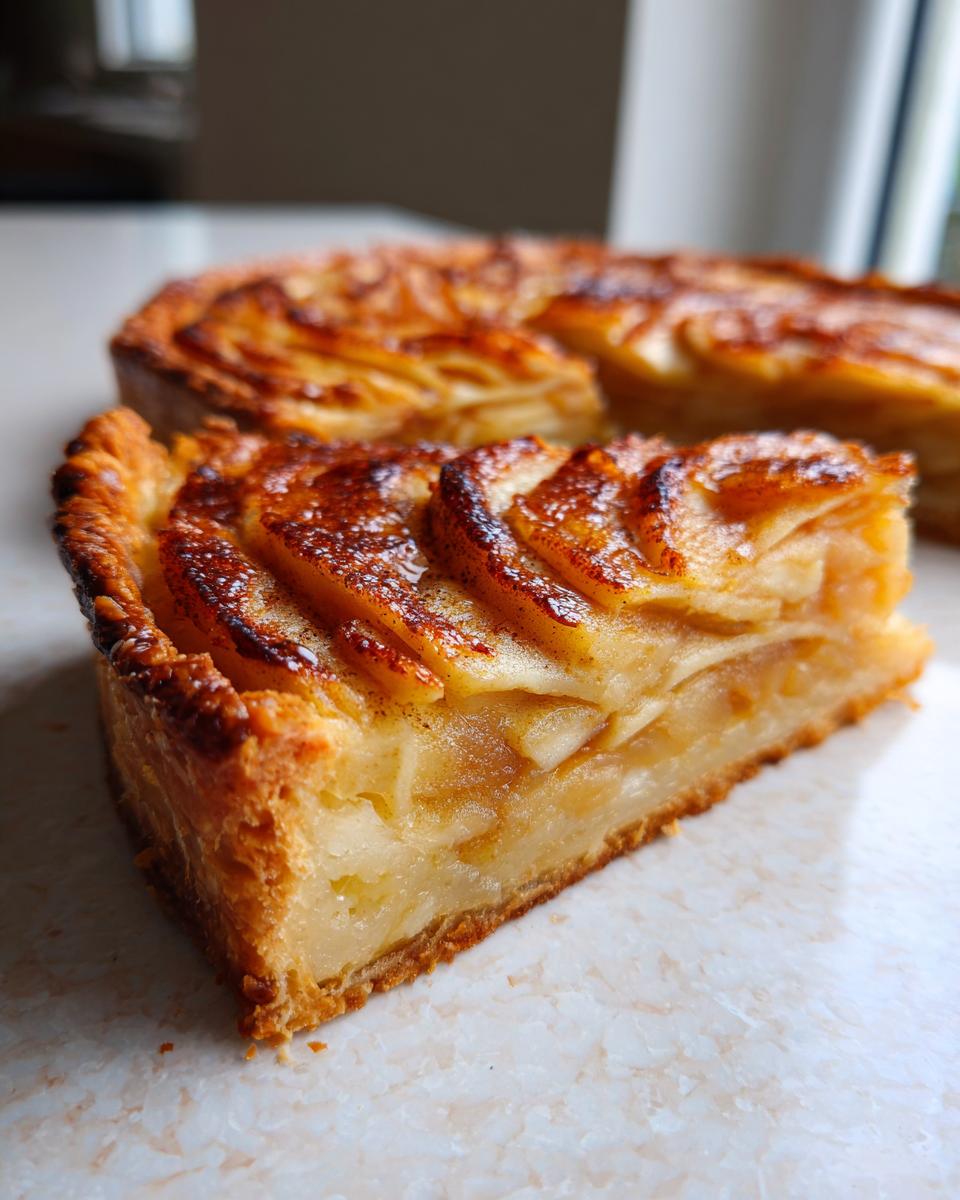
Toss those slices right in a bowl with the sugar, flour, cinnamon, and lemon juice. Now, lay the pastry out. If you’re using puff pastry, just unfold it onto your baking sheet or right into your tart pan. Pile those spiced apples right into the center. Here’s the visual trick: fold that outer 1-inch edge of pastry up and over the apples. It doesn’t need to be neat; overlapping the slices in pretty rows first, then folding over that edge creates the perfect rustic rim for this **apple tart**.
Baking and Glazing the Flaky Pastry Dessert
We need that gorgeous golden sheen, so whisk that egg and water together really fast—that’s your egg wash. Brush that mixture all over the pastry rim you just folded up. Don’t put it on the apples themselves, just the crust! Pop the whole thing into that hot oven for about 30 to 35 minutes. You’re looking for the pastry to be puffed up and deep golden brown, and the apples should be tender when you give them a gentle poke.

Once it’s out, if you want that professional, shiny look, this is your moment. Gently warm up 2 tablespoons of apricot jam or apple jelly on the stovetop or in the microwave until it’s runny. Use a pastry brush to lightly coat the top of the warm apples. This not only looks amazing but helps preserve that beautiful color on your **flaky pastry dessert**! Don’t forget to let it rest for at least 15 minutes on the pan before you even think about slicing. If you’re looking for more easy baking inspiration after this win, check out my biscuit topping cobbler recipe!
Tips for No-Fail Apple Tart Success
You want this **No-Fail Apple Tart** to come out perfect every time, and I have just a few little tricks that take it from good to absolutely show-stopping. The biggest danger area is always that bottom crust getting mushy, so here is how we fight back!
First, when you toss the apples with the sugar and flour, make sure that flour coats everything evenly. That little bit of starch mixes with the apple juices during baking and thickens them up so they don’t just weep onto your pastry. Also, feel free to mix your apples! I love a 50/50 split of sweet flavor and tart structure. If you’re using store-bought pastry, make sure it’s nice and cold before you fold up those edges—warm puff pastry just gets greasy, not flaky.
For that gorgeous retail look, I highly recommend brushing the exposed apples with a little water before the egg wash hits the rim. It helps prevent the apples from browning too quickly while the crust gets golden. Seriously, these small moves are what separate a successful home bake from one that ends up in the compost. If you want to see how a pro handles a rustic crust, check out my guide on another take on rustic French tarts!
Serving Suggestions for Your Impressive Apple Tart
Okay, you baked this gorgeous, golden **apple tart**—now what? You can’t just stare at it! This tart is amazing all by itself, especially warm from the oven, but trust me, a little something on the side elevates it instantly. This is the perfect centerpiece for any meal, truly an ideal **Autumn Apple Dessert**.
My absolute favorite way to serve it is with a big, cold scoop of vanilla bean ice cream. The contrast of the warm, spiced apple with the melting cool cream is just heaven. If you want something lighter, a dollop of fresh, lightly sweetened whipped cream is fantastic because it carries that richness without overpowering the cinnamon flavor.
If you’re feeling like going all out for a dinner party, you could even serve a thin slice alongside a drizzle of extra melted jelly, or perhaps try something completely different like my Bananas Foster sauce if you happen to have some prepped—that deep caramel pairs brilliantly with the apples!
Storage and Reheating Instructions for Leftover Apple Tart
Don’t sneeze at leftovers—this **apple tart** tastes even better the next day, if you can believe it! Since we used puff pastry, we have to be a little smart about storage to keep that crust from getting sad and soggy. If you have any left (good luck!), cover it loosely with plastic wrap or foil. You can absolutely keep it out on the counter at room temperature for a day, as long as your kitchen isn’t summer-hot.

If you need it to last longer than 24 hours, pop it into the fridge. Now, for reheating: skip the microwave; it destroys crisp pastry! I swear by popping a slice into a toaster oven or a regular oven set low—like 300°F—for just 5 minutes. It warms the apples perfectly and crisps up that buttery crust right back to its former glory. Enjoy that second slice!
Frequently Asked Questions About This Apple Tart Recipe
I know you might have a few lingering questions because baking can feel like a science sometimes, but honestly, this apple tart is super simple. Let’s cover the biggest things people usually ask so you can start baking with total confidence!
What kind of apples should I use for the best flavor?
For the genuine flavor of a classic French Apple Tart like this one, you really want a mix! I recommend using half tart apples (like Granny Smith) and half sweeter, firm apples (like Honeycrisp or Gala). This combo keeps the tart from tasting flat, and those firmer apples hold that lovely, thin slice shape without turning into applesauce during baking. If you only have one kind, just make sure it’s one known for holding up well when baked.
Can I use a homemade crust instead of puff pastry?
Absolutely! But remember, that’s why this is called an Easy Apple Tart—we are leaning into the store-bought goodness! If you prefer homemade, go for it! Use your favorite 9-inch shortcrust or pie crust recipe. Since this bakes relatively fast, just make sure your crust dough is cold when you press it in so it bakes up nice and flaky, just like a good Puff Pastry Apple Tart should.
Can I make this apple tart recipe ahead of time?
You certainly can prep ahead, which is handy for parties! You can peel and slice your apples and keep them tossed in the lemon juice and sugar mixture in an airtight container in the fridge for up to 24 hours. The assembly is fast, too! However, I really advise against baking the whole thing until just before you plan to serve it. Warm tart is the best tart, and the crispness of the pastry is unmatched right out of the oven. For more about our kitchen philosophy, check out our story page!
Estimated Nutritional Breakdown for One Serving of Apple Tart
Now, I know we bake because it tastes amazing, not so we can obsess over every single number, right? But for those of you who like to keep track, here are the estimated numbers based on the ingredients we used in this apple tart recipe. Remember, since we are using store-bought puff pastry and whatever apples I have on hand, these are just rough guidelines—consider them starting points!
If you use the apricot jelly glaze, these numbers will shift slightly, but overall, this is a pretty good representation of what one slice gives you. Enjoy it guilt-free; you deserve it after making something so elegant!
- Serving Size: 1 slice
- Calories: 320
- Total Fat: 18g (Be mindful of saturated fat at 10g, mostly from that wonderful butter in the puff pastry!)
- Carbohydrates: 38g
- Sugar: 22g (That’s the apples and the added sugar doing their job!)
- Protein: 4g
- Fiber: 3g
- Sodium: 180mg
Just a quick disclaimer here—these are our best estimates! If you swap out the puff pastry for a homemade crust, or use much sweeter apples, your final count will change. The most important metric is how happy it makes you, and I think this Simple Apple Dessert scores a 10 out of 10 on the joy meter!
Share Your Beautiful Apple Tart Creation
That’s it, friends! You’ve conquered the **apple tart**, and I really, truly want to see what you made. It’s one thing for me to proudly pull it out of my oven, but it’s another thing entirely to see your own kitchen successes.
When you finish those beautiful, golden slices, do me a favor! Come right back here and leave a review. Tell me if you used Honeycrisp or Granny Smith, how much your family loved it, and if you tried the apricot glaze. Your feedback helps other home cooks feel confident trying this recipe next time they’re planning an **Impressive Dessert**.
And please, please tag me on social media if you share a picture! There is honestly nothing better than seeing that flaky pastry and perfectly arranged apples pop up on my feed. You put the work in, so show off your gorgeous Tarte aux Pommes! If you have any final questions after baking, or if you want to share a fun substitution you made, don’t hesitate to reach out directly via my contact form. Happy baking, and come back soon!
PrintEasy Classic French Apple Tart (Tarte aux Pommes)
Make a classic French apple tart using a simple, buttery crust and tender, cinnamon-spiced apples. This recipe is easier than pie and delivers impressive results for any occasion.
- Prep Time: 20 min
- Cook Time: 35 min
- Total Time: 55 min
- Yield: 6 servings 1x
- Category: Dessert
- Method: Baking
- Cuisine: French
- Diet: Vegetarian
Ingredients
- 1 package (14.1 ounces) all-butter puff pastry, thawed
- 4 medium apples (such as Honeycrisp or Granny Smith)
- 1/4 cup granulated sugar
- 1 tablespoon all-purpose flour
- 1 teaspoon ground cinnamon
- 1 tablespoon lemon juice
- 1 large egg, beaten (for egg wash)
- 1 tablespoon water (for egg wash)
- 2 tablespoons apricot jam or apple jelly (optional, for glaze)
Instructions
- Preheat your oven to 400°F (200°C). Line a baking sheet with parchment paper.
- If using store-bought puff pastry, unfold it onto the prepared baking sheet. If you are making a homemade crust, press it into a 9-inch tart pan with a removable bottom.
- Peel, core, and thinly slice the apples. You want slices about 1/8 inch thick.
- In a medium bowl, gently toss the apple slices with the granulated sugar, flour, cinnamon, and lemon juice until the apples are evenly coated.
- Arrange the apple slices over the pastry base in a decorative pattern, such as overlapping concentric circles, leaving a 1-inch border around the edge.
- Fold the 1-inch border of the pastry up and over the edges of the apples to create a rustic rim.
- In a small bowl, whisk together the beaten egg and water to create an egg wash. Brush the folded pastry rim generously with the egg wash.
- Bake for 30 to 35 minutes, or until the crust is golden brown and the apples are tender.
- If using, warm the apricot jam or jelly slightly in a small saucepan or microwave. Brush the warm glaze lightly over the baked apples for shine.
- Let the tart cool on the baking sheet for at least 15 minutes before slicing and serving.
Notes
- For a richer flavor, use a mix of sweet and tart apples.
- If you prefer a caramelized finish, sprinkle 1 tablespoon of brown sugar over the apples before baking.
- This tart pairs well with vanilla ice cream or a dollop of lightly sweetened whipped cream.
Nutrition
- Serving Size: 1 slice
- Calories: 320
- Sugar: 22
- Sodium: 180
- Fat: 18
- Saturated Fat: 10
- Unsaturated Fat: 8
- Trans Fat: 0.5
- Carbohydrates: 38
- Fiber: 3
- Protein: 4
- Cholesterol: 55