
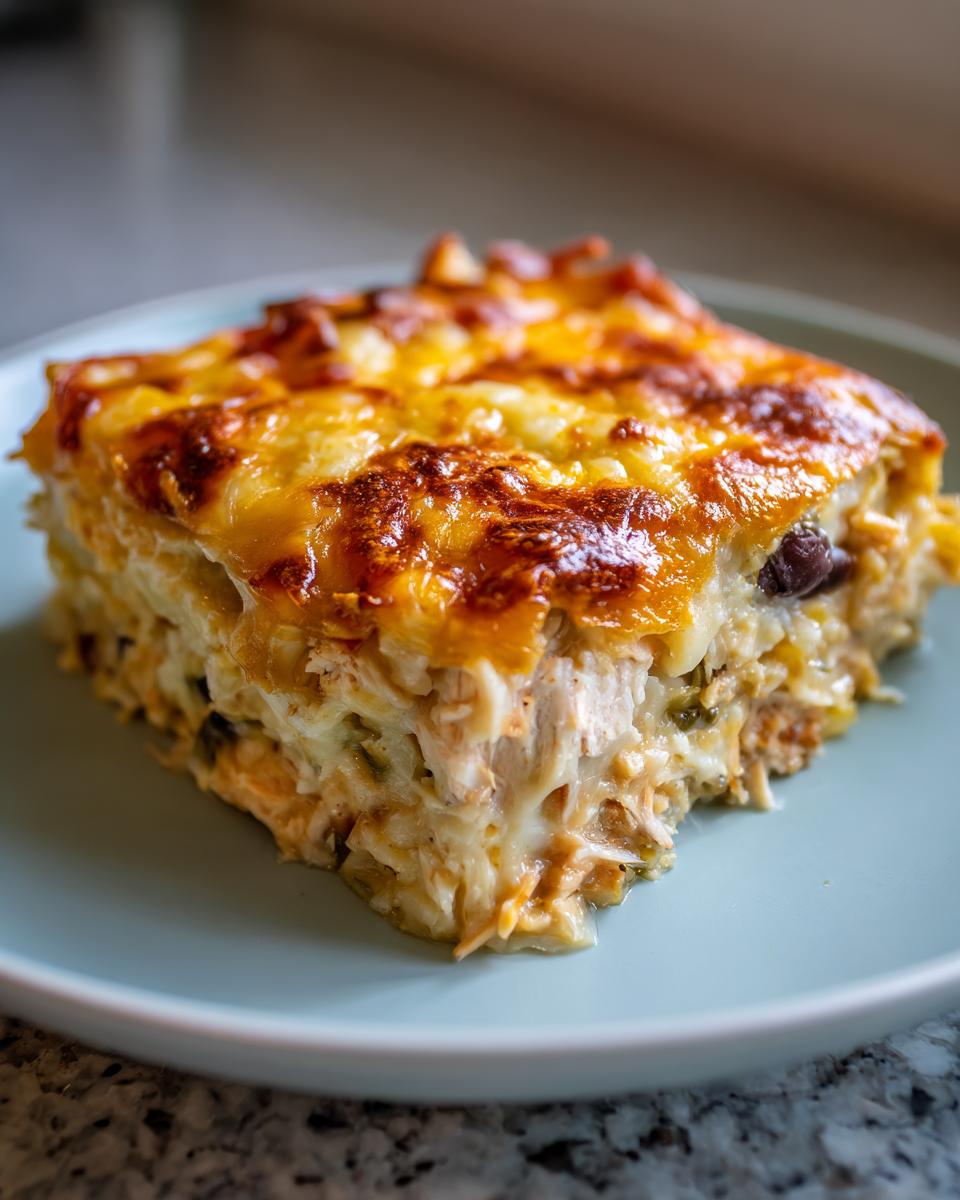
Are you tired of that Tuesday night panic when you realize you have zero energy left but somehow still need to get a satisfying, full-flavor meal on the table? Trust me, I’ve been there! That’s exactly why I developed this game-changer: the quintessential burrito bake. It takes everything you love about your favorite handheld meal—the seasoned meat, the fluffy rice, all that glorious cheese—and bakes it into one stunning, zero-fuss casserole. At Cookery Command, Emily Harrison insists that every recipe must perform beautifully under pressure, and this one is proof: it’s quick, reliable, and tastes like you cooked all afternoon.
- Why This Easy Burrito Bake Recipe Works for Busy Families
- Essential Ingredients for Your Chicken Burrito Casserole
- Step-by-Step Guide to Making the Perfect Burrito Bake
- Tips for a Freezer Friendly Burrito Bake Success
- Variations on the Classic Burrito Bake Casserole
- Serving Suggestions for Your Tex Mex Casserole
- Storage and Reheating Instructions for Leftover Burrito Bake
- Frequently Asked Questions About This Mexican Casserole Bake
- Nutritional Snapshot of the Chicken Burrito Casserole
Why This Easy Burrito Bake Recipe Works for Busy Families
When the dinner clock is ticking, you don’t need complicated steps; you need flavor that lands perfectly, every single time. This easy burrito bake recipe is the answer to that weeknight dinner scramble we all dread. It’s designed for maximum payoff with minimal effort, checking every box for a successful quick weeknight casserole. During testing in our kitchen, we made this particular recipe three times in one week—once for dinner, once for leftovers, and once completely assembled for freezing—just to make sure it holds up beautifully under real-life kitchen chaos. If you love this style of reliable comfort food, you might also enjoy our instructions for making an easy chicken cobbler casserole!
This isn’t just another family dinner casserole; it’s your new reliable weeknight hero because it tastes homemade without requiring an entire evening of work. We stand behind this version because we’ve adjusted the sauce ratio repeatedly until it never comes out dry!
Quick Prep and Minimal Cleanup: The One Pan Burrito Bake Advantage
Seriously, this is where the magic happens. You have about 15 minutes of active prep time, max. You toss everything together right in the bowl, scoop it into one standard 9×13 dish, and that’s it for the assembly! This truly is the ultimate one pan burrito bake experience. Think about it: you save so much time when you only have one dish to scrub clean later. That single dish becomes the delivery system for cheesy, Tex-Mex perfection. It lets you focus on packing lunches or just sitting down for five minutes before the chaos starts again!
Essential Ingredients for Your Chicken Burrito Casserole
To get that restaurant-worthy flavor without leaving the house, you have to start with the right stuff! People often ask me what sets this chicken burrito casserole apart from dishes that turn out just… okay. It really comes down to respecting the ingredients and making sure they’re prepped correctly. When you look at the ingredient list, you’ll see we aren’t just throwing things in; we’re building layers of flavor!
- The oil is just a tablespoon of olive oil to start things off, nothing fancy required!
- We need 1 pound of boneless, skinless chicken breasts, and please, make sure they are fully cooked and nicely shredded. Nobody wants to chew on tough, dry hunks of meat in a casserole, right?
- One 15-ounce can of black beans—rinsed and drained thoroughly—is essential for that perfect texture.
- One cup of cooked white rice. This is what keeps the whole thing filling and comforting. For faster results, I often grab leftover rice or even check out my tips on quick broccoli and rice!
- We need 10 ounces of enchilada sauce, and I always say, use what you love, red or green!
- One cup of sour cream or, if you’re looking to sneak in a little extra good stuff, plain Greek yogurt works wonders as a substitute for that creamy binder.
- For the spice backbone, grab 1 teaspoon of ground cumin, 1/2 teaspoon chili powder, 1/4 teaspoon garlic powder.
- And just salt and pepper to taste—1/2 teaspoon salt and 1/4 teaspoon pepper should get you started.
- Crucially, we need 8 medium flour tortillas, which you must cut into 1-inch pieces. These soften up in the bake and turn into delightful, doughy pockets of flavor!
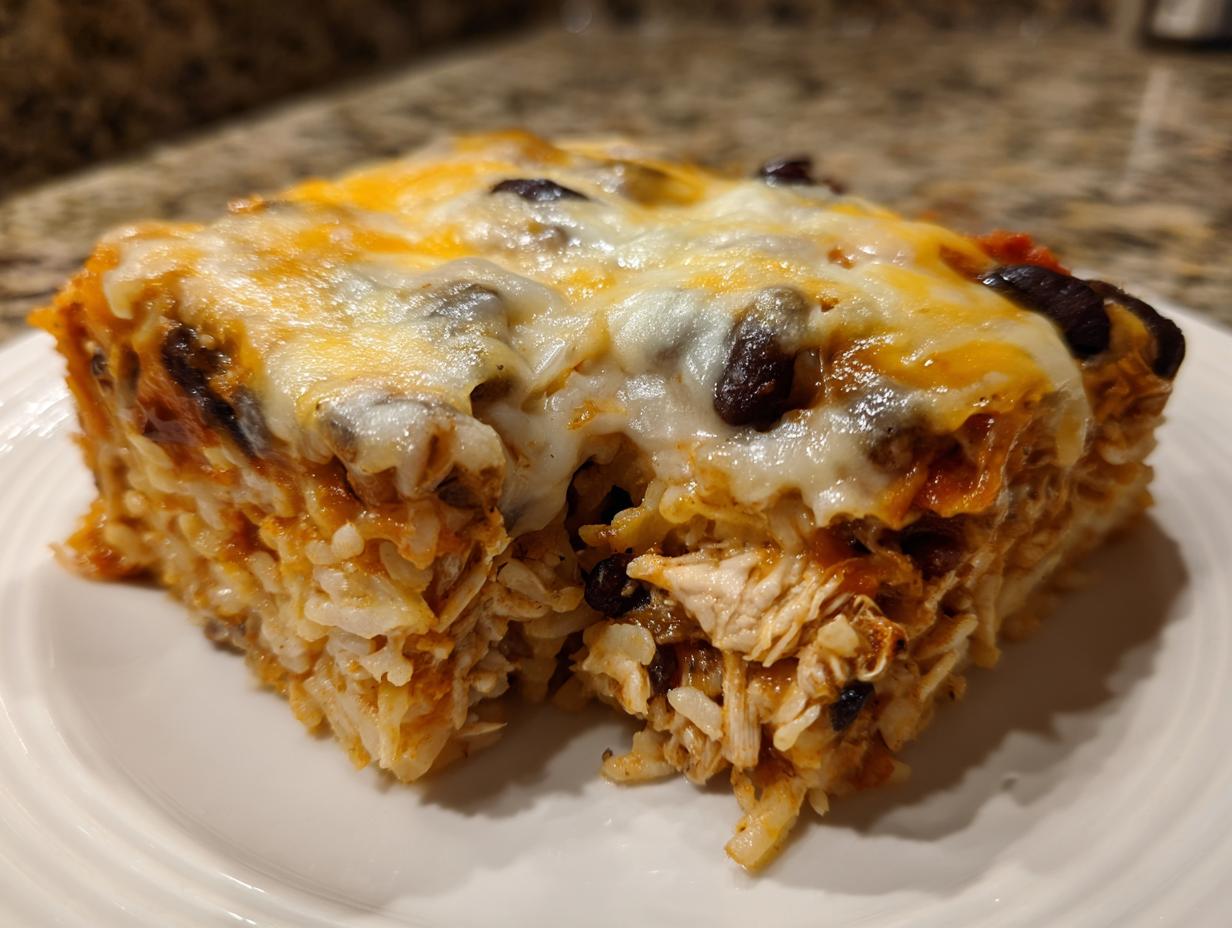
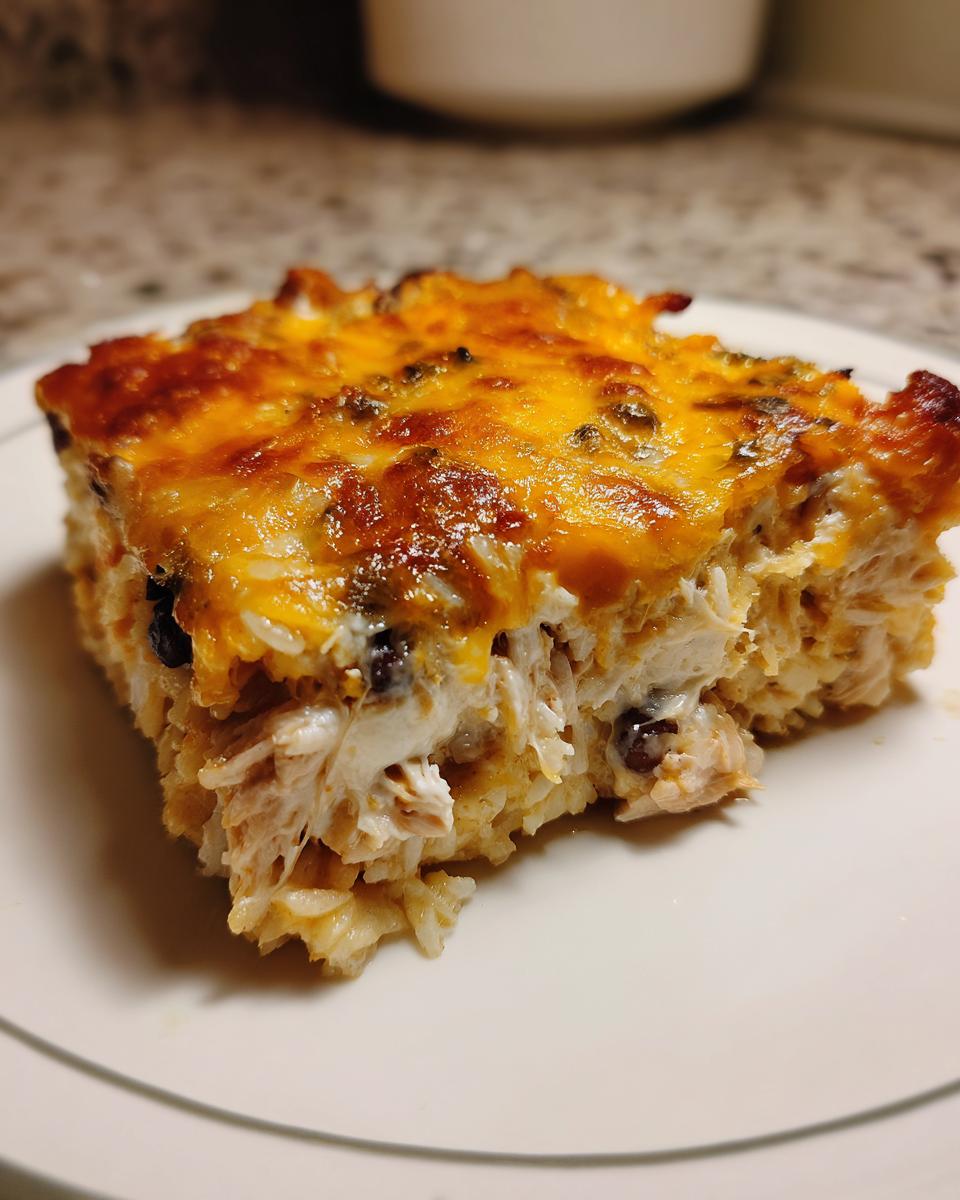
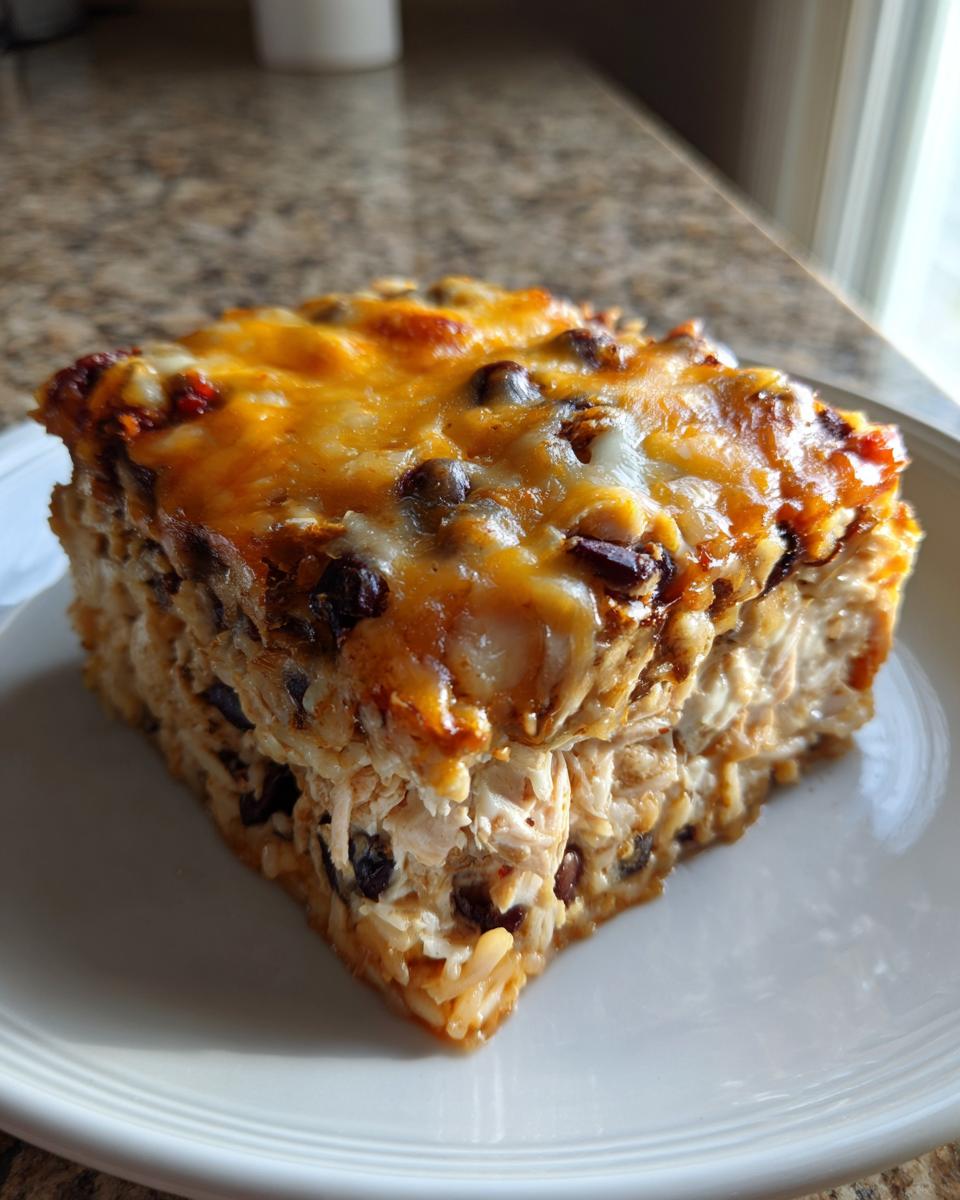
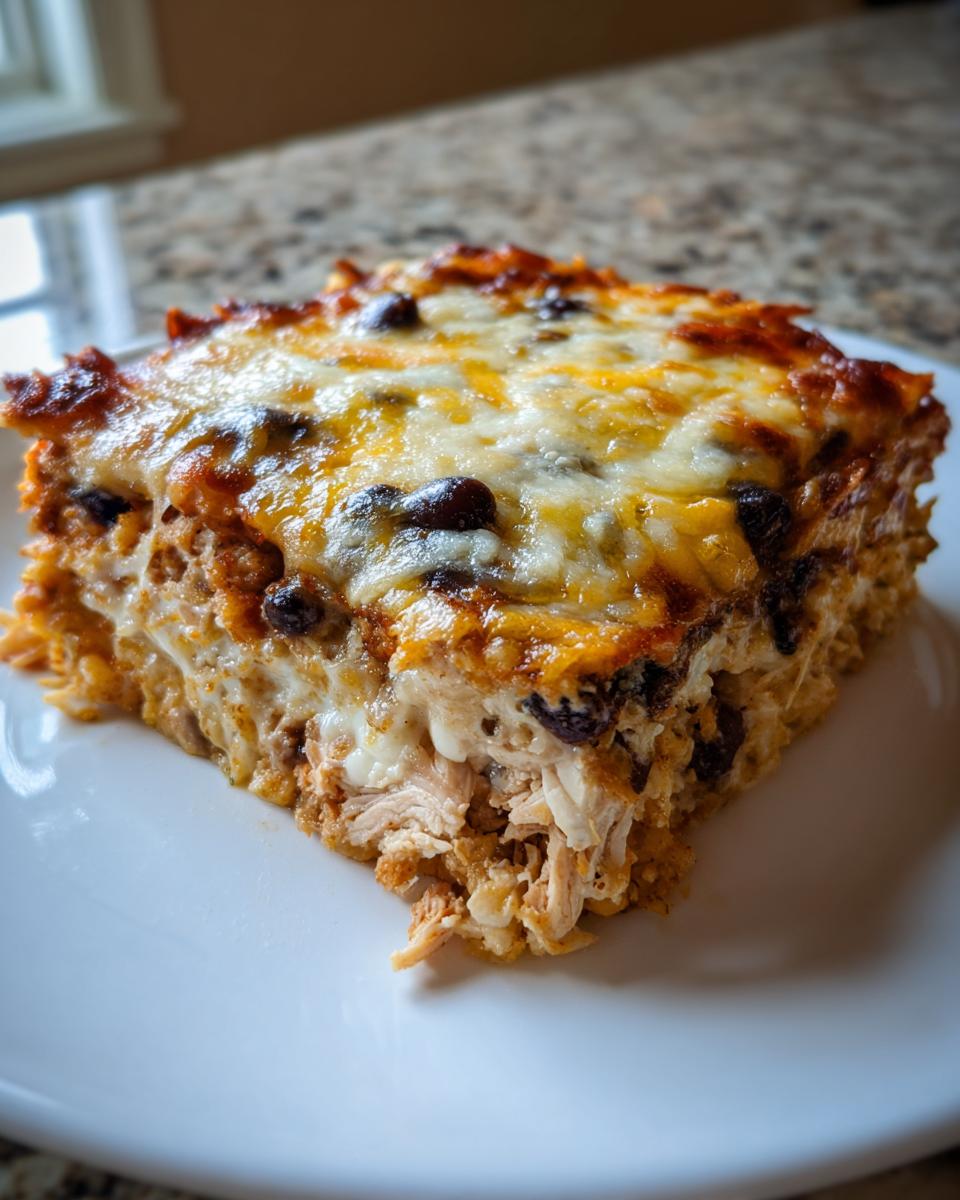
- For the cheese situation, grab 2 cups of a good Mexican blend for mixing, and then an extra 1/2 cup of Monterey Jack just for the crowning glory on top.
Ingredient Notes and Smart Substitutions
Okay, let’s talk efficiency because I know your time is precious. If you are truly pressed for time, do not hesitate! Use a good quality store-bought rotisserie chicken; just shred about three cups worth. That’s my best expert tip for shaving off 20 minutes! If chicken just isn’t happening one night, this recipe loves swaps. If you opt for ground beef instead, brown about a pound of it first and season it well with taco seasoning before adding it to the mix—it turns into a fantastic beef burrito bake concept right there in the dish!
Step-by-Step Guide to Making the Perfect Burrito Bake
Time to put this delicious plan into action! First things first: crank that oven up to 375 degrees Fahrenheit and get your 9×13 dish greased up. Honestly, this recipe saved me last winter when flu season hit our house hard. I had a few cooked chicken breasts staring at me, no energy to cook, and that aroma of savory spices mixed with melting cheese was the only thing that sounded good. That’s the beauty of this simple burrito bake—it demands so little and gives back so much comfort!
Now for the actual build. We’re keeping everything in one big bowl until just before it hits the pan. This process ensures that every single tortilla piece gets coated in that creamy, flavorful sauce before it even sees the oven. It’s critical for success with all easy baked dinner recipes!
Mixing the Base for a Creamy Burrito Casserole
Grab that large bowl and start combining your wet ingredients first—the enchilada sauce, the sour cream, and all those lovely spices like cumin and chili powder. Whisk that just until it’s smooth and uniform. We’re aiming for a truly creamy burrito casserole base here. Once that’s perfect, start folding in your shredded chicken, black beans, rice, and those 1-inch tortilla pieces. You want everything coated nicely, but please, don’t overmix! If you smash those tortillas into oblivion, you lose that great texture you worked for in the ingredient prep. Just fold until you see mostly even coverage.
Layering and Achieving the Ultimate Cheesy Baked Burrito Top
This is where we build structure! Spread exactly half of that chicken-tortilla mixture into your prepared dish. Now, sprinkle on 1 cup of your Mexican cheese blend right over that first layer. Next, plop the remaining half of the mixture on top and smooth it out gently. For the finale—the part that makes this a total crowd-pleaser and a glorious cheesy baked burrito—sprinkle the last cup of Mexican blend cheese, followed by that reserved 1/2 cup of Monterey Jack. That Jack melts beautifully and gives you those irresistible, browned, bubbly spots you crave on top of any great casserole.
Tips for a Freezer Friendly Burrito Bake Success
One thing I absolutely adore about this recipe is how amazing it is for planning ahead. Seriously, preparing one of these dishes for dinner knowing you have another one tucked away for a crazy night next week? That’s peace of mind on a plate! This absolutely becomes a champion freezer friendly burrito bake, which is a huge bonus if you are into batch cooking or just trying to keep things simple for busy times.
There are a couple of little things you need to nail for freezer success, and I’ve learned them the hard way—once I pulled out a frozen casserole that had freezer burn because I didn’t wrap it right! So, listen up, because this step is crucial for retaining that incredible flavor and moisture.
First, you must assemble the entire thing exactly as the recipe says—mix it, layer it, cheese it up—in your 9×13 dish. Don’t bake it yet! Once it’s assembled, cover that entire dish tightly. I mean *tightly*. I use two layers of plastic wrap, pressed right down along the edges, followed by a heavy layer of aluminum foil over the top. This seals out any air that causes trouble!
Label it clearly! Write down what it is—”Chicken Burrito Bake”—and the date you froze it. It stays perfect in the deep freeze for about three months. When you’re ready to use it, the best way is to transfer it to the fridge the night before you want to bake it. Thaw it overnight! Once it’s thawed, you might want to add about 10 minutes to the stated baking time just to ensure it’s piping hot all the way through. If you’re baking it straight from frozen, plan for at least 75-90 minutes at 375°F. Learn more about making ahead meals over at my guide to meal prep burrito bake success!
Variations on the Classic Burrito Bake Casserole
One of the best things about any casserole base, especially one as versatile as this burrito bake, is how easily you can make it work for whatever you have on hand or whatever mood strikes! Believe me, I’ve tweaked this recipe countless times when I needed to stretch ingredients or just sneak in some extra greens for the kids.
If chicken isn’t your favorite protein, don’t sweat it for a second! You can easily convert this into a fantastic ground beef burrito casserole just by browning a pound of ground beef with a packet of taco seasoning before you mix it into the sauce and tortilla mixture. If you go the beef route, you might find it needs just a tiny splash more enchilada sauce, since beef tends to release a little less moisture than chicken.
Now, for those days when you are looking for something a bit lighter, maybe you’re trying to incorporate more veggies, which leads us into some great healthy burrito bake ideas!
- Try adding a cup of steamed corn kernels and a cup of diced, softened bell peppers (red or green work beautifully) right into the main mix. They bulk up the casserole without adding a ton of extra calories.
- If you are feeling extra ambitious, you can replace some of the rice with cauliflower rice! Just make sure you cook the cauliflower rice completely beforehand so it doesn’t release too much water during the bake.
- For an extra protein punch that still feels satisfying, you can always add a can of refried beans right into the base mixture alongside the black beans. That makes it incredibly rich and hearty.
It’s all about adapting that core flavor profile. Whether you’re looking for a pure meat-and-cheese comfort experience or a slightly healthier takeout-style dinner, this baked tortilla casserole base is ready for your customizations. If you’re looking for other high-protein side dishes that pair well with this flavor profile, check out my recipe for easy bean salad!
Serving Suggestions for Your Tex Mex Casserole
Wow, pull that beautiful, bubbly, Tex Mex casserole out of the oven, and you’re definitely halfway to an amazing dinner! But let’s be honest: a dish this rich, savory, and cheesy deserves the perfect fresh counterpoint. You need things that slice through that decadence, and that’s where the sides come in. A great set of toppings and sides turns this simple cheesy baked burrito into a full-on spread!
My absolute first step when serving is to have cooling, bright elements ready to go. You can’t beat fresh toppings for texture and temperature contrast. Think about grabbing some creamy avocado slices—or maybe mashing up some guacamole if you’re feeling ambitious—because the healthy fat just marries perfectly with the seasoned meat and cheese.
Don’t skip the fresh herbs! A sprinkle of bright green, finely chopped cilantro really wakes up the entire dish. And, of course, a dollop of sour cream (or you can use that Greek yogurt again if you had some left over!) really adds that classic tangy creaminess we all know and love from a good burrito.
If you need something bigger on the side—maybe you’re feeding hungry teenagers or you just want to turn this into a lighter, more balanced meal—I always steer people toward something crisp. While this is a Tex-Mex feast, sometimes I serve it alongside a really bright, acidic salad. If you happen to be craving something green but still robust, you have to check out my recipe for the best Caesar salad recipe with chicken; the creamy, garlicky dressing is surprisingly wonderful against the bold spices of this bake!
So, plan for freshness, plan for tang, and don’t be shy with the salsa. You’ve done the hard work baking; now let the toppings do the decorating!
Storage and Reheating Instructions for Leftover Burrito Bake
Okay, if you managed to have any leftover of this incredible burrito bake—which, let’s be real, usually takes some serious willpower—you need to know how to save those delicious moments for later. I take storing leftovers seriously because nobody wants a sad, dried-out casserole the next day! This recipe is packed with sauce and soft tortillas, so maintaining that texture when reheating is my top priority for building trust in this recipe.
For storage, the key is to get it cooled down and sealed up quickly. Once the casserole has cooled to room temperature (don’t leave it out longer than two hours, okay? Food safety first!), cut any remaining squares and transfer them into an airtight glass container. Glass is just better for reheating, I find. You can usually keep these leftovers perfectly good in the refrigerator for a solid three to four days. If you need to store it longer, remember that the freezer is your best friend—you can wrap individual portions tightly in plastic wrap and foil and they are good for up to three months!
Now, for the glorious part: reheating! You have two main options, and one is definitely superior for flavor and texture preservation.
The Best Way: Reheating in the Oven
If you want that melt-in-your-mouth texture back, the oven is calling your name. Set your oven to a gentle 350 degrees Fahrenheit. Place your desired portion, ideally in an oven-safe dish, and cover it loosely with foil. This traps the steam and moisture inside so the tortillas don’t turn stiff. You only need about 15 to 20 minutes for a square or two to heat through completely. It comes out tasting almost exactly like it did fresh from the oven—that’s the trust factor right there!
The Quick Fix: Microwave Reheating
If you are absolutely starving and need this cheesy baked burrito goodness in under two minutes, the microwave will work, but it’s a trade-off. Place a serving on a microwave-safe plate and cover it with a damp paper towel. That paper towel is non-negotiable because it creates steam and stops the edges from getting rubbery. Zap it in 45-second intervals, checking between bursts, until it’s hot. Just manage your expectations—the cheese might not be as perfectly gooey as when it’s first baked, but it’s fast and still tastes amazing!
Frequently Asked Questions About This Mexican Casserole Bake
It’s funny; even when a recipe is simple, people always have wonderful questions to make sure they get it absolutely perfect for their family! I try to answer everything I can in the main recipe, but here are a few things readers often ask me about this flavor-packed Mexican casserole bake.
Can I use corn tortillas instead of flour in this burrito bake?
That is such a great question, especially if you’re trying to keep things gluten-free or just prefer the flavor profile of corn! You definitely *can*, but you need to be more careful about the texture. Flour tortillas are more pliable and absorb that creamy sauce beautifully, becoming almost like soft pasta pillows in the mix. Corn tortillas tend to stiffen up or even break apart more noticeably when they bake, and they can dry out faster.
If you want to go the corn route for this burrito bake, I have two suggestions for you! First, you might want to add just an extra 1/4 cup of enchilada sauce or sour cream to the base mixture to ensure everything stays moist enough. Second, instead of cutting them up and mixing them in, consider using the corn tortillas whole or halved and then doing a true layered burrito casserole construction, treating them just like you would in a traditional enchilada stack. Layer them raw right in between the filling layers, and they’ll steam perfectly.
How can I make this easy burrito bake recipe spicier?
If you’re like my husband and need that extra kick to really wake up your tastebuds, making this bake spicier is super simple! You already have cumin and chili powder in there providing the baseline warmth, but for actual heat, I suggest adding 1/2 teaspoon of cayenne pepper right into your spice blend when you mix the sour cream and sauce. That gets instant heat distributed throughout the entire thing.
Another trick for next-level flavor in this Tex Mex casserole is your choice of enchilada sauce. If you use green sauce, swap it for a hot green chili sauce. If you normally use mild red, switch to a medium or hot variety. For serving, keep fresh jalapeños sliced thin or even pickled jalapeños nearby—that way, everyone can customize their own square!
What internal temperature should the casserole reach?
This is a sign of a seasoned home cook asking the right questions! Because this dish contains fully cooked chicken, rice, and dairy, we aren’t cooking for safety as much as we are cooking for texture and ensuring everything is deliciously hot. However, for peace of mind and the best eating experience, you should aim for the center of the casserole to register 165 degrees Fahrenheit on an instant-read thermometer. That 375°F baking temperature usually gets you there in about 30 minutes, giving you that ideal melted cheese top and steaming hot center. It’s the sign that your quick weeknight casserole is ready to eat!
Can this be made ahead like a meal prep burrito bake?
Absolutely! In fact, I often prep this on Sunday specifically so I don’t have to think about dinner all week. You can assemble the entire dish, cover it tightly (I double-wrap everything so no freezer air gets in!), and keep it in the fridge for up to 2 days, or freeze it for up to 3 months. Just remember that if you bake it straight from the fridge, you’ll need to add about 10-15 minutes to the bake time I listed. If you’re baking from frozen, cover it with foil and bake low and slow—maybe 45 minutes at 350°F before uncovering and finishing. You can also find more great batch cooking ideas in my guide to easy appetizers and snacks!
Nutritional Snapshot of the Chicken Burrito Casserole
Now, I know some of you are balancing macros or just trying to keep an eye on what you’re eating, even when diving into comfort food like this amazing burrito bake. It’s important to me that you have all the information you need right here, transparently, because that’s the Cookery Command promise. While this recipe is loaded with big, bold flavors—and yes, cheese needs to be respected!—it also packs a serious protein punch thanks to all that chicken!
Here is the estimated breakdown for one serving of this chicken burrito casserole, based on the exact ingredients listed in the recipe above. Remember, because we all use different brands of tortillas, cheese, and sauce, these numbers are a good, honest ballpark estimate, not a sworn medical document!
- Serving Size: 1 serving
- Calories: 480
- Protein: 30g (See? That’s excellent for a weeknight meal!)
- Fat: 22g (About 11g of that is saturated fat, mostly from that glorious cheese topping)
- Carbohydrates: 45g
- Fiber: 7g
- Sugar: 6g
- Sodium: 750mg (This is where those canned goods add up, so rinsing your beans is extra important!)
If you’re focusing on filling, satisfying dinners that keep you full until breakfast, this recipe shines. We’ve managed to cram a lot of goodness into a straightforward meal, proving that delicious isn’t forbidden! For more dishes focused on making your macros happy while still delivering that hearty feel, you might want to check out my guide on the protein-packed burrito bake variations.
We aim for reliability and transparency here in the kitchen, and that includes being upfront about the numbers. Eat well!
PrintEasy Chicken Burrito Bake Casserole for Family Dinner
This easy burrito bake delivers all the bold flavors of a classic burrito in one simple, comforting casserole. It uses seasoned chicken, rice, beans, and plenty of cheese, making it a perfect, protein-packed option for quick weeknight dinners or meal prep.
- Prep Time: 15 min
- Cook Time: 30 min
- Total Time: 45 min
- Yield: 6 servings 1x
- Category: Dinner
- Method: Baking
- Cuisine: Tex-Mex
- Diet: Vegetarian
Ingredients
- 1 tablespoon olive oil
- 1 pound boneless, skinless chicken breasts, cooked and shredded
- 1 (15 ounce) can black beans, rinsed and drained
- 1 cup cooked white rice
- 1 (10 ounce) can enchilada sauce (red or green)
- 1 cup sour cream or plain Greek yogurt
- 1 teaspoon ground cumin
- 1/2 teaspoon chili powder
- 1/4 teaspoon garlic powder
- 1/2 teaspoon salt
- 1/4 teaspoon black pepper
- 8 medium flour tortillas, cut into 1-inch pieces
- 2 cups shredded Mexican cheese blend
- 1/2 cup shredded Monterey Jack cheese (for topping)
- Optional toppings: salsa, sliced green onions, avocado
Instructions
- Preheat your oven to 375 degrees Fahrenheit. Lightly grease a 9×13 inch baking dish.
- In a large bowl, combine the shredded chicken, rinsed black beans, cooked rice, enchilada sauce, sour cream, cumin, chili powder, garlic powder, salt, and pepper. Mix until all ingredients are evenly coated.
- Fold in the cut tortilla pieces into the chicken mixture until they are mostly incorporated.
- Spread half of the chicken and tortilla mixture evenly into the prepared baking dish. Sprinkle with 1 cup of the Mexican cheese blend.
- Top with the remaining chicken mixture, spreading it out evenly. Sprinkle the remaining 1 cup of Mexican cheese blend and the Monterey Jack cheese over the top layer.
- Bake for 25 to 30 minutes, or until the casserole is hot throughout and the cheese is melted and lightly browned.
- Let the cheesy baked burrito casserole rest for 5 minutes before serving. Cut into squares and serve with your preferred toppings like salsa or green onions.
Notes
- For a freezer-friendly burrito bake, assemble the casserole completely, cover tightly with foil, and freeze for up to three months. Thaw overnight in the refrigerator before baking, adding about 10 minutes to the bake time.
- You can substitute ground beef for the chicken. Brown 1 pound of ground beef with taco seasoning before mixing it into the casserole base.
- To make this a one-pan burrito bake, use pre-cooked rice and rotisserie chicken to reduce prep time significantly.
Nutrition
- Serving Size: 1 serving
- Calories: 480
- Sugar: 6
- Sodium: 750
- Fat: 22
- Saturated Fat: 11
- Unsaturated Fat: 11
- Trans Fat: 0.5
- Carbohydrates: 45
- Fiber: 7
- Protein: 30
- Cholesterol: 75