
I’m going to let you in on a little secret: that restaurant-quality dessert that seems impossible to replicate? It’s actually waiting for you right in your kitchen. I’m talking about the glorious, rich, and utterly decadent **creme brulee**. Forget those shaky, overcooked custards you’ve had—we are shooting for total perfection here! My goal, just like the folks who built this site, is making sure you master the technique, especially that moment of truth: achieving that perfect, glass-like crack over the cold, silky vanilla custard.
If you’ve ever swooned over that contrast between the shatteringly crisp, warm caramelized sugar and the cool, luscious cream underneath, you know why this is worth the effort. It truly is culinary magic! We’ve tested and refined this classic French custard method obsessively, ensuring our focus on gentle heat and precision results in a dessert that feels luxurious but is totally achievable.
We absolutely respect tradition here, but we marry it with iron-clad technique. Trust me on this one; once you nail the water bath and the torch, you’ll be whipping these out for everyone. You can even read a bit more about why we obsess over technique right over here. Let’s make that amazing crack happen!
- Why This Creme Brulee Recipe Delivers an Elegant French Dessert Experience
- Gathering Ingredients for Your Creme Brulee
- Step-by-Step Guide to Making the Creme Brulee Custard Base
- Baking Your Creme Brulee in a Water Bath
- Chilling and Preparing for the Caramelized Sugar Topping
- The Grand Finale: Torching the Creme Brulee
- Tips for Success with Your Creme Brulee Recipe
- Frequently Asked Questions About Making Creme Brulee
- Estimated Nutritional Data for This Elegant French Dessert
Why This Creme Brulee Recipe Delivers an Elegant French Dessert Experience
When you make our recipe, you aren’t just baking a dessert; you’re creating an impressive finale for your meal. It’s shocking how few ingredients we use to achieve something that tastes like it was flown in from Paris! But the secret isn’t in the shopping list—it’s in the method. We walk you through the reliable steps so you can serve something truly special.
- You get that amazing restaurant quality, every single time.
- The ingredient list is surprisingly short—mostly just cream, eggs, and sugar!
- We guarantee that perfect, shatteringly crisp caramelized sugar topping that everyone craves.
Achieving the Perfect Vanilla Custard Dessert Texture
The biggest fear I hear about this lovely dessert is scrambling the eggs, making the base gritty instead of silky smooth. Trust me, that never happens here! We rely totally on a gentle water bath, or bain-marie, while baking. This extra layer of slow, even heat cooks the rich vanilla custard evenly. It keeps the temperature steady around the ramekins so you never have to worry about curdling. It’s all about patience!
The Secret to a Shattering Caramelized Sugar Topping
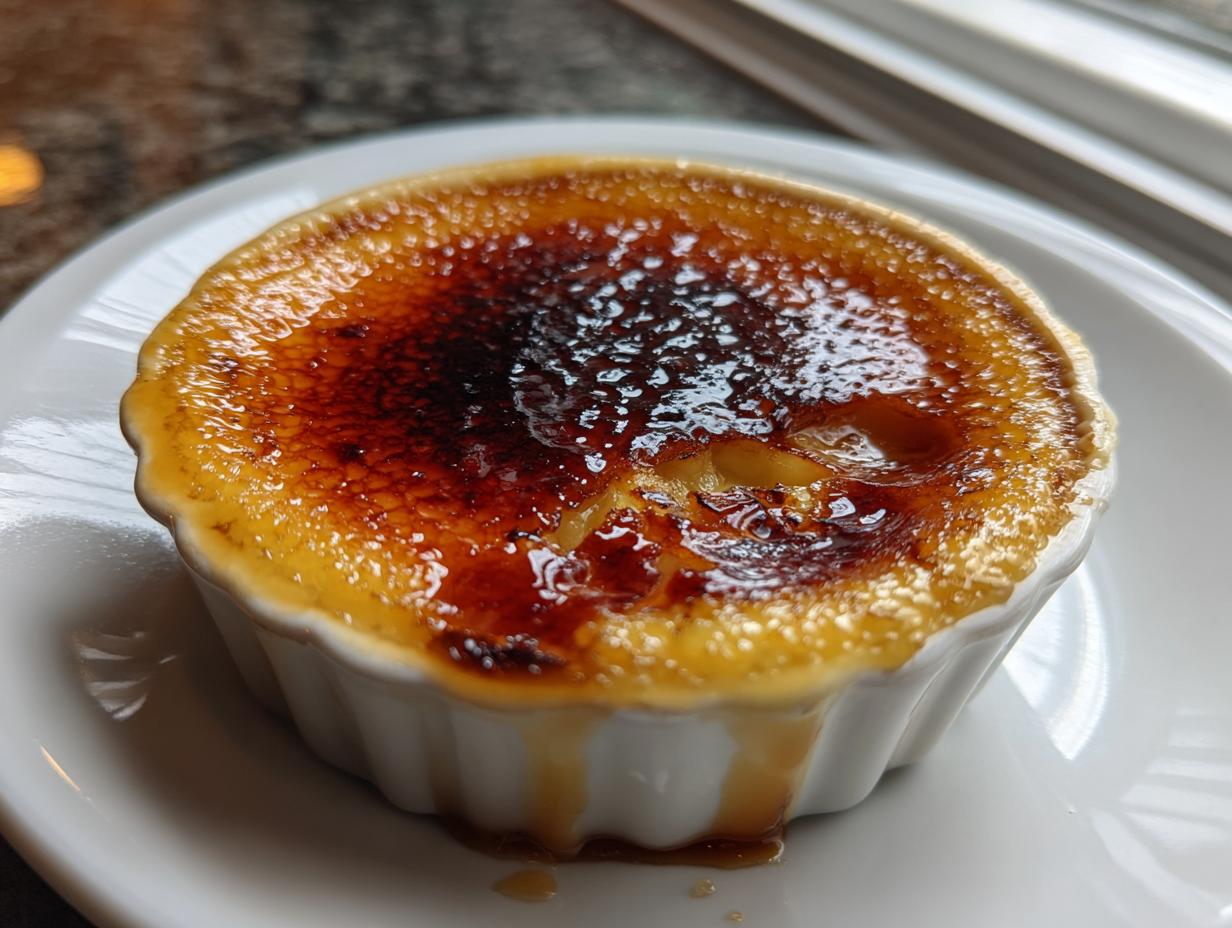
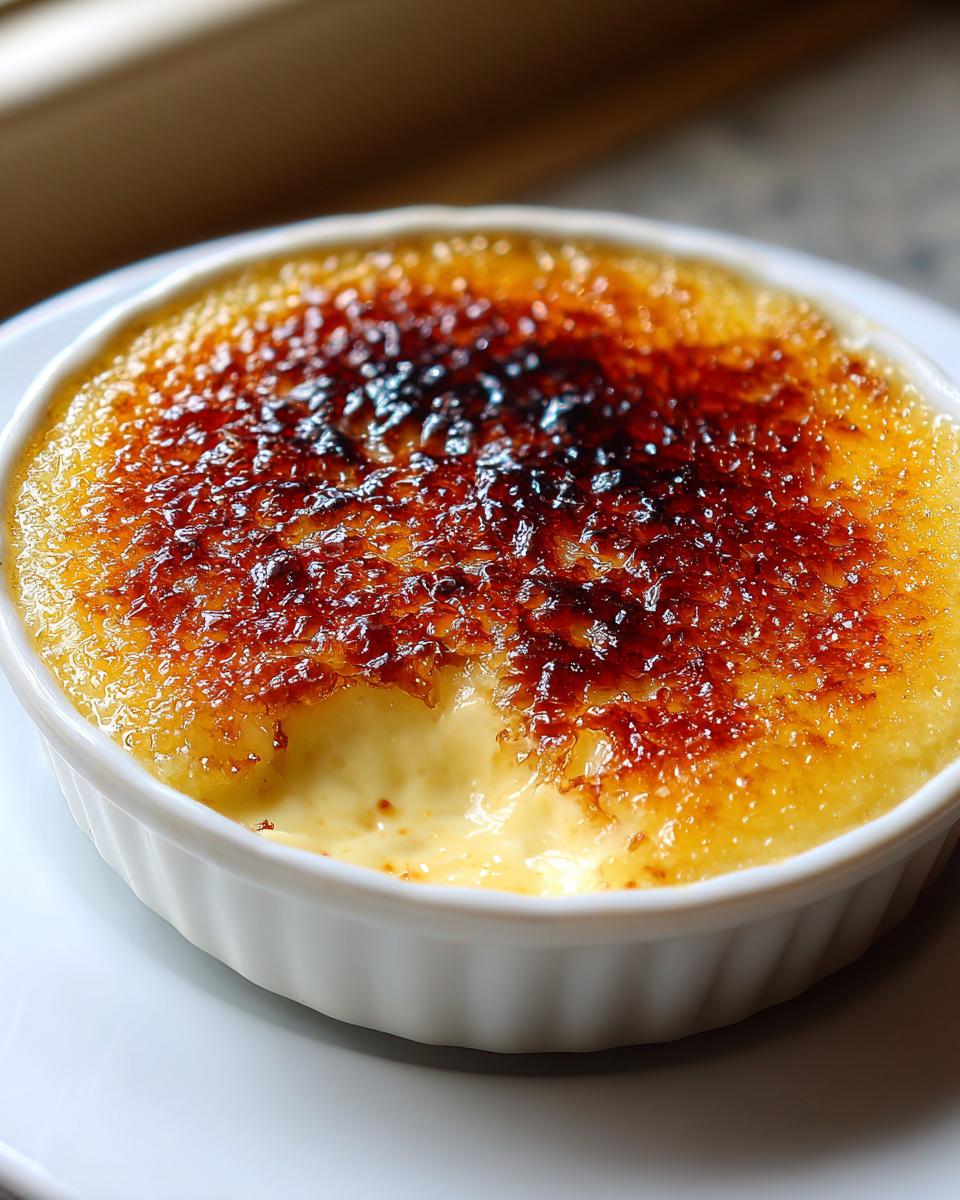
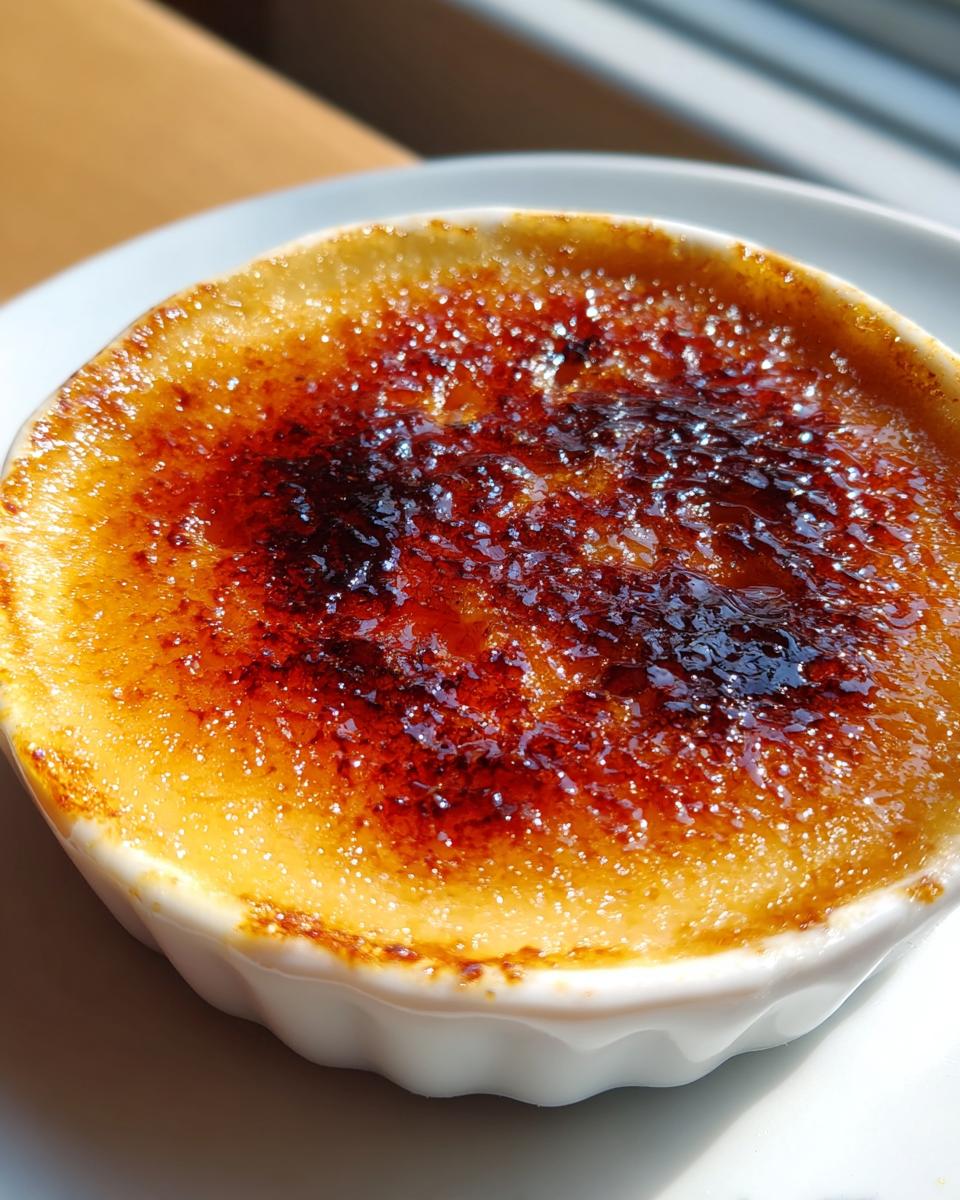
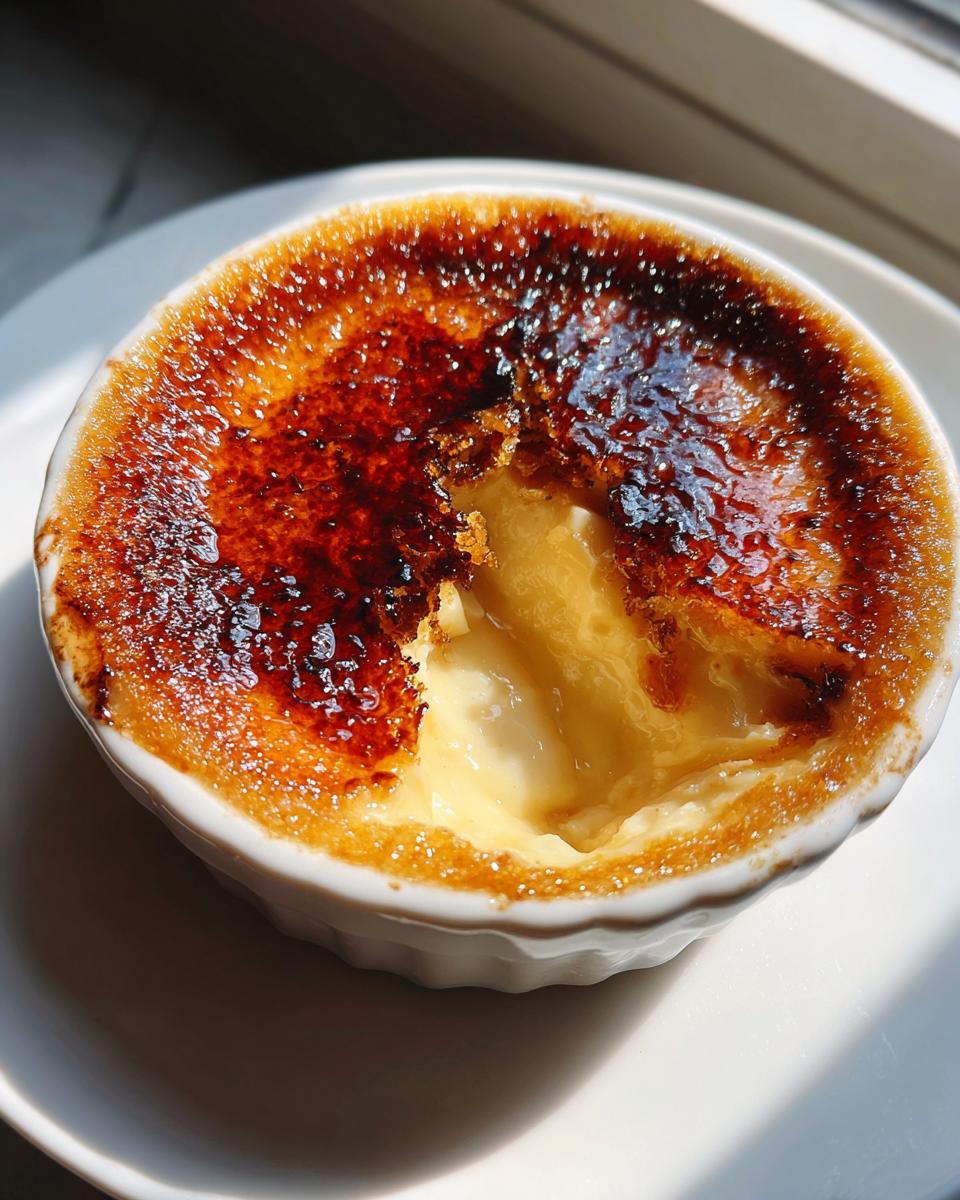
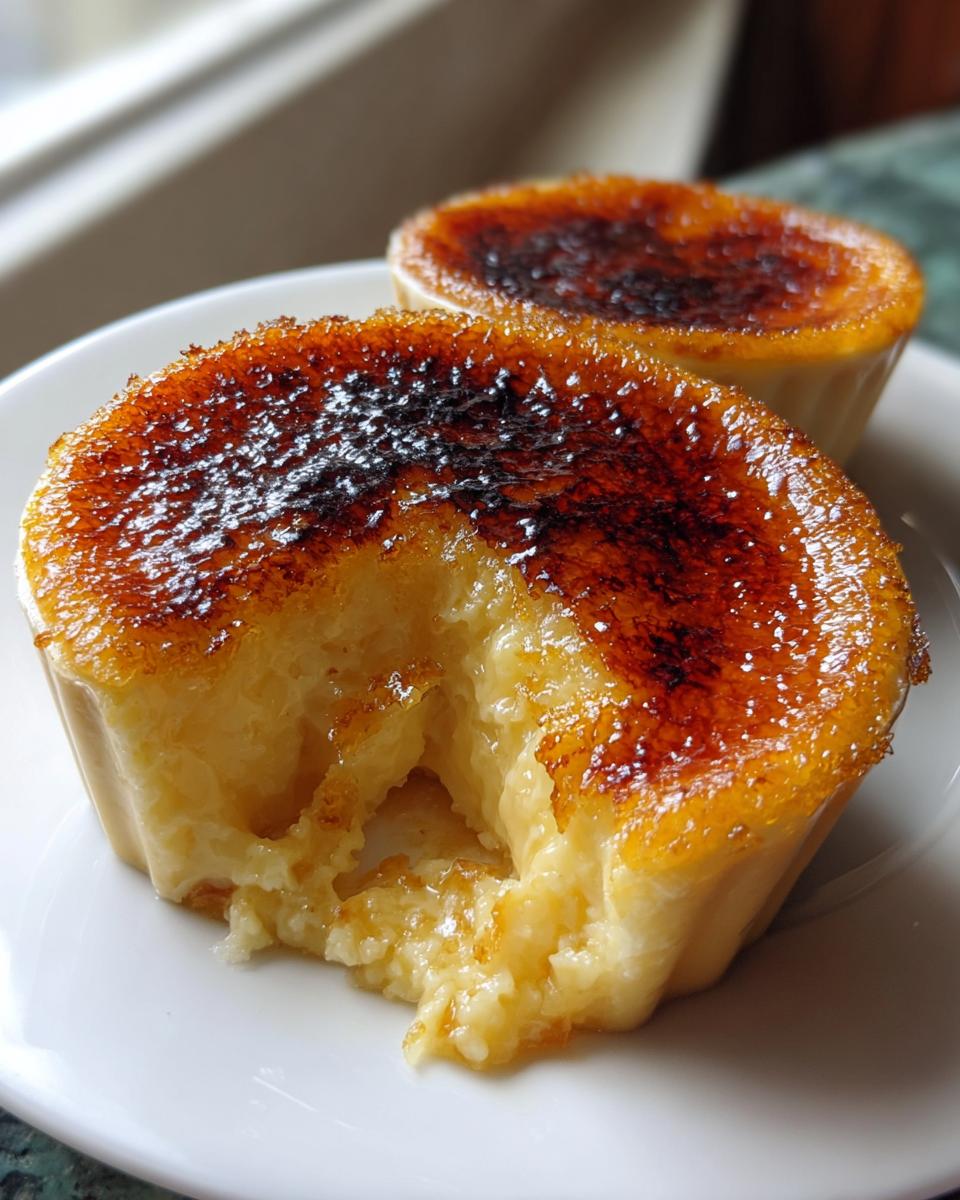
This is the fun part, the magic trick! Once that custard is perfectly chilled, we rain down an even layer of sugar. Then comes your kitchen torch. Working quickly, you want to see that sugar bubble up and turn deep amber right before your eyes. That contrast—the warm, brittle shell giving way to the icy cold, creamy body—is what takes this from good to absolutely unforgettable. Don’t skip the chilling stage; it makes the crack so much better!
Gathering Ingredients for Your Creme Brulee
When you’re making something as pure and simple as a classic crème brûlée, you absolutely cannot skimp on quality! Since there are so few players in this rich vanilla custard dessert game, every component has to be top-notch. We’re only making enough for four perfect servings here, so make those ingredients count. You must use really good quality heavy cream; that’s the backbone of the texture we’re aiming for! And please, grab the nice pure vanilla extract, not that imitation stuff. It makes a huge difference in the depth of flavor.
Ingredient Clarity and Preparation
The success of this elegant French dessert starts before the whisk even touches the bowl. Make sure you measure out exactly five large egg yolks—don’t try to sneak in whole eggs here; we need that richness without the white protein that causes curdling. For that sweet, crackly top, you’ll need extra granulated sugar set aside specifically for that final layer. Honestly, having everything measured out and ready (mise en place, in fancy chef talk!) keeps me calm when I start the heating process. It just makes everything flow so much smoother.
Step-by-Step Guide to Making the Creme Brulee Custard Base
Alright, deep breaths! This is where we build the foundation for that perfect vanilla custard dessert. First things first: get your oven humming along at 300°F (150°C). While it’s warming up, set your four little ramekins right inside that deep baking dish you’ll use for the water bath later—it saves awkward lifting once everything is hot. Now, grab your saucepan for the heavy cream. You need to heat it gently until you see just tiny little bubbles forming around the edge—that’s right on the verge of a simmer. Don’t let it roll! If it boils, you lose moisture and it gets too hot for the eggs. Pull it straight off the heat and stir in that lovely vanilla extract.
Meanwhile, in a separate bowl, you’re going to whisk those five egg yolks together with the half-cup of sugar until they look lighter in color and are a little thicker. Whisk in your pinch of salt too. This part feels routine, but it’s important groundwork for a silky texture!
Mastering the Tempering Process for Smooth Vanilla Custard Dessert
Okay, this tempering step is where we prove we understand the science behind our gorgeous classic creme brulee! This is the ONLY way to safely introduce the hot cream to the cold egg yolks without instantly turning them into little yellow scrambled bits. You have to be slow and steady. Take about one cup of that warm cream mixture and pour it into the yolks in a very thin, steady stream while you whisk the yolks constantly, never stopping! You’re actually slowly raising the temperature of the eggs so they are ready. Once those yolks are gently warmed up, *then* you can pour that improved yolk mixture back into the saucepan with the rest of the warm cream. Whisk it all together gently—we don’t want to make new bubbles now!
Straining the Creme Brulee Mixture for Ultimate Silkiness
Once your base is perfectly blended, you need to strain it. I know, it feels like an extra step, but trust me, it’s non-negotiable for a truly elegant French dessert. Use a fine-mesh sieve, either over a clean bowl or directly into your measuring cup. This simple action catches any bits of cooked egg that might have slipped through the tempering process. More importantly, it removes the chalazae—those little stringy white bits attached to the yolk—and any tiny air bubbles floating on top. We are going for liquid velvet here, and straining is the key to achieving it!
Baking Your Creme Brulee in a Water Bath
Now we move to the oven, and this is where we guarantee that smooth texture we’ve been working so hard for! Remember that deep baking dish holding your ramekins? It’s time for the bain-marie, or water bath. Carefully pour hot water—using water that’s already hot really speeds things up—into that outer dish. You want the water to come about halfway up the sides of the little custard cups. This water bath is absolutely essential for making a perfect classic creme brulee because it insulates the custards. It acts like a shock absorber against the oven’s heat, ensuring everything cooks slowly and evenly at our target 300°F. Bake them for about 30 to 40 minutes. You want gentle cooking, not boiling!
Identifying When Your Creme Brulee Custard is Perfectly Set
The moment of truth during baking lies entirely in the jiggle. You’re not looking for them to be completely firm! Carefully slide the pan out and give it a gentle nudge. The edges should look solid, but if the center still wobbles slightly—like a shy, unset pudding—they are done! Pull them out immediately. If you wait until the center stops jiggling entirely, they will be overbaked once they cool down. Remember, residual heat is doing a lot of work here, so take them out when they still look just a tiny bit underdone!
Chilling and Preparing for the Caramelized Sugar Topping
Now that you’ve pulled those beautiful custards out of the oven and managed not to burn yourself, you have to exercise the hardest muscle in baking: patience! Those custards need to cool down completely on the counter first. Don’t even think about touching the torch yet! Once they’re just warm—maybe 20 minutes on the rack—it’s time for the fridge. We need them ice cold for the final act, so cover them with plastic wrap (be careful not to let the wrap touch that fragile surface!) and let them chill for a minimum of four hours. Honestly, overnight is even better. That deeply chilled, silky interior is what makes that final, hot caramelized sugar topping crackle perfectly when you tap it.
The Grand Finale: Torching the Creme Brulee
We’ve reached the absolute best part of making your creme brulee—the caramelization! First, make sure those custards are truly frosty cold from the fridge; this contrast is everything. Grab your extra granulated sugar and sprinkle a very thin, even layer right over the top of each one. I mean thin! You only need enough sugar to cover the surface completely, maybe a teaspoon or two per ramekin. If you pile it on, it’ll just burn before it melts smoothly.
Now, bring out the big guns: the kitchen torch. You want to hold the flame about two inches above the sugar layer and move it constantly in small, overlapping circles. Don’t linger in one spot, or you’ll end up with a burnt black hole instead of golden amber! Watch the sugar bubble, melt, and slowly turn that deep, beautiful brown. It happens surprisingly fast. Once it’s all melted and crackly looking, pull the torch away immediately. That quick application melts the sugar without having time to push unwanted heat down into your perfectly chilled vanilla custard dessert. Pop these aside for just five minutes to let that shell harden, and voilà—you have achieved pure culinary magic!
Tips for Success with Your Creme Brulee Recipe
I’ve made enough of this classic crème brûlée to know where things can go sideways, so let me pass on a quick survival guide! Firstly, remember that broiler alternative I mentioned? If you absolutely don’t have a kitchen torch—and trust me, you should get one because it’s so much fun—you *can* use your oven’s broiler. But you have to be ready to hover! Put the sugared ramekins on a high rack, preheat the broiler until it’s screaming hot, and then watch them like a hawk. Seriously, 60 seconds can turn gorgeous amber into bitter ash! I usually leave them under for maybe two minutes total, checking every 20 seconds.
The other critical tip is that resting period right after the torching. Once that sugar crust forms, it’s super hot, and if you try to crack it right away, it’ll just stick to your spoon. You need to let it sit on the counter for about five minutes. That brief pause allows the fresh caramel to cool down and harden into that satisfying, shatter-resistant shield we’re aiming for. Trust me, waiting those few extra minutes is the difference between a good dessert and a truly spectacular one!
Frequently Asked Questions About Making Creme Brulee
I get so many questions about this favorite dessert, and honestly, most issues come from small technique slips that are easy to fix next time! It’s all part of learning to command your kitchen. Here are a few things people often ask me about serving up a beautiful classic creme brulee.
Can I use milk instead of heavy cream in this creme brulee recipe?
Oh, honey, please don’t! You really need that heavy cream here. Milk is too watery; you’ll end up with something that tastes closer to a thin pudding than a rich, decadent vanilla custard dessert. The high fat content in the heavy cream is what gives this French dessert its velvety, luxurious mouthfeel after baking and chilling. If you try using milk, the texture will just be disappointing!
How do I know if my custard for the creme brulee actually scrambled?
If you look at your mixture after pouring it into the ramekins and you see little tiny specks or ribbons of solidified egg floating around, oops, you probably added the hot cream too fast! The key is whisking constantly while you pour that initial ladle of hot liquid in very slowly. If you do see speckles, though, don’t worry! That’s exactly why we strain the mixture through a fine-mesh sieve. It catches those little bits, saving your creme brulee base instantly. You’ll still get a decent result!
How long does a classic creme brulee safely last in the fridge?
Since this custard is so rich, it actually holds up really well! Once you’ve successfully chilled the custard, it keeps perfectly for about four or five days in the refrigerator, covered tightly. The best part is that you can make them ahead of time for a party! Just remember you *must* wait until you are absolutely ready to serve them before sprinkling on the sugar and torching that amazing caramelized sugar topping. You can even prepare the sugar topping ahead, but place them under the broiler immediately, as you don’t want that sugar sitting on the cold custard for hours and dissolving.
Is using a kitchen torch really necessary for the topping?
For that perfect, delicate crackle effect, yes, a torch is what I always recommend! It allows you to focus intense heat only on the sugar layer for just a few seconds. This melts the sugar perfectly and caramelizes it to a beautiful amber before the cold custard underneath has time to warm up. If you want to try the broiler method as an alternative, just make sure you check on them every 15 seconds. That close call is what scares people away from the broiler, but it can work in a pinch! If you’ve messed up a batch before, remember you can always reach out to us for more help over at the Cookery Command contact page!
Estimated Nutritional Data for This Elegant French Dessert
Now, I know we’re cooking for pure joy here, but sometimes we need the facts! Because this creme brulee is made with rich heavy cream and plenty of egg yolks, it definitely lands on the decadent side. These numbers are just estimates based on our specific recipe and serving size (which is one lovely ramekin). If you’re tracking macros, just keep in mind that real-world results can change based on the brand of cream you buy, but this gives you a great baseline for this amazing dessert!
- Calories: Approximately 450 per serving
- Fat: Around 38g
- Protein: About 8g
- Carbohydrates: Roughly 28g
We keep all our recipe processing transparent, and you can always see our full data explanation on our policy page if you ever have questions about how we calculate these figures!
PrintClassic Crème Brûlée

Make a restaurant-quality French custard dessert with a crisp, caramelized sugar topping.
- Prep Time: 20 min
- Cook Time: 40 min
- Total Time: 5 hours 0 minutes
- Yield: 4 servings 1x
- Category: Dessert
- Method: Baking
- Cuisine: French
- Diet: Vegetarian
Ingredients
- 5 large egg yolks
- 2 cups heavy cream
- 1/2 cup granulated sugar, plus extra for topping
- 1 teaspoon vanilla extract
- Pinch of salt
Instructions
- Preheat your oven to 300°F (150°C). Place four 6-ounce ramekins in a deep baking dish.
- In a medium saucepan, heat the heavy cream over medium heat until it just begins to simmer around the edges. Do not boil. Remove from heat and stir in the vanilla extract.
- In a separate bowl, whisk the egg yolks and 1/2 cup of sugar together until the mixture is pale yellow and slightly thickened. Add the pinch of salt.
- Temper the yolks: Slowly pour about one cup of the hot cream mixture into the yolk mixture while whisking constantly. This prevents the eggs from scrambling.
- Pour the tempered yolk mixture back into the saucepan with the remaining hot cream. Whisk gently until fully combined.
- Strain the custard mixture through a fine-mesh sieve into a clean bowl to remove any solids.
- Divide the custard evenly among the four ramekins.
- Carefully pour hot water into the baking dish until the water reaches halfway up the sides of the ramekins. This is your water bath.
- Bake for 30 to 40 minutes, or until the edges are set but the center still has a slight jiggle when gently nudged.
- Carefully remove the ramekins from the water bath and let them cool completely on a wire rack. Once cool, cover them and chill in the refrigerator for at least 4 hours, or preferably overnight.
- Before serving, sprinkle an even, thin layer of granulated sugar over the top of each chilled custard.
- Use a kitchen torch to melt and caramelize the sugar until it forms a hard, amber-colored crust. Work quickly to avoid heating the custard underneath.
- Let the caramelized sugar cool and harden for about 5 minutes before serving. Tap the top with a spoon to crack the sugar.
Notes
- For the water bath, use water that is already hot to speed up the process.
- If you do not have a torch, you can place the sugared custards under a preheated broiler for 1-2 minutes, watching constantly to prevent burning.
- Make sure the custard is completely cold before adding the final sugar layer for the best contrast.
Nutrition
- Serving Size: 1 ramekin
- Calories: 450
- Sugar: 25
- Sodium: 50
- Fat: 38
- Saturated Fat: 22
- Unsaturated Fat: 16
- Trans Fat: 1
- Carbohydrates: 28
- Fiber: 0
- Protein: 8
- Cholesterol: 350